Steps to create MongoDB Depot
There are two ways to set up the MongoDB connection: Through username and password, and certificate authentication. Follow the sections below to create the Depot using both methods.
Pre-requisites specific to Depot creation
The following are the prerequisites for creating a MongoDB Depot.
-
Tags: A developer must possess the following tags, which can be obtained from a DataOS operator.
-
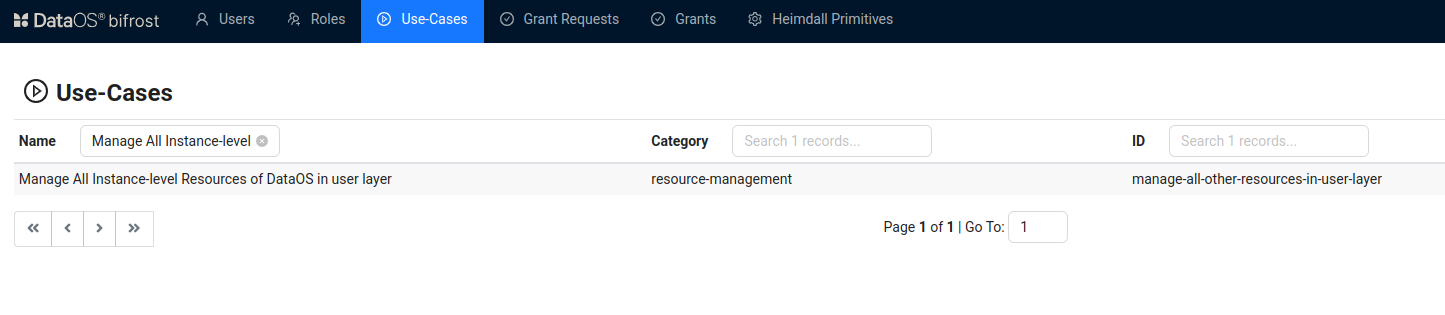
Use cases: Alternatively, instead of assigning tags, a developer can create a Depot if an operator grants them the "Manage All Instance-level Resources of DataOS in the user layer" use case through Bifrost Governance.
Bifrost Governance
Pre-requisites specific to the source system
For username and password authentication:
- Obtain the username and password for MongoDB from your organization's database administrator
- Also, obtain the MongoDB node's details from the database administrator.
For certificate authentication:
-
Obtain the username and password for MongoDB from your organization's database administrator.
-
Obtain the MongoDB node's details from the database administrator.
-
Obtain the
.crtcertificate file for the MongoDB connection from the database administrator for creating the Depot through certificate authentication. -
Java 17 must be installed in your system.
-
Create a Keystore and Truststore file from a
.crtfile. Follow the below steps to create the keystore and trust store files from the.crtfile.-
Initialize the Keystore, remember the password you create while initializing the Keystore.
-
Run the following command, to import a certificate (
demo-ssl-public-cert.cert) into the Java KeyStore with the alias (moderncert03). It will create a keystore and trust store files in the JAVA folder.
sudo keytool -importcert -alias moderncert03 -keystore $JAVA_HOME/lib/security/cacerts -storepass 123456 -file /Users/iamgroot/office/poc-squad/mongodb-poc/demo-ssl-public-cert.cert-
keystore: Points to the KeyStore file to update. -
importcert: Specifies the operation of importing a certificate. -
alias moderncert03: Assigns the aliasmoderncert03to the imported certificate. -
storepass 123456: Provide the password for the keystone you created while initializing the keystore. -
file: Specifies the path to the certificate file to import.
-
Steps to create MongoDB Depot through username and password authentication
This section involves the steps to create a MongoDB Depot with Instance Secret reference.
-
Create a manifest file for Depot containing the following code and update the details.
version: v2alpha # depot version name: ${{"depot-name"}} type: ${{depot}} description: ${{"MongoDb depot for sanity"}} tags: - ${{MongoDb}} - ${{Sanity}} layer: ${{user}} depot: type: ${{mongodb}} compute: ${{query-default}} mongodb: subprotocol: ${{"mongodb"}} nodes: ${{["mongodb-tmdc.dataos.info:27017"]}} params: tls: ${{false}} replicaSet: "${{replica set name}}" # Required for Nilus CDC only external: true secrets: - name: ${{"instance-secret-name"}}-r keys: - ${{"instance-secret-name"}}-r allkeys: truename: coremongodbcdc version: v2alpha type: depot tags: - mongodb - depot layer: user depot: type: mongodb description: description compute: runnable-default mongodb: subprotocol: "mongodb" # Changed to mongodb (not srv) nodes: ["mongodb-replicas-tmdc.dataos.info:27017"] # Port allowed here params: tls: "false" replicaSet: "rs0" external: true secrets: - name: coremongodbcdc-r keys: - coremongodbcdc-r allkeys: trueTo get the details of each attribute, please refer to this link.
-
Apply the Depot manifest file by executing the below command.
-
Verify the Depot creation by executing the below command.
-
Scan the metadata. By creating and applying the Scanner Workflow by referring to the MongoDB Depot name, you can extract the metadata that can be accessed on the Metis App.
To get the details of each attribute, please refer to this link.version: v1 name: depotscanner type: workflow tags: - postgres - scanner description: The job scans schema tables and register metadata workflow: dag: - name: depotjob description: The job scans schema from postgres depot tables and register metadata to metis spec: stack: scanner:2.0 compute: runnable-default stackSpec: depot: dataos://mongodb03 # MongoDB depot name -
Apply the Scanner Workflow by executing the below command.
Steps to create MongoDB Depot through certificate authentication
This section involves the alternative steps to create a MongoDB Depot without an Instance Secret.
-
Create a manifest file for Depot containing the following code and update the details.
To get the details of each attribute, please refer to this link.version: ${{v1}} # depot version name: ${{"mongodb"}} type: ${{depot}} description: ${{"MongoDb depot for sanity"}} tags: - ${{MongoDb}} - ${{Sanity}} layer: ${{user}} depot: type: ${{mongodb}} compute: ${{query-default}} spec: subprotocol: ${{"mongodb"}} nodes: ${{["SG-demo-66793.servers.mongodirector.com:27071"]}} params: tls: ${{true}} external: ${{true}} connectionSecret: - acl: ${{rw}} type: ${{key-value-properties}} data: username: ${{admin}} password: ${{Kl6swyCRLPteqljkdyrf}} keyStorePassword: ${{123456}} trustStorePassword: ${{123456}} files: ca_file: ${{mongodb-poc/demo-ssl-public-cert.cert}} key_store_file: ${{/Library/Java/JavaVirtualMachines/jdk-22.jdk/Contents/Home/lib/security/cacerts}} trust_store_file: ${{/Library/Java/JavaVirtualMachines/jdk-22.jdk/Contents/Home/lib/security/cacerts}} -
Apply the Depot manifest file by executing the below command.
-
Verify the Depot creation by executing the below command.
-
Scan the metadata. By creating and applying the Scanner Workflow by referring to the MongoDB Depot name, you can extract the metadata that can be accessed on the Metis App.
To get the details of each attribute, please refer to this link.version: v1 name: depotscanner type: workflow tags: - postgres - scanner description: The job scans schema tables and register metadata workflow: dag: - name: depotjob description: The job scans schema from postgres depot tables and register metadata to metis spec: stack: scanner:2.0 compute: runnable-default stackSpec: depot: dataos://mongodb # MongoDB depot name -
Apply the Scanner Workflow by executing the below command.
Steps to create MongoDB Depot through VPCE
This section involves the alternative steps to create a MongoDB Depot without an Instance Secret. VPCE-based Depot is similar to certificate authentication Depot just additional parameters have been added that allow connection with VPCs.
-
Create a manifest file for Depot containing the following code and update the details.
To get the details of each attribute, please refer to this link.version: ${{v1}} name: ${{"ldmmongodb"}} type: ${{depot}} description: ${{"MongoDb depot for sanity"}} tags: - ${{Mongodb}} layer: ${{user}} depot: type: ${{mongodb}} compute: ${{query-default}} spec: subprotocol: ${{"mongodb"}} nodes: ${{["SG-demo-664533.servers.mongodirector.com:27071"]}} params: tls: ${{true}} tlsAllowInvalidHostnames: ${{true}} directConnection: ${{true}} external: ${{true}} secrets: connectionSecret: - acl: ${{rw}} type: ${{key-value-properties}} data: username: ${{admin}} password: ${{Kl6lyCRLPteqljkdyrf}} keyStorePassword: ${{changeit}} trustStorePassword: ${{changeit}} files: ca_file: ${{/Users/iamgroot/Downloads/ca-chain-cn-qa.crt}} key_store_file: ${{$JAVA_HOME/lib/security/cacerts}} trust_store_file: ${{$JAVA_HOME/lib/security/cacerts}} -
Apply the Depot manifest file by executing the below command.
-
Verify the Depot creation by executing the below command.
-
Scan the metadata. By creating and applying the Scanner Workflow by referring to the MongoDB Depot name, you can extract the metadata that can be accessed on the Metis App.
To get the details of each attribute, please refer to this link.version: v1 name: depotscanner type: workflow tags: - postgres - scanner description: The job scans schema tables and register metadata workflow: dag: - name: depotjob description: The job scans schema from postgres depot tables and register metadata to metis spec: stack: scanner:2.0 compute: runnable-default stackSpec: depot: dataos://mongodb # MongoDB depot name -
Apply the Scanner Workflow by executing the below command.
MongoDB Depots configured with multiple nodes
MongoDB supports Depots configured with multiple nodes, enabling users to reuse the same depot created for the MongoDB CDC source for destination use cases as well, but limited to the replace incremental strategy for destination.
Multiple nodes MongoDB Depot Manifest
name: mongomultiport
version: v1
type: depot
tags:
  - MongoDb
  - Sanity
  - dataos:type:resource
  - dataos:type:cluster-resource
  - dataos:resource:depot
  - dataos:layer:user
layer: user
depot:
  type: mongodb
  description: "MongoDb depot with multiple nodes"
  compute: niluscompute
  spec:
    subprotocol: mongodb
    nodes:
    - <host>.dataos.info:27017
    - <host>.info:27018
    - <host>.dataos.info:27019
    params:
      authSource: admin
      replicaSet: rs0
  external: "true"
  secrets:
    - name: ${{instance-secret-name}}-r
      allkeys: ${{true}}

    - name: ${{instance-secret-name}}-rw
      allkeys: ${{true}}