Skip to content

Database

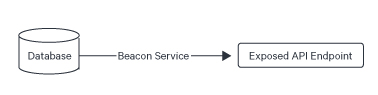
A Database Resource in DataOS acts as a repository for storing transaction data, utilizing a managed Postgres relational database. It fulfills the transactional data storage needs of custom data applications developed on top of DataOS. Internal applications like Lens, Metis, etc., also leverage the Database Resource for their transactional data storage. Utilizing a Service supported by the Beacon Stack facilitates CRUD operations (Create, Read, Update, Delete) on data assets stored in the Database, ensuring smooth connectivity between the data application and the Database. For analytical operations, users can utilize the Flare Stack to move the data from transactional data storage to other Depots or Lakehouses.

Check Database
Database Resource

  • How to create and manage a Database?


    Learn how to create and manage a Database in DataOS.

    Create and Manage Database

  • How to configure a database manifest file?


    Discover how to configure a Database manifest file by adjusting its attributes.

    Database Attributes

  • Possible Errors


    Explore common errors in configuration and troubleshooting strategies.

    Explore possible errors

  • Database Usage Examples


    Explore examples showcasing the usage of Database in various scenarios.

    Database Usage Examples

How to create and manage a Database?

Create a Database manifest file

To create a Database, the first step is to create a Database manifest file. A sample Database mainfest file is given below:

Example Database manifest
# Resource-meta section (1)
name: products_db   #database name
version: v1                      
type: database
description: products_db database created for testing.
tags:
    - database
# Database specific section (2)
database:
migrate:
    includes:
        - migrations/     # all up & down sql files.
    command: up           # in case of drop table, write down.
  1. Resource meta section within a manifest file comprises metadata attributes universally applicable to all Resource-types. To learn more about how to configure attributes within this section, refer to the link: Attributes of Resource meta section.

  2. Database-specific section within a manifest file comprises attributes specific to the Database Resource. To learn more about how to configure attributes of Database-specific section, refer the Attributes of Database-specific section

The manifest for creating a Database has the following two sections:

Resource meta section

In DataOS, a Database is categorized as a Resource-type. The Resource meta section within the manifest file encompasses attributes universally applicable to all Resource-types. The provided manifest file elucidates the requisite attributes for this section:

#Attribtues for Resource
name: ${resource-name}                #database_name 
version: v1                           
type: database                        
description: ${description}
  - ${tag1}
  - ${tag2}
owner: ${iamgroot}
layer: ${user}
database: 
  #database specific mapping(mandatory)
#Attribtues for Resource
name: products_db
version: v1                           #database_name 
type: database                        
description: product database created for testing.
tags:
  - database
database: #database specific mapping(mandatory)
owner: iamgroot
layer: user 

For more information about the various attributes in Resource meta section, refer to the Attributes of Resource meta section.

Database-specific section

The Database-specific section of a Database manifest comprises attributes-specific to the Database Resource.

database:                            # Specify the resource type
  migrate:
    includes:
      - ${migration-directory}     # Address to all migrations (relative path)
    includesInline:
      migration: |
        ${migration_script}

    command: ${migration-command}   # ("up" or "down")
  compute: runnable-default
database:                            # Specify the resource type
  migrate:
    includes:
      - migrations/  
    includesInline:
      migration: |                    # Address to all migrations (relative path)
        CREATE TABLE Product (
        id INT PRIMARY KEY AUTO_INCREMENT,
        name VARCHAR(100),
        price DECIMAL(10, 2),
        description TEXT);
    command: up  # Specify the migration command (e.g., "up" or "drop table")
  compute: runnable-default

The table below describes the various attributes used for defining conditions:

Attribute Data Type Default Value Possible Values Requirement
database mapping none none mandatory
migrate mapping none none mandatory
includes list of strings none any valid path optional
includesInline mapping none Key-value pairs of strings optional
command string none up/down mandatory
parameter string none integer value optional

For more information about the below attributes, refer to the link Attributes of Database

Migrate Configuration

The migration in Database Resource typically involves defining changes to a Database schema, such as creating or altering tables, adding or modifying columns, or establishing relationships between tables.

Example migration

001_create.up.sql
    CREATE TABLE user (
    user_id INT PRIMARY KEY,
    username VARCHAR(50),
    email VARCHAR(100),
    created_at TIMESTAMP
    );
002_insert.up.sql
    INSERT INTO user (user_id, username, email, created_at) VALUES
    (1, 'JohnDoe', 'john@example.com', '2024-03-29 10:00:00'),
    (2, 'JaneSmith', 'jane@example.com', '2024-03-29 11:00:00'),
    (3, 'AliceJones', 'alice@example.com', '2024-03-29 12:00:00');

    -- Removing the added column
    ALTER TABLE users
    DROP COLUMN IF EXISTS created_at;
0021_drop.down.sql
-- Dropping the new table
    DROP TABLE IF EXISTS users;

There are two ways to define migrations: .

  • Embed an external directory for migration.
  • Provide the migration within the Database manifest.

To embed an external scripts for migration, create a folder with name say migration. In your migration folder, create a new SQL file, e.g., 001_migration_up.sql, and write the migration script to define the changes to the Database schema.

migrate:
  includes:
    - ${migration_folder_path}  #address to all migrations
migrate:
  includes:
    - migration/

Inline migration involves embedding migration logic directly within the manifest file. While simpler to implement for small projects, it may lead to complexity for long complex migrations.

migrate:
  includesInline:
    migration: |
      ${sql script}
migrate:
  includesInline:
    migration: |
      CREATE TABLE IF NOT EXISTS products(
      sproduct_id SERIAL PRIMARY KEY,
      product_name VARCHAR(100) NOT NULL,
      category VARCHAR(50),
      price NUMERIC(10, 2) NOT NULL,
      stock_quantity INT NOT NULL,
      description TEXT,
      created_at TIMESTAMP DEFAULT CURRENT_TIMESTAMP);

📖 Best Practice

  • Numeric Prefixing: Prefix filenames with a numeric sequence for a clear execution order.
  • File Naming Format: Use <anything>.up.sql and <anything>.down.sql for migration files.

  • Example:

001_initialize.up.sql
001_initialize.down.sql
002_add_column.up.sql
002_add_column.down.sql
003_update_data.up.sql
003_update_data.down.sql

Database migration
Database Migration

Apply the Database manifest

After successfully creating the Database manifest, it’s time to apply manifest. To apply the Database manifest, utilize the apply command.

dataos-ctl resource apply -f ${manifest-file-path} -w ${workspace-name}
dataos-ctl resource apply -f database.yaml -w curriculum
# Expected Output
INFO[0000] 🛠 apply...                                   
INFO[0000] 🔧 applying(curriculum) products_db:v1:database... 
INFO[0027] 🔧 applying(curriculum) products_db:v1:database...created 
INFO[0027] 🛠 apply...complete

Managing a Database

Verify Database creation

To check the successful creation of Database in DataOS Workspace use the following two methods:

  • Check the Database in a Workspace: Use the following command to list the created Database in a specific Workspace:
dataos-ctl resource get -t database -w ${workspace-name} 
dataos-ctl resource get -t database -w curriculum

# Expected Output
|    NAME     | VERSION |   TYPE    |  WORKSPACE  | STATUS | RUNTIME |     OWNER       |
|-------------|---------|-----------|-------------|--------|---------|-----------------|
| products_db  |   v1    | database  | curriculum  | active |         | iamgroot |

If the status is ‘active’, re run or use -r to refresh the command to get runtime as ‘succeeded’.

  • Retrieve all Databases in a Workspace:

To retrieve the list of all Databases created in the Workspace, add the -a flag to the command:

dataos-ctl resource get -t database -w ${workspace-name} -a
dataos-ctl resource get -t database -w curriculum -a

Debugging a Database

When a Database creation or service encounter errors, data developers can employ various tactics to diagnose and resolve issues effectively. Here are the recommended debugging techniques:

  • Check the Database logs
dataos-ctl resource get -t database -w curriculum -n products_db -d

Deleting a Database and Service

As part of best practices, it is recommended to regularly delete Resources that are no longer in use. This practice offers several benefits, including saving time and reducing costs.

There are 3 ways to delete Database(or any Resource):

dataos-ctl delete -t ${database} -n ${name of depot}S
dataos-ctl delete -i ${name of database in the output table from get status command}
dataos-ctl delete -f ${file-path}

How to configure a Database manifest file?

The Database manifest files serves as the blueprint for defining the structure and behavior of Database Resources within DataOS. By configuring various attributes within the the Database manifest file, data developers can customize it to meet specific requirements. Below is an overview of the key attributes used to configure a the Database-specific section: Attributes of a Database manifest

Create a Beacon Service

Create a Beacon Service to expose the PostgreSQL database on API. The syntax for the Beacon Service manifest file is provided below:

service.yaml
version: v1
name: products-test               
type: service
service:
  replicas: 1
  ingress:
    enabled: true
    stripPath: true
    path: /product_db/api/v1           # desried path  <database>/api/version        
    noAuthentication: true
  stack: beacon+rest                 #specify the stack
  compute: runnable-default
  envs:
    PGRST_OPENAPI_SERVER_PROXY_URI: https://{dataos_fqdn}/{database_path} 

#specify the stack specific section                           
  stackSpec:
    source:
      type: database
      name: products_db              
      workspace: public
  topology:
    - name: database
      type: input
      doc: products database connection
    - name: rest-api
      type: output
      doc: serves up the products database as a RESTful API
      dependencies:
        - database
For detailed customization options and additional attributes of the Service Resource Section, refer to the link Attributes of Service Section.

Apply the Service manifest

dataos-ctl resource apply -f ${service file name} -w ${workspace-name} 
dataos-ctl resource apply -f beacon_service_up.yaml -w curriculum

Verify Service creation

To check the successful completion of Service use the following command:

dataos-ctl resource get -t service -w curriculum

Expected output

        NAME      | VERSION |  TYPE   | WORKSPACE | STATUS |  RUNTIME  |     OWNER       
----------------|---------|---------|-----------|--------|-----------|-----------------
  employee-test | v1      | service | curriculum   | active | running:1 | iamgroot
  product-test  | v1      | service | curriculum   | active | running:1 | iamgroot  
  products-test | v1      | service | curriculum   | active | running:1 | iamgroot

you can now access the PostgreSQL database using the exposed API by

To validate the outcome, execute a request to the designated URL:

https://<dataos_fqdn>/<database_path>/<table_name>
https://humorous-adder.dataos.app/products_db/api/v1/products

Expected Output

    0
id              1
product_name    "Laptop"
category        "Electronics"
price           999.99
stock_quantity  20
1
id              2
product_name    "Smartphone"
category        "Electronics"
price           499.99
stock_quantity  30

This action will enable verification of the expected result by accessing the provided endpoint.

Possible Errors

Dependency Error

During the deletion of a Database, several errors may arise, particularly when dependencies exist or due to various operational issues.

Error: Unable to delete the database 'products_db' as it is a dependency of 'service:v1:products_db-test:curriculum'.

Identify and eliminate the dependent service prior to Database deletion and delete it

# Get status of services
dataos-ctl get -t service -w curriculum

# Delete the dependent service
dataos-ctl resource delete -t service -n products-test 

Database Usage Examples