Skip to content

Instance Secret

An Instance Secret is a DataOS Resource designed for securely storing sensitive information at the DataOS instance level. This encompasses sensitive information like usernames, passwords, certificates, tokens, and keys. The primary purpose of Instance Secret is to address the inherent exposure risk associated with directly embedding such confidential data within application code or manifest file (YAML configuration files).

Instance secrets establish a critical segregation between sensitive data and Resource definitions. This division minimizes the chances of inadvertent exposure during various Resource management phases, including creation, viewing, or editing. By leveraging Instance Secrets, data developers ensure the safeguarding of sensitive information, thereby mitigating security vulnerabilities inherent in their data workflows.

  • How to create and manage an Instance Secret?


    Learn how to create and manage an Instance secret in DataOS.

    Create and manage an Instance Secret

  • How to refer an Instance Secret in other DataOS Resources?


    Discover how to use Instance Secrets to securely refer sensitive information in other DataOS Resources.

    Referring Instance Secrets

  • Types of Instance Secrets


    Different types of Instance Secret securely store diverse sensitive data, addressing specific needs like key-value pairs, certificates, etc.

    Types of Instance Secret

  • Instance Secret Templates


    Explore manifest file templates of various data source-specific Instance Secrets like Bigquery, PostgreSQL, Google Cloud Storage, and many more.

    Example

How to create and manage an Instance Secret?

To create an Instance Secret Resource in DataOS, ensure you have access to the DataOS Command Line Interface (CLI) and the required permissions. Then, follow the provided steps to complete the creation process efficiently and securely.

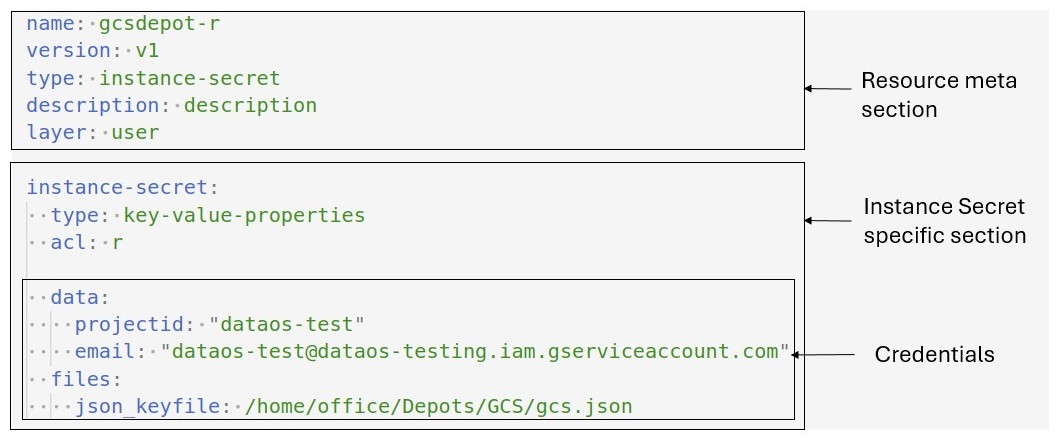
Structure of an Instance Secret manifest file

The structure of the Instance Secret manifest file is outlined as follows:

Instance Secret Manifest Structure

Create an Instance Secret manifest file

Begin by creating a manifest file that will hold the configuration details for your Instance Secret. A sample manifest is provided below:

Sample Instance Secret manifest
sample_instance_secret_manifest.yaml
# Resource meta section
name: depotsecret-r # Resource name (mandatory)
version: v1 # Manifest version (mandatory)
type: instance-secret # Resource-type (mandatory)
tags: # Tags (optional)
- just for practice
description: instance secret configuration # Description of Resource (optional)
layer: user

# Instance Secret-specific section
instance-secret: # Instance Secret mapping (mandatory)
  type: key-value-properties # Type of Instance-secret (mandatory)
  acl: r # Access control list (mandatory)
  data: # Data section mapping (mandatory)
    username: iamgroot
    password: yourpassword

Resource meta section

The Instance Secret manifest comprise of a Resource meta section that outlines essential metadata attributes applicable to all Resource-types. Note that within this section some attributes are optional, while others are mandatory.

# Resource meta section
name: ${depotsecret-r} # Resource name (mandatory)
version: v1 # Manifest version (mandatory)
type: instance-secret # Resource-type (mandatory)
tags: 
  - ${new instance secret} # Tags (optional)
  - ${resource}
description: ${resource description} # Description (optional)
owner: ${iamgroot} # Owner's DataOS UserID (optional)
layer: ${user} # Layer (optional)
instance-secret: # Instance-secret specific section
Resource meta section of the manifest file

For more information about the various attributes in Resource meta section, refer to the Attributes of Resource meta section.

Instance Secret specific section

This section focuses on Instance Secret attributes, outlining details such as Instance Secret type, acl(access control list), sensitive data to be stored. Additionally, it allows for the optional inclusion of file paths of sensitive information to be stored using the files attribute.

instance-secret: # Instance-secret specific section
  type: ${{key-value-properties}} # Type of Instance-secret (mandatory)
  acl: ${{r|rw}} # Access control list (mandatory)
  data: # Data section mapping (either files or data is required)
    ${{username: iamgroot}}
    ${{password: abcd1234}}
  files: # Manifest file path (either files or data is required)
    ${{xyz: /home/instance-secret.yaml}}
Instance-secret specific section of the manifest file

The table below summarizes the attributes of Instance-secret specific section:

Attribute Data Type Default Value Possible Value Requirement
instance-secret mapping none none mandatory
type string none cloud-kernel, key-value, key-value-properties, certificates mandatory
acl string none r, rw mandatory
data mapping none none mandatory
files string none file-path optional

For more information about the various attributes in Instance Secret specific section, refer to the Attributes of Instance Secret specific section.

Apply the Instance Secret manifest

To create an Instance Secret Resource-instance within the DataOS, use the apply command. When applying the manifest file from the DataOS CLI, make sure you don't specify Workspace as Instance Secrets are Instance-level Resource. The apply command is as follows:

dataos-ctl resource apply -f ${path/instance_secret.yaml}
Alternate
dataos-ctl apply -f ${path/instance_secret.yaml}

dataos-ctl apply -f depot_secret.yaml
Alternate
dataos-ctl apply -f depot_secret.yaml
Expected output:

$ dataos-ctl apply -f depot_secret.yaml
INFO[0000] 🛠 apply...                                   
INFO[0000] 🔧 applying depotsecret-r:v1:instance-secret... 
INFO[0004] 🔧 applying depotsecret-r:v1:instance-secret...created 
INFO[0004] 🛠 apply...complete

Managing an Instance-Secret

Validate the Instance Secret

To validate the proper creation of the Instance Secret Resource within the DataOS environment, employ the get command. Execute the following command to ascertain the existence of the Instance Secret Resource:

  • To get the details of instance-secret created by the user who applies the instance-secret, use the following command:

    dataos-ctl resource get -t instance-secret
    
    Alternate

    dataos-ctl get -t instance-secret
    
  • To get the details of instance-secret created by all the users within the DataOS Instance, use the above command with -a flag:

    dataos-ctl resource get -t instance-secret -a
    
    Alternate

    dataos-ctl get -t instance-secret -a
    

dataos-ctl get -t instance-secret
Alternate
dataos-ctl resource get -t instance-secret -a
Expected Output
INFO[0000] 🔍 get...                                     
INFO[0000] 🔍 get...complete                             

        NAME     | VERSION |      TYPE       | WORKSPACE | STATUS |  RUNTIME  |  OWNER             
-----------------|---------|-----------------|-----------|--------|-----------|------------------------------
     depotsecret | v1      | instance-secret |           | active |           | iamgroot               

Delete the Instance Secret

To remove the Instance Secret Resource from the DataOS environment, utilize the delete command. Execute the following command to initiate the deletion process:

Deleting using the -t (type) and -n (name) flag

dataos-ctl resource delete -t ${resource-type} -n ${resource-name}
Alternate
dataos-ctl delete -t ${resource-type} -n ${resource-name}

dataos-ctl resource delete -t instance-secret -n myinstance_secret
Alternate
dataos-ctl delete -t instance-secret -n myinstance_secret

Deleting using the -i (identifier) flag

dataos-ctl resource delete -i ${resource-name:version:resource-type}
Alternate
dataos-ctl resource delete -i ${resource-name:version:resource-type}

dataos-ctl delete -i myinstance_secret:v1:instance-secret
Expected output
dataos-ctl delete -t instance-secret -n sampleinstsecret
INFO[0000] 🗑 delete...                                  
INFO[0000] 🗑 deleting sampleinstsecret:instance-secret...nothing 
INFO[0000] 🗑 delete...complete

Types of Instance Secrets

When creating Instance Secret Resource, you can specify its type using the type field within the instance-secret section. The Instance Secret type is used to facilitate programmatic handling of the Secret data.

DataOS provides several built-in types for some common usage scenarios. These types vary in terms of the validations performed and the constraints DataOS imposes on them.

Instance Secret Type Description
cloud-kernel This type stores arbitrary user-defined data in the form of key-value pair as a Kubernetes Secret with the same name as the Instance Secret Resource.
key-value This type stores arbitrary user-defined data as key-value pairs within an Instance Secret, with each pair being encoded separately in base64 format.
key-value-properties This type conserves arbitrary user-defined data as an Instance Secret by transforming multiple key-value pairs into a singular key-value pair, which is then encoded in base64 format.
certificates This is an instance secret type used to securely store certificates, which are often necessary for secured communication in the system.

For a more detailed analysis of each type and to explore the syntax, please navigate the below tabs.

The cloud-kernel instance secret type means that a Kubernetes secret will be created with the same name as the Instance Secret Resource.

Syntax

instance_secret_type_cloud_kernel.yaml
# Instance Secret Manifest type: cloud-kernel

name: ${my-instancesecret}
version: v1
type: instance-secret
description: ${cloud kernel instance secret}
instance-secret:
  type: cloud-kernel
  acl: r
  data:
    ${a: b}
    ${c: d}
    ${e: f}

This Instance Secret type is for storing simple pairs of keys and values. They are stored in Heimdall vault.

Syntax

instance_secret_type_key_value.yaml
name: ${testing}
version: v1
type: instance-secret
instance-secret:
  type: key-value
  acl: r
  data:
    ${key1:value1}
    ${key2:value2}

When you store an Instance Secret as a key-value type, the system passes the instance secret in the format they are stated, without any alterations.

This type is similar to key-value, but the difference lies in the way the system passes the data. In the key-value-properties type, the system passes all the key-value pairs as one single field, while in the case of the key-value type, they are passed as separate fields.

Syntax

instance_secret_type_key_value_properties.yaml
name: ${testing}
version: v1
type: instance-secret
secret:
  type: key-value-properties
  acl: r
  data:
    ${key1:value1}
    ${key2:value2}

This type is used to store TLS certificates and keys. The most common usage scenario is Ingress resource termination, but this type is also sometimes used with other resources.

Syntax

instance_secret_type_certificates.yaml
name: ${secret-name}
version: v1
type: instance-secret
instance-secret:
  type: certificate
  acl: rw
  files:
      truststoreLocation: ${file-path}
      keystoreLocation: ${file-path}

How to refer Instance Secret in other DataOS Resources?

To access the stored secret data in DataOS, you can reference them in your code using the dataosSecrets attribute. This identifier ensures secure referencing of Instance Secrets across different Resources, enhancing system security and operational integrity.

Syntax

dataosSecrets:
  - name: ${your-instance-secret-name}-r|rw # Mandatory
    workspace: ${instance-secret-workspace} # Optional
    key: ${key of your instance-secret} # Optional, used when only single key is required.
    keys:            # Optional, used when multiple key is required.
      - ${instance secret_key}
      - ${instance secret-key}
    allKeys: ${true-or-false} # Optional
    consumptionType: ${envVars} # Optional, possible values: envVars, propfile and file.

To refer to an instance-secret in Depots, follow these steps:

  1. Ensure Creation of Instance-Secret: First, make sure you have created the respective instance-secret.

  2. Use dataosSecrets Identifier: In the depot manifest, use the dataosSecrets identifier to refer to the instance-secret.

For read-only access to a depot, create read-only secrets. For read-write access, create both read and read-write instance-secrets. This is necessary because when providing someone else access to the Depot, you can grant either read or read-write access using either CLI or Bifrost UI. For either type of access, the person will have access to the respective instance-secret.

read_instance_secret.yaml
name: depotsecret-r # Resource name (mandatory)
version: v1 # Manifest version (mandatory)
type: instance-secret # Resource-type (mandatory)
tags: # Tags (optional)
  - just for practice
description: instance secret configuration # Description of Resource (optional)
layer: user
instance-secret: # Instance Secret mapping (mandatory)
  type: key-value-properties # Type of Instance-secret (mandatory)
  acl: r # Access control list (mandatory)
  data: # Data section mapping (mandatory)
    username: iamgroot
    password: yourpassword
read_write_instance_secret.yaml
name: depotsecret-rw # Resource name (mandatory)
version: v1 # Manifest version (mandatory)
type: instance-secret # Resource-type (mandatory)
tags: # Tags (optional)
  - just for practice
description: instance secret configuration # Description of Resource (optional)
layer: user
instance-secret: # Instance Secret mapping (mandatory)
  type: key-value-properties # Type of Instance-secret (mandatory)
  acl: rw # Access control list (mandatory)
  data: # Data section mapping (mandatory)
    username: iamgroot
    password: yourpassword

Now while creating the manifest file for your Depot, ensure to include a reference to the Instance Secret using the dataosSecrets identifier, instead of directly specifying the secret using the connectionSecrets attribute:

depot.yaml
name: depotsecret
version: v2alpha
type: depot
tags:
  - snowflake
  - depot
layer: user
depot:
  type: SNOWFLAKE
  description: testing instance secrets using snowflake depot
snowflake:
  warehouse: mywarehouse
  url: avengers.central-india.azure.snowflakecomputing.com
  database: mydatabase
  external: true
  dataosSecrets:
    - name: depotsecret-r
      keys:
        - depotsecret-r

    - name: depotsecret-rw
      keys:
        - depotsecret-rw

Instance Secret Templates

Object stores are distributed storage systems designed to store and manage large amounts of unstructured data. Instance-Secrets can configured to securely store sensitive information of the following object stores:

The manifest files provided below are the templates for securely storing ABFSS credentials. Depending on your access needs (read-only or read-write), start with the corresponding YAML template provided below.

instance_secret_abfss_read.yaml
# Azure Blob File System Secure (ABFSS) Read Instance Secret Manifest

name: ${abfss-depot-name}-r # Name of the instance-secret, indicating it's for read-only access.
version: v1 # Manifest Version           
type: instance-secret # Resource-type
description: ${description}   # Optional: Brief description of the instance-secret's purpose.
layer: user # DataOS Layer                 
instance-secret:
  type: key-value-properties  # Type of Instance-secret
  acl: r                     # Access control level, set to 'r' for read-only access.
  data:                       
    azureendpointsuffix: ${azure-endpoint-suffix}  # Endpoint suffix for the Azure storage account.
    azurestorageaccountkey: ${azure-storage-account-key}  # Access key for the Azure storage account.
    azurestorageaccountname: ${azure-storage-account-name}  # Name of the Azure storage account.
instance_secret_abfss_read_write.yaml
# Azure Blob File System Secure (ABFSS) Read Write Instance Secret Manifest

name: ${abfss-depot-name}-rw  # Name of the instance-secret, indicating it's for read-write access.
version: v1 # Manifest Version           
type: instance-secret # Resource-type
description: ${description}   # Optional: Brief description of the instance-secret's purpose.
layer: user # DataOS Layer                 
instance-secret:
  type: key-value-properties  # Type of Instance-secret
  acl: rw                     # Access control level, set to 'rw' for read-write access.
  data:                       
    azureendpointsuffix: ${azure-endpoint-suffix}  # Endpoint suffix for the Azure storage account.
    azurestorageaccountkey: ${azure-storage-account-key}  # Access key for the Azure storage account.
    azurestorageaccountname: ${azure-storage-account-name}  # Name of the Azure storage account.

To configure the template, the details required are provided below. Ensure that you replace each placeholder (e.g., ${abfss-depot-name}, ${azure-endpoint-suffix}) with the actual values pertaining to your Azure account and ABFSS configuration.

  • name: Define the name of your Instance secret ${abfss-depot-name}-${acl}. For instance, if your ${abfss-depot-name} is alpha and the acl(access control list) is rw, then the instance secret name will be alpha-rw.
  • description: Provide a brief description of the instance-secret's purpose. This field is optional but recommended for easier management and identification of instance-secrets.
  • azureendpointsuffix: The endpoint suffix for your Azure storage account.
  • azurestorageaccountkey: The access key for your Azure storage account.
  • azurestorageaccountname: The name of your Azure storage account. This name is used in conjunction with the endpoint suffix to form the base URL for your ABFSS resources.

The manifest files provided below are the templates for securely storing WASBS credentials. Depending on your access needs (read-only or read-write), start with the corresponding YAML template provided below.

instance_secret_wasbs_read.yaml
name: ${wasbs-depot-name}-r # Name of the instance-secret, indicating it's for read-only access.
version: v1 # Manifest Version           
type: instance-secret # Resource-type
description: ${description}   # Optional: Brief description of the instance-secret's purpose.
layer: user # DataOS Layer                 
instance-secret:
  type: key-value-properties  # Type of Instance-secret
  acl: r                     # Access control level, set to 'r' for read-only access.
  data:                       
    azureendpointsuffix: ${azure-endpoint-suffix}  # Endpoint suffix for the Azure storage account.
    azurestorageaccountkey: ${azure-storage-account-key}  # Access key for the Azure storage account.
    azurestorageaccountname: ${azure-storage-account-name}  # Name of the Azure storage account.
instance_secret_wasbs_read_write.yaml
name: ${wasbs-depot-name}-rw  # Name of the instance-secret, indicating it's for read-write access.
version: v1 # Manifest Version           
type: instance-secret # Resource-type
description: ${description}   # Optional: Brief description of the instance-secret's purpose.
layer: user # DataOS Layer                 
instance-secret:
  type: key-value-properties  # Type of Instance-secret
  acl: rw                     # Access control level, set to 'rw' for read-write access.
  data:                       
    azureendpointsuffix: ${azure-endpoint-suffix}  # Endpoint suffix for the Azure storage account.
    azurestorageaccountkey: ${azure-storage-account-key}  # Access key for the Azure storage account.
    azurestorageaccountname: ${azure-storage-account-name}  # Name of the Azure storage account.

To configure the above WASBS instance-secret templates, the details required are provided below. Ensure that you replace each placeholder (e.g., ${wasbs-depot-name}, ${azure-endpoint-suffix}) with the actual values pertaining to your Azure account and WASBS configuration.

  • name: Define the name of your Instance secret ${wasbs-depot-name}-${acl}. For instance, if your ${wasbs-depot-name} is alpha and the acl(access control list) is rw, then the instance secret name will be alpha-rw.
  • description: Provide a brief description of the instance-secret's purpose. This field is optional but recommended for easier management and identification of instance-secrets.
  • azureendpointsuffix: The endpoint suffix for your Azure storage account.
  • azurestorageaccountkey: The access key for your Azure storage account.
  • azurestorageaccountname: The name of your Azure storage account. This name is used in conjunction with the endpoint suffix to form the base URL for your WASBS resources.

The manifest files provided below are the templates for securely storing GCS credentials. Depending on your access needs (read-only or read-write), start with the corresponding YAML template provided below.

instance_secret_gcs_read.yaml
name: ${gcs-depot-name}-r # Name of the instance-secret, indicating it's for read-only access.
version: v1
type: instance-secret
description: ${description} # Optional: Brief description of the instance-secret's purpose.
layer: user # DataOS layer
instance-secret:
  type: key-value-properties # Type of Instance-secret
  acl: r # Access control level, set to 'r' for read-write access.
  data:
    projectid: ${project-id} # Unique identifier of the Google Cloud project that your GCS bucket resides in
    email: ${client-email} # Email address associated with the Google Cloud service account
  files:
    gcskey_json: ${path-to-gcskey-json} # JSON key file of the Google Cloud service account
instance_secret_gcs_read_write.yaml
name: ${gcs-depot-name}-rw # Name of the instance-secret, indicating it's for read-write access.
version: v1
type: instance-secret
description: ${description} # Optional: Brief description of the instance-secret's purpose.
layer: user # DataOS layer
instance-secret:
  type: key-value-properties # Type of Instance-secret
  acl: rw # Access control level, set to 'rw' for read-write access.
  data:
    projectid: ${project-id} # Unique identifier of the Google Cloud project that your GCS bucket resides in
    email: ${client-email} # Email address associated with the Google Cloud service account
  files:
    gcskey_json: ${path-to-gcskey-json} # JSON key file of the Google Cloud service account

To configure the above GCS instance-secret templates, the details required are provided below. In the chosen template, replace the placeholders (${gcs-depot-name}, ${project-id}, ${email}, ${gcskey_json}, and optionally ${description}) with the actual values.

  • name: Define the name of your Instance secret ${gcs-depot-name}-${acl}. For instance, if your ${gcs-depot-name} is alpha and the acl(access control list) is rw, then the instance secret name will be alpha-rw.
  • description: Provide a brief description of the instance-secret's purpose. This field is optional but recommended for easier management and identification of instance-secrets.
  • projectid: The unique identifier of the Google Cloud project that your GCS bucket resides in. You can find this information in the Google Cloud Console under the 'Project Info' section.
  • email: The email address associated with the Google Cloud service account that will be used for accessing GCS. This service account should have the necessary permissions to perform operations on the GCS bucket.
  • gcskey_json: The JSON key file of the Google Cloud service account. This file contains the private key and other credentials that are required for authenticating the service account. It can be obtained by creating a service account key in the Google Cloud Console.

The manifest files provided below are the templates for securely storing GCS credentials. Depending on your access needs (read-only or read-write), start with the corresponding YAML template provided below.

instance_secret_s3_read.yaml
# Amazon S3 Read Instance-secret Manifest

name: ${s3-depot-name}-r # Unique identifier for Resource, replace ${s3-depot-name} with depot name
version: v1 # Manifest version
type: instance-secret # Type of the Resource
description: ${description} # Purpose of the Instance-secret
layer: user # DataOS layer
instance-secret:
  type: key-value-properties # Secret type
  acl: r # Access control: 'r' for read-only
  data:
    accesskeyid: ${access-key-id} # Replace with access key ID
    awsaccesskeyid: ${aws-access-key-id} # Replace with AWS access key ID
    awssecretaccesskey: ${aws-secret-access-key} # Replace with AWS secret access key
    secretkey: ${secret-key} # Replace with secret key
instance_secret_s3_read_write.yaml
# Amazon S3 Read Write Instance-secret Manifest

name: ${s3-depot-name}-rw # Unique identifier for Resource, replace ${s3-depot-name} with depot name
version: v1 # Manifest version
type: instance-secret # Type of the Resource
description: ${description} # Purpose of the Instance-secret
layer: user # DataOS layer
instance-secret:
  type: key-value-properties # Secret type
  acl: rw # Access control: 'rw' for read-write
  data:
    accesskeyid: ${access-key-id} # Replace with access key ID
    awsaccesskeyid: ${aws-access-key-id} # Replace with AWS access key ID
    awssecretaccesskey: ${aws-secret-access-key} # Replace with AWS secret access key
    secretkey: ${secret-key} # Replace with secret key

To configure the above S3 instance-secret templates, the details required are provided below. Ensure that you replace each placeholder (e.g., ${s3-depot-name}, ${access-key-id}) with the actual values pertaining to your AWS account and S3 configuration.

  • name: Define the name of your Instance secret ${s3-depot-name}-${acl}. For instance, if your ${s3-depot-name} is alpha and the acl(access control list) is rw, then the instance secret name will be alpha-rw.
  • description: Provide a brief description of the instance-secret's purpose. This field is optional but recommended for easier management and identification of instance-secrets.
  • access-key-id: Your access key ID. This key serves as an identifier for your IAM user or role.
  • awsaccesskeyid: AWS-specific access key ID, required for authenticating requests made to AWS services.
  • awssecretaccesskey: The secret access key for AWS. It's used in conjunction with the AWS access key ID to sign programmatic requests to AWS.
  • secretkey: The secret key associated with your access key ID. Together, they authenticate requests to AWS services.

A data warehouse serves as a centralized repository for structured data, enabling efficient query and analysis. Instance-Secrets can be configured for securely storing credentials for the Amazon Redshift, Snowflake, and Google Bigquery Warehouses in the following ways:

The manifest files provided below are the templates for securely storing Google Bigquery credentials. Depending on your access needs (read-only or read-write), start with the corresponding YAML template provided below.

instance_secret_bigquery_read.yaml
# Google Bigquery Read Instance-secret Manifest

name: ${bigquery-depot-name}-r # Unique identifier for Resource, replace ${bigquery-depot-name} with depot name
version: v1 # Manifest version
type: instance-secret # Type of the Resource
description: ${description} # Purpose of the Instance-secret
layer: user # DataOS layer
instance-secret:
  type: key-value-properties # Secret type
  acl: r # Access control: 'r' for read-only
  data:
    projectid: ${project-name} # Replace with Bigquery project ID
    email: ${email-id} # Replace with Bigquery email ID
  files:
    json_keyfile: ${json-file-path}                               
instance_secret_bigquery_read_write.yaml
# Google Bigquery Read-Write Instance-secret Manifest

name: ${bigquery-depot-name}-rw # Unique identifier for Resource, replace ${bigquery-depot-name} with depot name
version: v1 # Manifest version
type: instance-secret # Type of the Resource
description: ${description} # Purpose of the Instance-secret
layer: user # DataOS layer
instance-secret:
  type: key-value-properties # Secret type
  acl: rw # Access control: 'rw' for read-write
  data:
    projectid: ${project-name} # Replace with Bigquery project ID
    email: ${email-id} # Replace with Bigquery email ID
  files:
    json_keyfile: ${json-file-path}

To create an instance-secret for securely storing Google BigQuery credentials, the details required are provided below. Ensure that you replace each placeholder (e.g., ${bigquery-depot-name}, ${projectid}, ${email}) with the actual values pertaining to your Google Cloud account and BigQuery configuration.

  • name: Define the name of your Instance secret ${bigquery-depot-name}-${acl}. For instance, if your ${bigquery-depot-name} is alpha and the acl(access control list) is rw, then the instance secret name will be alpha-rw.

  • description: Provide a brief description of the instance-secret's purpose. This field is optional but recommended for easier management and identification of instance-secrets.

  • projectid: Your BigQuery project ID. This identifier is associated with your Google Cloud project and is required for authenticating requests made to BigQuery services.

  • email: The email ID associated with your BigQuery account. This information is essential for specifying the user account that will be used to access BigQuery resources.

  • json_keyfile: The JSON key file of the Google Cloud service account. This file contains the private key and other credentials that are required for authenticating the service account. It can be obtained by creating a service account key in the Google Cloud Console.

The manifest files provided below are the templates for securely storing Amazon Redshift credentials. Depending on your access needs (read-only or read-write), start with the corresponding YAML template provided below.

instance_secret_redshift_read.yaml
# Amazon Redshift Read Instance-secret Manifest

name: ${redshift-depot-name}-r # Unique identifier for Resource, replace ${re-depot-name} with depot name
version: v1 # Manifest version
type: instance-secret # Type of the Resource
description: ${description} # Purpose of the Instance-secret
layer: user # DataOS layer
instance-secret:
  type: key-value-properties # Secret type
  acl: r # Access control: 'r' for read-only
  data:
    username: ${username} # replace with Redshift username
    password: ${password} # replace with Redshift password
    awsaccesskeyid: ${access key} # replace with AWS access ID
    awssecretaccesskey: ${secret key}  # replace with AWS access key
instance_secret_redshift_read_write.yaml
# Amazon Redshift Read Write Instance-secret Manifest

name: ${redshift-depot-name}-rw # Unique identifier for Resource, replace ${re-depot-name} with depot name
version: v1 # Manifest version
type: instance-secret # Type of the Resource
description: ${description} # Purpose of the Instance-secret
layer: user # DataOS layer
instance-secret:
  type: key-value-properties # Secret type
  acl: rw # Access control: 'rw' for read-write
  data:
    username: ${username} # replace with Redshift username
    password: ${password} # replace with Redshift password
    awsaccesskeyid: ${access key} # replace with AWS access ID
    awssecretaccesskey: ${secret key}  # replace with AWS access key

To create an instance-secret for securely storing Amazon Redshift credentials, the details required are provided below. Ensure that you replace each placeholder (e.g., ${redshift-depot-name}, ${username}, ${access key}) with the actual values pertaining to your Redshift and AWS account configuration.

  • name: Define the name of your Instance secret ${redshift-depot-name}-${acl}. For instance, if your ${redshift-depot-name} is alpha and the acl(access control list) is rw, then the instance secret name will be alpha-rw.

  • description: Provide a brief description of the instance-secret's purpose. This field is optional but recommended for easier management and identification of instance-secrets.

  • username: Your Redshift username. This is the identifier for your Redshift user account.

  • password: The password associated with your Redshift username. It is used for authenticating requests to your Redshift cluster.

  • awsaccesskey: AWS-specific access key ID, required for authenticating requests made to AWS services, including Redshift.

  • awssecretaccesskey: The secret access key for AWS. It's used in conjunction with the AWS access key ID to sign programmatic requests to AWS, including Redshift.

The manifest files provided below are the templates for securely storing Snowflake credentials. Depending on your access needs (read-only or read-write), start with the corresponding YAML template provided below.

instance_secret_snowflake_read.yaml
# Snowflake Read Instance-secret Manifest

name: ${snowflake-depot-name}-r # Unique identifier for Resource, replace ${snowflake-depot-name} with depot name
version: v1 # Manifest version
type: instance-secret # Type of the Resource
description: ${description} # Purpose of the Instance-secret
layer: user # DataOS layer
instance-secret:
  type: key-value-properties # Secret type
  acl: r # Access control: 'r' for read-only
  data:
    username: ${username} # replace with snowflake username
    password: ${password} # replace with snowflake password
instance_secret_snowflake_read_write.yaml
# Snowflake Read Write Instance-secret Manifest

name: ${snowflake-depot-name}-rw # Unique identifier for Resource, replace ${snowflake-depot-name} with depot name
version: v1 # Manifest version
type: instance-secret # Type of the Resource
description: ${description} # Purpose of the Instance-secret
layer: user # DataOS layer
instance-secret:
  type: key-value-properties # Secret type
  acl: rw # Access control: 'rw' for read-write
  data:
    username: ${username} # replace with snowflake username
    password: ${password} # replace with snowflake password

To create an instance-secret for securely storing Snowflake credentials, the details required are provided below. Ensure that you replace each placeholder (e.g., ${snowflake-depot-name}, ${username}) with the actual values pertaining to your Snowflake account configuration.

  • name: Define the name of your Instance secret ${snowflake-depot-name}-${acl}. For instance, if your ${snowflake-depot-name} is alpha and the acl(access control list) is rw, then the instance secret name will be alpha-rw.

  • description: Provide a brief description of the instance-secret's purpose. This field is optional but recommended for easier management and identification of instance-secrets.

  • username: Your Snowflake username. This is the identifier for your Snowflake user account.

  • password: The password associated with your Snowflake username. It is used for authenticating requests to your Snowflake account.

SQL databases are typically centralized systems designed for structured data, organized into tables with a predefined schema. Instance-Secrets are configured to securely access and interact with the respective SQL databases.

The manifest files provided below are the templates for securely storing MySQL credentials. Depending on your access needs (read-only or read-write), start with the corresponding YAML template provided below.

instance_secret_mysql_read.yaml
# MySQL Read Instance-secret Manifest

name: ${mysql-depot-name}-r # Unique identifier for Resource, replace ${mysql-depot-name} with depot name
version: v1 # Manifest version
type: instance-secret # Type of the Resource
description: ${description} # Purpose of the Instance-secret
layer: user # DataOS layer
instance-secret:
  type: key-value-properties # Secret type
  acl: r # Access control: 'r' for read-only
  data:
    username: ${username} # replace with MySQL username
    password: ${password} # replace with MySQL password
instance_secret_mysql_read_write.yaml
# MySQL Read Write Instance-secret Manifest

name: ${mysql-depot-name}-rw # Unique identifier for Resource, replace ${mysql-depot-name} with depot name
version: v1 # Manifest version
type: instance-secret # Type of the Resource
description: ${description} # Purpose of the Instance-secret
layer: user # DataOS layer
instance-secret:
  type: key-value-properties # Secret type
  acl: rw # Access control: 'rw' for read-write
  data:
    username: ${username} # replace with MySQL username
    password: ${password} # replace with MySQL password

To create an instance-secret for securely storing MySQL credentials, the details required are provided below. Ensure that you replace each placeholder (e.g., ${mysql-depot-name}, ${username}) with the actual values pertaining to your MySQL account configuration.

  • name: Define the name of your Instance secret ${mysql-depot-name}-${acl}. For instance, if your ${mysql-depot-name} is alpha and the acl(access control list) is rw, then the instance secret name will be alpha-rw.

  • description: Provide a brief description of the instance-secret's purpose. This field is optional but recommended for easier management and identification of instance-secrets.

  • username: Your MySQL username. This is the identifier for your MySQL user account.

  • password: The password associated with your MySQL username. It is used for authenticating requests to your MySQL database.

The manifest files provided below are the templates for securely storing MSSQL credentials. Depending on your access needs (read-only or read-write), start with the corresponding YAML template provided below.

instance_secret_mssql_read.yaml
# Microsoft SQL Server Read Instance-secret Manifest

name: ${mssql-depot-name}-r # Unique identifier for Resource, replace ${mssql-depot-name} with depot name
version: v1 # Manifest version
type: instance-secret # Type of the Resource
description: ${description} # Purpose of the Instance-secret
layer: user # DataOS layer
instance-secret:
  type: key-value-properties # Secret type
  acl: r # Access control: 'r' for read-only
  data:
    username: ${username} # replace with MsSQL username
    password: ${password} # replace with MsSQL password
instance_secret_mssql_read_write.yaml
# Microsoft SQL Server Read Write Instance-secret Manifest

name: ${mssql-depot-name}-rw # Unique identifier for Resource, replace ${mssql-depot-name} with depot name
version: v1 # Manifest version
type: instance-secret # Type of the Resource
description: ${description} # Purpose of the Instance-secret
layer: user # DataOS layer
instance-secret:
  type: key-value-properties # Secret type
  acl: rw # Access control: 'rw' for read-write
  data:
    username: ${username} # replace with MsSQL username
    password: ${password} # replace with MsSQL password

To create an instance-secret for securely storing MSSQL credentials, the details required are provided below. Ensure that you replace each placeholder (e.g., ${mssql-depot-name}, ${username}) with the actual values pertaining to your MSSQL account configuration.

  • name: Define the name of your Instance secret ${mssql-depot-name}-${acl}. For instance, if your ${mssql-depot-name} is alpha and the acl(access control list) is rw, then the instance secret name will be alpha-rw.

  • description: Provide a brief description of the instance-secret's purpose. This field is optional but recommended for easier management and identification of instance-secrets.

  • username: Your MSSQL username. This is the identifier for your MSSQL user account.

  • password: The password associated with your MSSQL username. It is used for authenticating requests to your MSSQL database.

The manifest files provided below are the templates for securely storing JDBC credentials. Depending on your access needs (read-only or read-write), start with the corresponding YAML template provided below.

instance_secret_jdbc_read.yaml
# JDBC Read Instance-secret Manifest

name: ${jdbc-depot-name}-r # Unique identifier for Resource, replace ${jdbc-depot-name} with depot name
version: v1 # Manifest version
type: instance-secret # Type of the Resource
description: ${description} # Purpose of the Instance-secret
layer: user # DataOS layer
instance-secret:
  type: key-value-properties # Secret type
  acl: r # Access control: 'r' for read-only
  data:
    username: ${username} # replace with JDBC username
    password: ${password} # replace with JDBC password
instance_secret_jdbc_read_write.yaml
# JDBC Read Write Instance-secret Manifest

name: ${jdbc-depot-name}-rw # Unique identifier for Resource, replace ${jdbc-depot-name} with depot name
version: v1 # Manifest version
type: instance-secret # Type of the Resource
description: ${description} # Purpose of the Instance-secret
layer: user # DataOS layer
instance-secret:
  type: key-value-properties # Secret type
  acl: rw # Access control: 'rw' for read-write
  data:
    username: ${username} # replace with JDBC username
    password: ${password} # replace with JDBC password

To create an instance-secret for securely storing JDBC credentials, the details required are provided below. Ensure that you replace each placeholder (e.g., ${jdbc-depot-name}, ${username}) with the actual values pertaining to your JDBC account configuration.

  • name: Define the name of your Instance secret ${jdbc-depot-name}-${acl}. For instance, if your ${jdbc-depot-name} is alpha and the acl(access control list) is rw, then the instance secret name will be alpha-rw.

  • description: Provide a brief description of the instance-secret's purpose. This field is optional but recommended for easier management and identification of instance-secrets.

  • username: Your JDBC username. This is the identifier for your database user account when connecting via JDBC.

  • password: The password associated with your JDBC username. It is used for authenticating requests when connecting to the database via JDBC.

The manifest files provided below are the templates for securely storing Oracle credentials. Depending on your access needs (read-only or read-write), start with the corresponding YAML template provided below.

instance_secret_oracle_read.yaml
# Oracle Read Instance-secret Manifest

name: ${oracle-depot-name}-r # Unique identifier for Resource, replace ${oracle-depot-name} with depot name
version: v1 # Manifest version
type: instance-secret # Type of the Resource
description: ${description} # Purpose of the Instance-secret
layer: user # DataOS layer
instance-secret:
  type: key-value-properties # Secret type
  acl: r # Access control: 'r' for read-only
  data:
    username: ${username} # replace with oracle username
    password: ${password} # replace with oracle password
instance_secret_oracle_read_write.yaml
# Oracle Read Write Instance-secret Manifest

name: ${oracle-depot-name}-r # Unique identifier for Resource, replace ${oracle-depot-name} with depot name
version: v1 # Manifest version
type: instance-secret # Type of the Resource
description: ${description} # Purpose of the Instance-secret
layer: user # DataOS layer
instance-secret:
  type: key-value-properties # Secret type
  acl: rw # Access control: 'rw' for read-write
  data:
    username: ${username} # replace with oracle username
    password: ${password} # replace with oracle password

To create an instance-secret for securely storing Oracle credentials, the details required are provided below. Ensure that you replace each placeholder (e.g., ${oracle-depot-name}, ${username}) with the actual values pertaining to your Oracle account configuration.

  • name: Define the name of your Instance secret ${oracle-depot-name}-${acl}. For instance, if your ${oracle-depot-name} is alpha and the acl(access control list) is rw, then the instance secret name will be alpha-rw.

  • description: Provide a brief description of the instance-secret's purpose. This field is optional but recommended for easier management and identification of instance-secrets.

  • username: Your Oracle username. This is the identifier for your Oracle user account.

  • password: The password associated with your Oracle username. It is used for authenticating requests to your Oracle database.

The manifest files provided below are the templates for securely storing Postgres credentials. Depending on your access needs (read-only or read-write), start with the corresponding YAML template provided below.

instance_secret_postgres_read.yaml
# PostgresSQL Read Instance-secret Manifest

name: ${postgres-depot-name}-r # Unique identifier for Resource, replace ${postgres-depot-name} with depot name
version: v1 # Manifest version
type: instance-secret # Type of the Resource
description: ${description} # Purpose of the Instance-secret
layer: user # DataOS layer
instance-secret:
  type: key-value-properties # Secret type
  acl: r # Access control: 'r' for read-only
  data:
    username: ${username} # replace with postgres username
    password: ${password} # replace with postgres password
instance_secret_postgres_read_write.yaml
# PostgresSQL Read Write Instance-secret Manifest

name: ${postgres-depot-name}-rw # Unique identifier for Resource, replace ${postgres-depot-name} with depot name
version: v1 # Manifest version
type: instance-secret # Type of the Resource
description: ${description} # Purpose of the Instance-secret
layer: user # DataOS layer
instance-secret:
  type: key-value-properties # Secret type
  acl: rw # Access control: 'rw' for read-write
  data:
    username: ${username} # replace with postgres username
    password: ${password} # replace with postgres password

To create an instance-secret for securely storing Postgres credentials, the details required are provided below. Ensure that you replace each placeholder (e.g., ${postgres-depot-name}, ${username}) with the actual values pertaining to your Postgres account configuration.

  • name: Define the name of your Instance secret ${postgres-depot-name}-${acl}. For instance, if your ${postgres-depot-name} is alpha and the acl(access control list) is rw, then the instance secret name will be alpha-rw.

  • description: Provide a brief description of the instance-secret's purpose. This field is optional but recommended for easier management and identification of instance-secrets.

  • username: Your PostgreSQL username. This is the identifier for your PostgreSQL user account.

  • password: The password associated with your PostgreSQL username. It is used for authenticating requests to your PostgreSQL database.

NoSQL databases are designed for flexible, distributed data storage, accommodating unstructured or semi-structured data. Instance-Secrets are configured to securely access and interact with the respective NonSQL databases.

The manifest files provided below are the templates for securely storing MongoDB credentials. Depending on your access needs (read-only or read-write), start with the corresponding YAML template provided below.

instance_secret_mongodb_read.yaml
# MongoDB Read Instance-secret Manifest

name: ${mongodb-depot-name}-r # Unique identifier for Resource, replace ${snowflake-depot-name} with depot name
version: v1 # Manifest version
type: instance-secret # Type of the Resource
description: ${description} # Purpose of the Instance-secret
layer: user # DataOS layer
instance-secret:
  type: key-value-properties # Secret type
  acl: r # Access control: 'r' for read-only
  data:
    username: ${username} # replace with mongodb username
    password: ${password} # replace with mongodb password
instance_secret_mongodb_read_write.yaml
# MongoDB Read Write Instance-secret Manifest

name: ${mongodb-depot-name}-r # Unique identifier for Resource, replace ${snowflake-depot-name} with depot name
version: v1 # Manifest version
type: instance-secret # Type of the Resource
description: ${description} # Purpose of the Instance-secret
layer: user # DataOS layer
instance-secret:
  type: key-value-properties # Secret type
  acl: rw # Access control: 'rw' for read-write
  data:
    username: ${username} # replace with mongodb username
    password: ${password} # replace with mongodb password

To create an instance-secret for securely storing MongoDB credentials, the details required are provided below. Ensure that you replace each placeholder (e.g., ${mongodb-depot-name}, ${username}) with the actual values pertaining to your MongoDB account configuration.

  • name: Define the name of your Instance secret ${mongodb-depot-name}-${acl}. For instance, if your ${mongodb-depot-name} is alpha and the acl(access control list) is rw, then the instance secret name will be alpha-rw.

  • description: Provide a brief description of the instance-secret's purpose. This field is optional but recommended for easier management and identification of instance-secrets.

  • username: Your MongoDB username. This is the identifier for your MongoDB user account.

  • password: The password associated with your MongoDB username. It is used for authenticating requests to your MongoDB database.

Streaming refers to the continuous and real-time transmission of data from a source to a destination. nstance-Secrets are configured to securely access and interact with the respective Streaming platforms.

The manifest files provided below are the templates for securely storing Eventhub credentials. Depending on your access needs (read-only or read-write), start with the corresponding YAML template provided below.

instance_secret_eventhub_read.yaml
# Eventhub Read Instance-secret Manifest

name: ${eventhub-depot-name}-r # Unique identifier for Resource, replace ${eventhub-depot-name} with depot name
version: v1 # Manifest version
type: instance-secret # Type of the Resource
description: ${description} # Purpose of the Instance-secret
layer: user # DataOS layer
instance-secret:
  type: key-value-properties # Secret type
  acl: r # Access control: 'r' for read-only
  data:
    eh_shared_access_key_name: ${EH_SHARED_ACCESS_KEY_NAME} # replace with eventhub access key name
    eh_shared_access_key: ${EH_SHARED_ACCESS_KEY} # replace with eventhub access key
instance_secret_eventhub_read_write.yaml
# Eventhub Read Write Instance-secret Manifest

name: ${eventhub-depot-name}-rw # Unique identifier for Resource, replace ${eventhub-depot-name} with depot name
version: v1 # Manifest version
type: instance-secret # Type of the Resource
description: ${description} # Purpose of the Instance-secret
layer: user # DataOS layer
instance-secret:
  type: key-value-properties # Secret type
  acl: rw # Access control: 'rw' for read-write
  data:
    eh_shared_access_key_name: ${EH_SHARED_ACCESS_KEY_NAME} # replace with eventhub access key name
    eh_shared_access_key: ${EH_SHARED_ACCESS_KEY} # replace with eventhub access key

To create an instance-secret for securely storing Eventhub credentials, the details required are provided below. Ensure that you replace each placeholder (e.g., ${eventhub-depot-name}, ${EH_SHARED_ACCESS_KEY_NAME}) with the actual values pertaining to your Azure Event Hub configuration.

  • name: Define the name of your Instance secret ${eventhub-depot-name}-${acl}. For instance, if your ${eventhub-depot-name} is alpha and the acl(access control list) is rw, then the instance secret name will be alpha-rw.

  • description: Provide a brief description of the instance-secret's purpose. This field is optional but recommended for easier management and identification of instance-secrets.

  • eh_shared_access_key_name: Your Azure Event Hub shared access key name. This is the identifier for your Event Hub.

  • eh_shared_access_key: The shared access key associated with your Azure Event Hub. It is used for authenticating requests to your Event Hub.