Skip to content

Depot

Depot in DataOS is a Resource used to connect different data sources to DataOS by abstracting the complexities associated with the underlying source system (including protocols, credentials, and connection schemas). It enables users to establish connections and retrieve data from various data sources, such as file systems (e.g., AWS S3, Google GCS, Azure Blob Storage), data lake systems, database systems (e.g., Redshift, SnowflakeDB, Bigquery, Postgres), and event systems (e.g., Kafka, Pulsar) without moving the data.

Within DataOS, the hierarchical structure of a data source is represented as follows:

Depot Hierarchy

Hierarchical Structure of a Data Source within DataOS

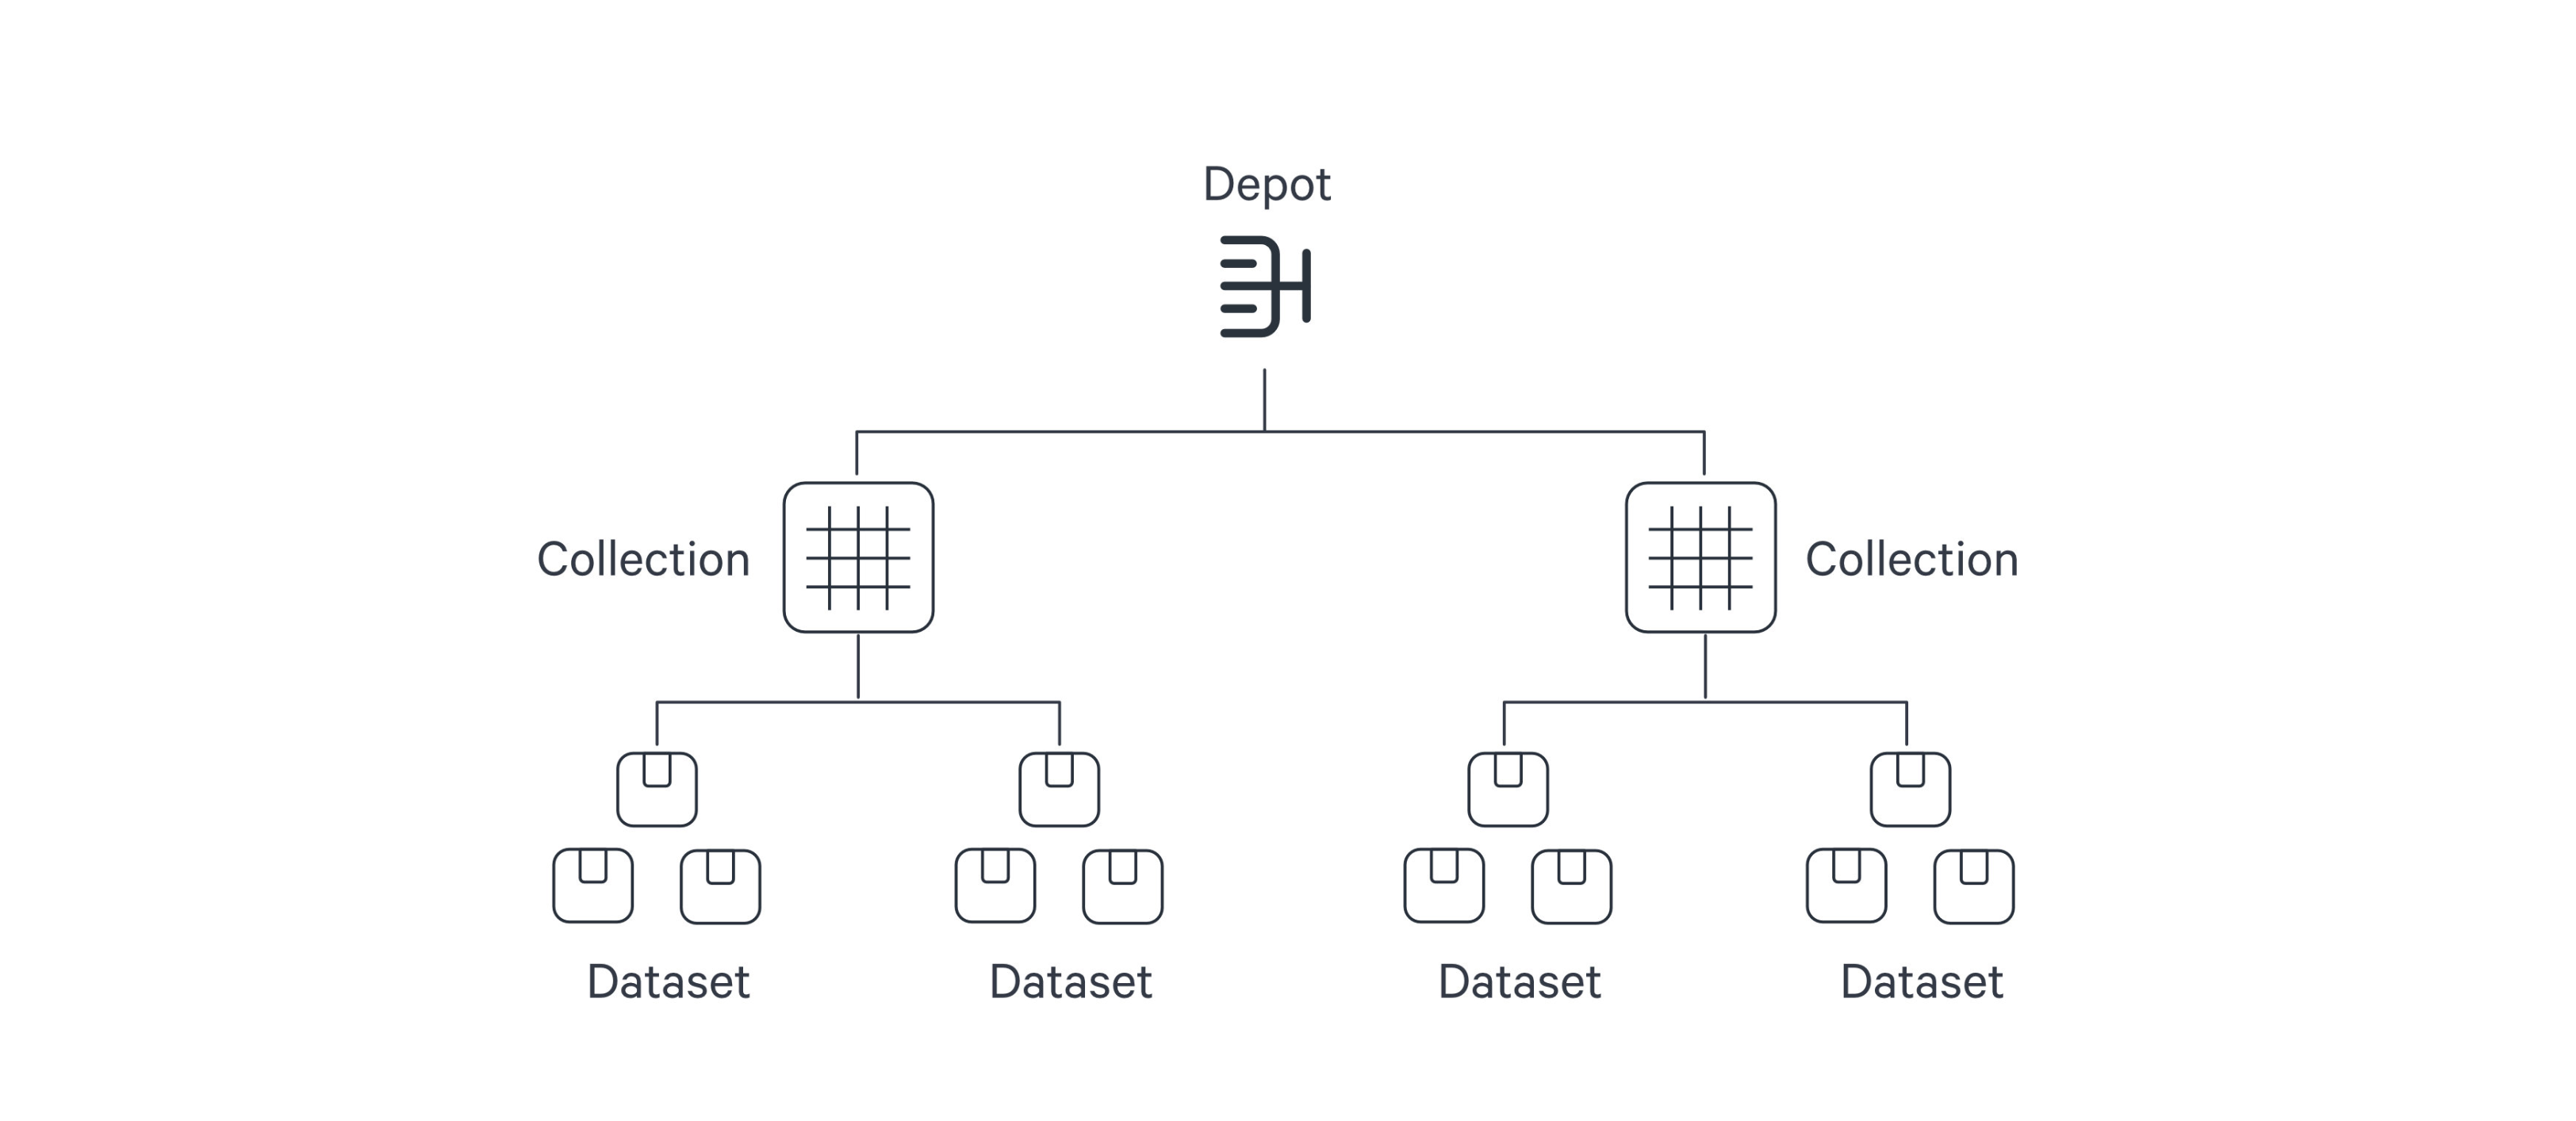
The Depot serves as the registration of data locations to be made accessible to DataOS. Through the Depot Service, each source system is assigned a unique address, referred to as a Uniform Data Link (UDL). The UDL grants convenient access and manipulation of data within the source system, eliminating the need for repetitive credential entry. The UDL follows this format:

dataos://[depot]:[collection]/[dataset]

Leveraging the UDL enables access to datasets and seamless execution of various operations, including data transformation using various Clusters and Policy assignments.

Once this mapping is established, Depot Service automatically generates the Uniform Data Link (UDL) that can be used throughout DataOS to access the data. As a reminder, the UDL has the format: dataos://[depot]:[collection]/[dataset].

For a simple file storage system, "Collection" can be analogous to "Folder," and "Dataset" can be equated to "File." The Depot's strength lies in its capacity to establish uniformity, eliminating concerns about varying source system terminologies.

Once a Depot is created, all members of an organization gain secure access to datasets within the associated source system. The Depot not only facilitates data access but also assigns default Access Policies to ensure data security. Moreover, users have the flexibility to define and utilize custom Access Policies for the depot and Data Policies for specific datasets within the Depot.

How to create a Depot?

To create a Depot in DataOS, simply compose a manifest configuration file for a Depot and apply it using the DataOS Command Line Interface (CLI).

Structure of a Depot manifest

Structure of a Depot YAML

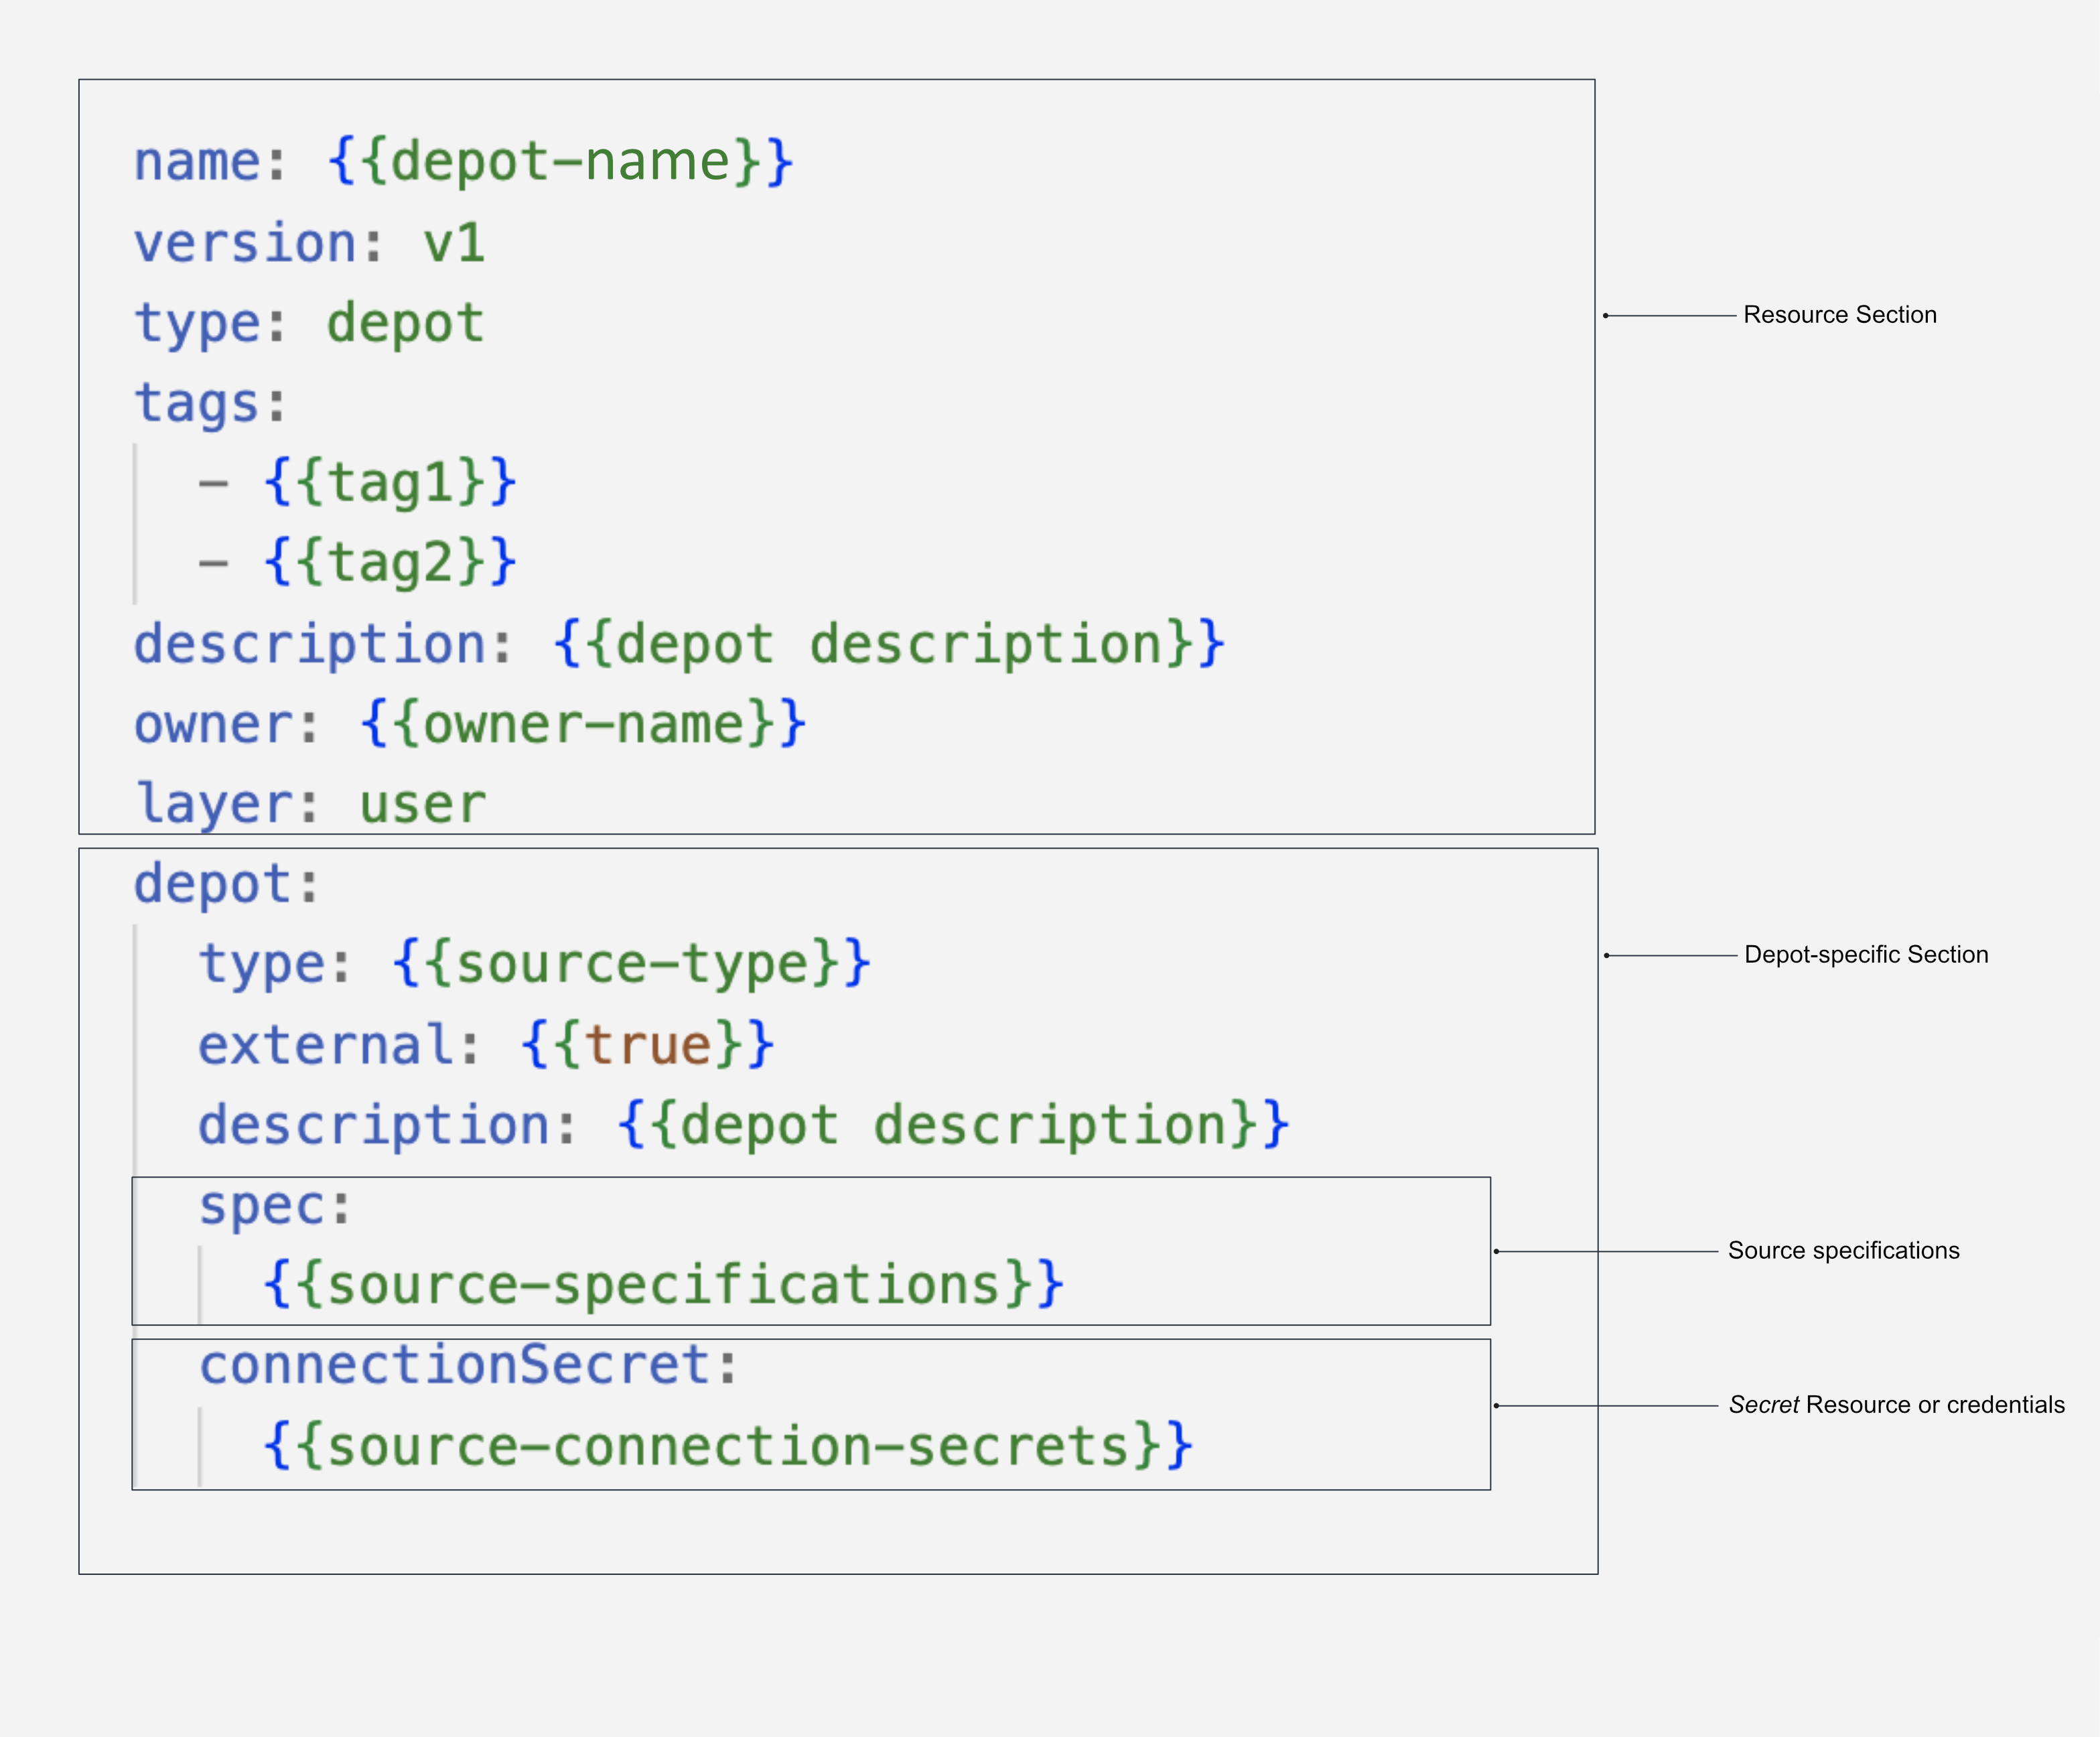
To know more about the attributes of Depot manifest Configuration, refer to the link: Attributes of Depot manifest.

Prerequisites

Before proceeding with Depot creation, it is essential to ensure that you possess the required authorization. To confirm your eligibility, execute the following commands in the CLI:

dataos-ctl user get
# Expected Output
INFO[0000] 😃 user get...                                
INFO[0000] 😃 user get...complete                        

      NAME          ID        TYPE          EMAIL                       TAGS    
───────────────┼─────────────┼────────┼──────────────────────┼────────────────────
  IamGroot      iamgroot     person  iamgroot@tmdc.io      roles:id:data-dev,  
                                                           roles:id:operator,  
                                                           roles:id:system-dev, 
                                                           roles:id:user,    
                                                           users:id:iamgroot
To create Depots, ensure that you possess the following tags.

  • roles:id:user
  • roles:id:data-dev
  • roles:id:system-dev

Create a Manifest File

The manifest configuration file for a Depot can be divided into four main sections: Resource sectionDepot-specific sectionConnection Secrets section, and Specifications section. Each section serves a distinct purpose and contains specific attributes.

Configure Resource Section

The Resource section of the manifest configuration file consists of attributes that are common across all resource types. The following snippet demonstrates the key-value properties that need to be declared in this section:

name: ${{mydepot}}
version: v1 
type: depot 
tags: 
  - ${{dataos:type:resource}}
description: ${{This is a sample depot YAML configuration}} 
owner: ${{iamgroot}}
layer: user
name: ${{mydepot}}
version: v2alpha 
type: depot 
tags: 
  - ${{dataos:type:resource}}
description: ${{This is a sample depot YAML configuration}} 
owner: ${{iamgroot}}
layer: user

For more details regarding attributes in the Resource section, refer to the link: Attributes of Resource Section.

Configure Depot-specific Section

The Depot-specific section of the configuration file includes key-value properties specific to the Depot-type being created. Each Depot type represents a Depot created for a particular data source. Multiple Depots can be established for the same data source, and they will be considered as a single depot type. The following snippet illustrates the key values to be declared in this section:

depot:   
  type: ${{BIGQUERY}}                  
  description: ${{description}}
  external: ${{true}}                  
  source: ${{bigquerymetadata}} 
  compute: ${{runnable-default}}
  connectionSecrets:
    {}
  specs:
    {}

The table below elucidates the various attributes in the Depot-specific section:

Attribute Data Type Default Value Possible Value Requirement
depot object none none mandatory
type string none ABFSS, WASBS, REDSHIFT,
S3, ELASTICSEARCH, EVENTHUB, PULSAR, BIGQUERY, GCS, JDBC, MSSQL, MYSQL, OPENSEARCH, ORACLE, POSTGRES, SNOWFLAKE
mandatory
description string none any string mandatory
external boolean false true/false mandatory
source string depot name any string which is a valid depot name optional
compute string runnable-default any custom Compute Resource optional
connectionSecret object none varies between data sources optional
spec object none varies between data sources mandatory

Configure Connection Secrets Section

The configuration of connection secrets is specific to each Depot type and depends on the underlying data source. The details for these connection secrets, such as credentials and authentication information, should be obtained from your enterprise or data source provider. For commonly used data sources, we have compiled the connection secrets here. Please refer to these templates for guidance on how to configure the connection secrets for your specific data source.

Examples

Here are examples demonstrating how the key-value properties can be defined for different depot-types:

For BigQuery, the connectionSecret section of the configuration file would appear as follows:

#Properties depend on the underlying data source
connectionSecret:                    
  - acl: rw                        
    type: key-value-properties
    data:
      projectid: ${{project-name}}
      email: ${{email-id}}
    files:
      json_keyfile: ${{secrets/gcp-demo-sa.json}} #JSON file containing the credentials to read-write 
  - acl: r                        
    type: key-value-properties
    files:
      json_keyfile: ${{secrets/gcp-demo-sa.json}} #JSON file containing the credentials to read-only`  

This is how you can declare connection secrets to create a Depot for AWS S3 storage:

connectionSecret:                     
  - acl: rw                         
    type: key-value-properties
    data:                           #credentials required to access aws
      awsaccesskeyid: ${{AWS_ACCESS_KEY_ID}}
      awsbucketname: ${{bucket-name}}
      awssecretaccesskey: ${{AWS_SECRET_ACCESS_KEY}}

For accessing JDBC, all you need is a username and password. Check it out below:

connectionSecret:
  - acl: rw
    type: key-value-properties
    data:                            #for JDBC, the credentials you get from the data source should have permission to read/write schemas of the database being accessed 
      username: ${{username}}
      password: ${{password}}

The basic attributes filled in this section are provided in the table below:

Attribute Data Type Default Value Possible Value Requirement
acl string none r/rw mandatory
type string none key-value properties mandatory
data object none fields within data varies between data sources mandatory
files string none valid file path optional

Alternative Approach: Using Instance Secret

Instance Secret is also a Resource in DataOS that allows users to securely store sensitive piece of information such as username, password, etc. Using Secrets in conjunction with DepotsStacks allows for decoupling of sensitive information from Depot and Stack YAMLs. For more clarity, let’s take the example of MySQL data source to understand how you can use Instance Secret Resource for Depot creation:

  • Create an Instance Secret file with the details on the connection secret:

name: ${{mysql-secret}}
version: v1      
type: instance-secret
instance-secret:
  type: key-value-properties
  acl: rw
  data:
    connection-user: ${{user}}
    connection-password: ${{password}}
- Apply this YAML file on DataOS CLI

dataos-ctl apply -f ${{path/instance_secret.yaml}}

For example, if a user wishes to create a MySQL Depot, they can define a Depot configuration file as follows:

YAML Configuration File
name: mysql05
version: v1
type: depot
tags:
  - dropzone
  - mysql
layer: user
depot:
  type: MYSQL
  description: "MYSQL Sample data"
spec:
  host: ${{host}}
  port: ${{port}}
external: true
dataosSecrets:
  - name: depotsecret-r
    keys:
      - depotsecret-r

  - name: depotsecret-rw
    keys:
      - depotsecret-rw
By referencing the name of the Instance Secret, "mysql-secret," users can easily incorporate the specified credentials into their Depot configuration. This approach ensures the secure handling and sharing of sensitive information.

To learn more about Instance Secrets as a Resource and their usage, refer to the documentation here

Configure Spec Section

The spec section in the manifest configuration file plays a crucial role in directing the Depot to the precise location of your data and providing it with the hierarchical structure of the data source. By defining the specification parameters, you establish a mapping between the data and the hierarchy followed within DataOS.

Let's understand this hierarchy through real-world examples:

In the case of BigQuery, the data is structured as "Projects" containing "Datasets" that, in turn, contain "Tables". In DataOS terminology, the "Project" corresponds to the "Depot", the "Dataset" corresponds to the "Collection", and the "Table" corresponds to the "Dataset".

Consider the following structure in BigQuery:

  • Project name: bigquery-public-data (Depot)
  • Dataset name: covid19_usa (Collection)
  • Table name: datafile_01 (Dataset)

The UDL for accessing this data would be dataos://bigquery-public-data:covid19_usa/datafile_01.

In the YAML example below, the necessary values are filled in to create a BigQuery Depot:

Bigquery Depot manifest Configuration

name: covidbq
version: v1
type: depot
tags:
  - bigquery
layer: user
depot:
  type: BIGQUERY
  description: "Covid public data in Google Cloud BigQuery"
  external: true
  spec:
    project: bigquery-public-data

In this example, the Depot is named "covidbq" and references the project "bigquery-public-data" within Google Cloud. As a result, all the datasets and tables within this project can be accessed using the UDL dataos://covidbq:<collection name>/<dataset name>.

By appropriately configuring the specifications, you ensure that the Depot is accurately linked to the data source's structure, enabling seamless access and manipulation of datasets within DataOS.

Depot provides flexibility in mapping the hierarchy for file storage systems. Let's consider the example of an Amazon S3 bucket, which has a flat structure consisting of buckets, folders, and objects. By understanding the hierarchy and utilizing the appropriate configurations, you can effectively map the structure to DataOS components.

Bucket

Amazon S3 Bucket Structure

Here's an example of creating a depot named 's3depot' that maps the following structure:

  • Bucket: abcdata (Depot)
  • Folder: transactions (Collection)
  • Objects: file1 and file2 (Datasets)

In the YAML configuration, specify the bucket name and the relative path to the folder. The manifest example below demonstrates how this can be achieved:

name: s3depot
version: v1
type: depot
tags:
  - S3
layer: user
depot:
  type: S3
  description: "AWS S3 Bucket for dummy data"
  external: true
  spec:
    bucket: "abcdata"
    relativePath:
If you omit the relativePath in the manifest configuration, the bucket itself becomes the depot in DataOS. In this case, the following UDLs can be used to read the data:

  • dataos://s3depot:transactions/file1
  • dataos://s3depot:transactions/file2

Additionally, if there are objects present in the bucket outside the folder, you can use the following UDLs to read them:

  • dataos://s3depot:none/online-transaction
  • dataos://s3depot:none/offline-transaction

However, if you prefer to treat the 'transactions' folder itself as another object within the bucket rather than a folder, you can modify the UDLs as follows:

  • dataos://s3depot:none/transactions/file1
  • dataos://s3depot:none/transactions/file2

In this case, the interpretation is that there is no collection in the bucket, and 'file1' and 'file2' are directly accessed as objects with the path '/transactions/file1' and '/transactions/file2'.

When configuring the manifets file for S3, if you include the relativePath as shown below, the 'transactions' folder is positioned as the depot:

name: s3depot
version: v1
type: depot
tags:
  - S3
layer: user
depot:
  type: S3
  description: "AWS S3 Bucket for dummy data"
  external: true
  spec:
    bucket: "abcdata"
    relativePath: "/transactions"

Since the folder ‘transactions’ in the bucket has now been positioned as the depot, two things happen.

First, you cannot read the object files online-transaction and offline-transaction using this depot.

Secondly with this setup, you can read the files within the 'transactions' folder using the following UDLs:

  • dataos://s3depot:none/file1
  • dataos://s3depot:none/file2

For accessing data from Kafka, where the structure consists of a broker list and topics, the spec section in the YAML configuration will point the depot to the broker list, and the datasets will map to the topic list. The format of the manifest file will be as follows:

depot:
  type: KAFKA
  description: ${{description}}
  external: true
  spec:
    brokers:
      - ${{broker1}}
      - ${{broker2}}

Apply Depot YAML

Once you have the manifest file ready in your code editor, simply copy the path of the manifest file and apply it through the DataOS CLI, using the command given below:

dataos-ctl apply -f ${{yamlfilepath}}

How to manage a Depot?

Verify Depot Creation

To ensure that your depot has been successfully created, you can verify it in two ways:

  • Check the name of the newly created depot in the list of depots where you are named as the owner:
dataos-ctl get -t depot
  • Alternatively, retrieve the list of all depots created in your organization:
dataos-ctl get -t depot -a

You can also access the details of any created Depot through the DataOS GUI in the Operations App and Metis UI.

Delete Depot

If you need to delete a depot, use the following command in the DataOS CLI:

dataos-ctl delete -t depot -n ${{name of depot}}

By executing the above command, the specified depot will be deleted from your DataOS environment.

How to utilize Depots?

Once a Depot is created, you can leverage its Uniform Data Links (UDLs) to access data without physically moving it. The UDLs play a crucial role in various scenarios within DataOS.

Work with Stacks

Depots are compatible with different Stacks in DataOS. Stacks provide distinct approaches to interact with the system and enable various programming paradigms in DataOS. Several Stacks are available that can be utilized with depots, including Scanner for introspecting depots, Flare for data ingestion, transformation, syndication, etc., Benthos for stream processing and Data Toolbox for managing Icebase DDL and DML.

Flare and Scanner Stacks are supported by all Depots, while Benthos, the stream-processing Stack, is compatible with read/write operations from streaming depots like Fastbase and Kafka Depots.

The UDL references are used as addresses for your input and output datasets within the manifest configuration file.

Limit Data Source's File Format

Another important function that a Depot can play is to limit the file type which you can read from and write to a particular data source. In the spec section of manifest config file, simply mention the format of the files you want to allow access for.

depot:
  type: S3
  description: ${{description}}
  external: true
  spec:
    scheme: ${{s3a}}
    bucket: ${{bucket-name}}
    relativePath: "raw" 
    format: ${{format}}  # mention the file format, such as JSON
For File based systems, if you define the format as ‘Iceberg’, you can choose the meta-store catalog between Hadoop and Hive. This is how you do it:

depot:
  type: ABFSS
  description: "ABFSS Iceberg depot for sanity"
  compute: runnable-default
  spec:
    account: 
    container: 
    relativePath:
    format: ICEBERG
    endpointSuffix:
    icebergCatalogType: Hive
If you do not mention the catalog name as Hive, it will use Hadoop as the default catalog for Iceberg format.

Depot Hierarchy

Flow when Hive is chosen as the catalog type

Hive, automatically keeps the pointer updated to the latest metadata version. If you use Hadoop, you have to manually do this by running the set metadata command as described on this page: Set Metadata

Scan and Catalog Metadata

By running the Scanner, you can scan the metadata from a source system via the Depot interface. Once the metadata is scanned, you can utilize Metis to catalog and explore the metadata in a structured manner. This allows for efficient management and organization of data resources.

Add Depot to Cluster Sources to Query the Data

To enable the Minerva Query Engine to access a specific source system, you can add the Depot to the list of sources in the Cluster. This allows you to query the data and create dashboards using the DataOS Workbench and Atlas.

Create Policies upon Depots to Govern the Data

Access and Data Policies can be created upon Depots to govern the data. This helps in reducing data breach risks and simplifying compliance with regulatory requirements. Access Policies can restrict access to specific depots, collections, or datasets, while Data Policies allow you to control the visibility and usage of data.

Building Data Models

You can use Lens to create Data Models on top of Depots and explore them using the Lens App UI.

Supported Storage Architectures in DataOS

DataOS Depots facilitate seamless connectivity with diverse storage systems while eliminating the need for data relocation. This resolves challenges pertaining to accessibility across heterogeneous data sources. However, the escalating intricacy of pipelines and the exponential growth of data pose potential issues, resulting in cumbersome, expensive, and unattainable storage solutions. In order to address this critical concern, DataOS introduces support for two distinct and specialized storage architectures - Icebase Depot, the Unified Lakehouse designed for OLAP data, and Fastbase Depot, the Unified Streaming solution tailored for handling streaming data.

Icebase

Icebase-type depots are designed to store data suitable for OLAP processes. It offers built-in functionalities such as schema evolutionupsert commands, and time-travel capabilities for datasets. With Icebase, you can conveniently perform these actions directly through the DataOS CLI, eliminating the need for additional Stacks like Flare. Moreover, queries executed on data stored in Icebase exhibit enhanced performance. For detailed information, refer to the Icebase page.

Fastbase

Fastbase type-depots are optimized for handling streaming data workloads. It provides features such as creating and listing topics, which can be executed effortlessly using the DataOS CLI. To explore Fastbase further, consult the link.

Data Integration - Supported Connectors in DataOS

The catalogue of data sources accessible by one or more components within DataOS is provided on the following page: Supported Connectors in DataOS

Templates of Depot for different source systems

To facilitate the creation of depots accessing commonly used data sources, we have compiled a collection of pre-defined manifest templates. These templates serve as a starting point, allowing you to quickly set up depots for popular data sources.

To make the process of creating a Depot configuration easier, we provide a set of predefined templates for various data sources. These templates serve as a starting point for configuring your Depot based on the specific data source you are working with. Simply choose the template that corresponds to your organization's data source and follow the instructions provided to fill in the required information.

You can access these templates by visiting the following links: 

DataOS provides the capability to establish a connection with the Amazon Redshift database. We have provided the template for the manifest file to establish this connection. To create a Depot of type ‘REDSHIFT‘, utilize the following template:

redshift_v1.yaml
name: {{redshift-depot-name}}
version: v1
type: depot
tags:
  - {{redshift}}
layer: user
description: {{Redshift Sample data}}
depot:
  type: REDSHIFT
  spec:
    host: {{hostname}}
    subprotocol: {{subprotocol}}
    port: {{5439}}
    database: {{sample-database}}
    bucket: {{tmdc-dataos}}
    relativePath: {{development/redshift/data_02/}}
  external: {{true}}
  connectionSecret:
    - acl: {{rw}}
      type: key-value-properties
      data:
        username: {{username}}
        password: {{password}}
        awsaccesskeyid: {{access key}}
        awssecretaccesskey: {{secret key}}

Follow these steps to create the depot:

  • Step 1: Create a manifest file.
  • Step 2: Copy the template from above and paste it in a code.
  • Step 3: Fill the values for the atttributes/fields declared in the YAML-based manifest file.
  • Step 4: Apply the file through DataOS CLI.
redshift_v2alpha.yaml
name: {{redshift-depot-name}}
version: v2alpha
type: depot
tags:
  - {{redshift}}
layer: user
description: {{Redshift Sample data}}
depot:
  type: REDSHIFT
  redshift:
    host: {{hostname}}
    subprotocol: {{subprotocol}}
    port: {{5439}}
    database: {{sample-database}}
    bucket: {{tmdc-dataos}}
    relativePath: {{development/redshift/data_02/}}
  external: {{true}}
  secrets:
    - name: {{redshift-instance-secret-name}}-r
      allkeys: true

    - name: {{redshift-instance-secret-name}}-rw
      allkeys: true

Follow these steps to create the depot:

  • Step 1: Create Instance-secret to store the credentials, for more imformation about instance secret, refer to Instance Secret.
  • Step 2: Copy the template from above and paste it in a code.
  • Step 3: Fill the values for the atttributes/fields declared in the YAML-based manifest file.
  • Step 4: Apply the file through DataOS CLI.

Requirements To establish a connection with Redshift, the following information is required:

  • Hostname
  • Port
  • Database name
  • User name and password

Additionally, when accessing the Redshift Database in Workflows or other DataOS Resources, the following details are also necessary:

  • Bucket name where the data resides
  • Relative path
  • AWS access key
  • AWS secret key

DataOS enables the creation of a Depot of type 'BIGQUERY' to read data stored in BigQuery projects. Multiple Depots can be created, each pointing to a different project. To create a Depot of type 'BIGQUERY', utilize the following template:

bigquery_v2alpha.yaml
name: {{depot-name}}
version: v1
type: depot
tags:
  - {{dropzone}}
  - {{bigquery}}
owner: {{owner-name}}
layer: user
depot: # mandatory
  type: BIGQUERY  # mandatory               
  description: {{description}} # optional
  external: {{true}} # mandatory
  connectionSecret:            
    - acl: rw
      type: key-value-properties
      data:
        projectid: {{project-name}}
        email: {{email-id}}
      files:
        json_keyfile: {{json-file-path}}
    - acl: r
      type: key-value-properties
      data:
        projectid: {{project-name}}
        email: {{email-id}}
      files:
        json_keyfile: {{json-file-path}}
  spec:  # optional                         
    project: {{project-name}} # optional
    params: # optional
      {{"key1": "value1"}}
      {{"key2": "value2"}}
Follow these steps to create the depot:

  • Step 1: Create a manifest file.
  • Step 2: Copy the template from above and paste it in a code.
  • Step 3: Fill the values for the atttributes/fields declared in the YAML-based manifest file.
  • Step 4: Apply the file through DataOS CLI.

bigquery_v2alpha.yaml
name: {{depot-name}}
version: v2alpha
type: depot
tags:
  - {{dropzone}}
  - {{bigquery}}
owner: {{owner-name}}
layer: user
depot:
  type: BIGQUERY                 
  description: {{description}} # optional
  external: {{true}}
  secrets:
    - name: {{bq-instance-secret-name}}-r
      allkeys: true

    - name: {{bq-instance-secret-name}}-rw
      allkeys: true
  bigquery:  # optional                         
    project: {{project-name}} # optional
    params: # optional
      {{"key1": "value1"}}
      {{"key2": "value2"}}
Follow these steps to create the depot:

  • Step 1: Create Instance-secret to store the credentials, for more imformation about instance secret, refer to Instance Secret.
  • Step 2: Copy the template from above and paste it in a code.
  • Step 3: Fill the values for the atttributes/fields declared in the YAML-based manifest file.
  • Step 4: Apply the file through DataOS CLI.

Requirements To establish a connection with BigQuery, the following information is required:

  • Project ID: The identifier of the BigQuery project.
  • Email ID: The email address associated with the BigQuery project.
  • Credential properties in JSON file: A JSON file containing the necessary credential properties.
  • Additional parameters: Any additional parameters required for the connection.

DataOS provides integration with Snowflake, allowing you to seamlessly read data from Snowflake tables using Depots. Snowflake is a cloud-based data storage and analytics data warehouse offered as a Software-as-a-Service (SaaS) solution. It utilizes a new SQL database engine designed specifically for cloud infrastructure, enabling efficient access to Snowflake databases. To create a Depot of type 'SNOWFLAKE', you can utilize the following YAML template as a starting point:

snowflake_v2alpha.yaml
name: {{snowflake-depot}}
version: v1
type: depot
tags:
  - {{tag1}}
  - {{tag2}}
layer: user
depot:
  type: snowflake
  description: {{snowflake-depot-description}}
  spec:
    warehouse: {{warehouse-name}}
    url: {{snowflake-url}}
    database: {{database-name}}
  external: true
  connectionSecret:
    - acl: rw
      type: key-value-properties
      data:
        username: {{snowflake-username}}
        password: {{snowflake-password}}
Follow these steps to create the depot:

  • Step 1: Create a manifest file.
  • Step 2: Copy the template from above and paste it in a code.
  • Step 3: Fill the values for the atttributes/fields declared in the YAML-based manifest file.
  • Step 4: Apply the file through DataOS CLI.

snowflake_v2alpha.yaml
name: {{snowflake-depot}}
version: v2alpha
type: depot
tags:
  - {{tag1}}
  - {{tag2}}
layer: user
depot:
  type: snowflake
  description: {{snowflake-depot-description}}
  snowflake:
    warehouse: {{warehouse-name}}
    url: {{snowflake-url}}
    database: {{database-name}}
  external: true
  secrets:
    - name: {{redshift-instance-secret-name}}-r
      allkeys: true

    - name: {{redshift-instance-secret-name}}-rw
      allkeys: true
Follow these steps to create the depot:

  • Step 1: Create Instance-secret to store the credentials, for more imformation about instance secret, refer to Instance Secret.
  • Step 2: Copy the template from above and paste it in a code.
  • Step 3: Fill the values for the atttributes/fields declared in the YAML-based manifest file.
  • Step 4: Apply the file through DataOS CLI.

Requirements

To establish a connection to Snowflake and create a Depot, you will need the following information:

  • Snowflake Account URL: The URL of your Snowflake account.
  • Snowflake Username: Your Snowflake login username.
  • Snowflake User Password: The password associated with your Snowflake user account.
  • Snowflake Database Name: The name of the Snowflake database you want to connect to.
  • Database Schema: The schema in the Snowflake database where your desired table resides.

DataOS provides the capability to establish a connection with the Amazon S3 buckets. We have provided the template for the manifest file to establish this connection. To create a Depot of type ‘S3‘, utilize the following template:

s3_v1.yaml
name: {{depot-name}}
version: v1
type: depot
tags:
  - {{tag1}}
owner: {{owner-name}}
layer: user
description: {{description}}
depot:
  type: S3                                          
  external: {{true}}
  spec:                                            
    scheme: {{s3a}}
    bucket: {{project-name}}
    relativePath: {{relative-path}}
    format: {{format}}
  connectionSecret:                                
    - acl: rw
      type: key-value-properties
      data:
        accesskeyid: {{AWS_ACCESS_KEY_ID}}
        secretkey: {{AWS_SECRET_ACCESS_KEY}}
        awsaccesskeyid: {{AWS_ACCESS_KEY_ID}}
        awssecretaccesskey: {{AWS_SECRET_ACCESS_KEY}}
    - acl: r
      type: key-value-properties
      data:
        accesskeyid: {{AWS_ACCESS_KEY_ID}}
        secretkey: {{AWS_SECRET_ACCESS_KEY}}
        awsaccesskeyid: {{AWS_ACCESS_KEY_ID}}
        awssecretaccesskey: {{AWS_SECRET_ACCESS_KEY}}
Follow these steps to create the depot:

  • Step 1: Create a manifest file.
  • Step 2: Copy the template from above and paste it in a code.
  • Step 3: Fill the values for the atttributes/fields declared in the YAML-based manifest file.
  • Step 4: Apply the file through DataOS CLI.

s3_v2alpha.yaml
name: {{depot-name}}
version: v2alpha
type: depot
tags:
  - {{tag1}}
owner: {{owner-name}}
layer: user
description: {{description}}
depot:
  type: S3                                          
  external: {{true}}
  s3:                                            
    scheme: {{s3a}}
    bucket: {{project-name}}
    relativePath: {{relative-path}}
    format: {{format}}
  secrets:
    - name: {{s3-instance-secret-name}}-r
      allkeys: true

    - name: {{s3-instance-secret-name}}-rw
      allkeys: true
Follow these steps to create the depot:

  • Step 1: Create Instance-secret to store the credentials, for more imformation about instance secret, refer to Instance Secret.
  • Step 2: Copy the template from above and paste it in a code.
  • Step 3: Fill the values for the atttributes/fields declared in the YAML-based manifest file.
  • Step 4: Apply the file through DataOS CLI.

Requirements

To establish a connection with Amazon S3, the following information is required:

  • AWS access key ID
  • AWS bucket name
  • Secret access key
  • Scheme
  • Relative Path
  • Format

DataOS enables the creation of a Depot of type 'ABFSS' to facilitate the reading of data stored in an Azure Blob Storage account. This Depot provides access to the storage account, which can consist of multiple containers. A container serves as a grouping mechanism for multiple blobs. It is recommended to define a separate Depot for each container. To create a Depot of type ‘ABFSS‘, utilize the following template:

abfss_v1.yaml
name: {{depot-name}}
version: v1
type: depot
tags:
  - {{tag1}}
  - {{tag2}}
owner: {{owner-name}}
layer: user
depot:
  type: ABFSS                                       
  description: {{description}}
  external: {{true}}
  compute: {{runnable-default}}
  connectionSecret:                                 
    - acl: rw
      type: key-value-properties
      data:
        azurestorageaccountname: {{account-name}}
        azurestorageaccountkey: {{account-key}}
    - acl: r
      type: key-value-properties
      data:
        azurestorageaccountname: {{account-name}}
        azurestorageaccountkey: {{account-key}}
  spec:                                             
    account: {{account-name}}
    container: {{container-name}}
    relativePath: {{relative-path}}
    format: {{format}}
Follow these steps to create the depot:

  • Step 1: Create a manifest file.
  • Step 2: Copy the template from above and paste it in a code.
  • Step 3: Fill the values for the atttributes/fields declared in the YAML-based manifest file.
  • Step 4: Apply the file through DataOS CLI.

abfss_v2alpha.yaml
name: {{depot-name}}
version: v2alpha
type: depot
tags:
  - {{tag1}}
  - {{tag2}}
owner: {{owner-name}}
layer: user
depot:
  type: ABFSS                                       
  description: {{description}}
  external: {{true}}
  compute: {{runnable-default}}
  secrets:
    - name: {{abfss-instance-secret-name}}-r
      allkeys: true

    - name: {{abfss-instance-secret-name}}-rw
      allkeys: true
  abfss:                                             
    account: {{account-name}}
    container: {{container-name}}
    relativePath: {{relative-path}}
    format: {{format}}
Follow these steps to create the depot:

  • Step 1: Create Instance-secret to store the credentials, for more imformation about instance secret, refer to Instance Secret.
  • Step 2: Copy the template from above and paste it in a code.
  • Step 3: Fill the values for the atttributes/fields declared in the YAML-based manifest file.
  • Step 4: Apply the file through DataOS CLI.

Requirements

To establish a connection with Azure ABFSS, the following information is required:

  • Storage account name
  • Storage account key
  • Container
  • Relative path
  • Data format stored in the container

DataOS enables the creation of a Depot of type 'WASBS' to facilitate the reading of data stored in Azure Data Lake Storage. This Depot enables access to the storage account, which can contain multiple containers. A container serves as a grouping of multiple blobs. It is recommended to define a separate Depot for each container.To create a Depot of type ‘WASBS‘, utilize the following template:

wasbs_v1.yaml
name: {{depot-name}}
version: v1
type: depot
tags:
  - {{tag1}}
  - {{tag2}}
owner: {{owner-name}}
layer: user
depot:
  type: WASBS                                      
  description: {{description}}
  external: {{true}}
  compute: {{runnable-default}}
  connectionSecret:                                 
    - acl: rw
      type: key-value-properties
      data:
        azurestorageaccountname: {{account-name}}
        azurestorageaccountkey: {{account-key}}
    - acl: r
      type: key-value-properties
      data:
        azurestorageaccountname: {{account-name}}
        azurestorageaccountkey: {{account-key}}
  spec:                                          
    account: {{account-name}}
    container: {{container-name}}
    relativePath: {{relative-path}}
    format: {{format}}
Follow these steps to create the depot:

  • Step 1: Create a manifest file.
  • Step 2: Copy the template from above and paste it in a code.
  • Step 3: Fill the values for the atttributes/fields declared in the YAML-based manifest file.
  • Step 4: Apply the file through DataOS CLI.

wasbs_v2alpha.yaml
name: {{depot-name}}
version: v2alpha
type: depot
tags:
  - {{tag1}}
  - {{tag2}}
owner: {{owner-name}}
layer: user
depot:
  type: WASBS                                      
  description: {{description}}
  external: {{true}}
  compute: {{runnable-default}}
  secrets:
    - name: {{wasbs-instance-secret-name}}-r
      allkeys: true

    - name: {{wasbs-instance-secret-name}}-rw
      allkeys: true
  wasbs:                                          
    account: {{account-name}}
    container: {{container-name}}
    relativePath: {{relative-path}}
    format: {{format}}
Follow these steps to create the depot:

  • Step 1: Create Instance-secret to store the credentials, for more imformation about instance secret, refer to Instance Secret.
  • Step 2: Copy the template from above and paste it in a code.
  • Step 3: Fill the values for the atttributes/fields declared in the YAML-based manifest file.
  • Step 4: Apply the file through DataOS CLI.

Requirements

To establish a connection with Azure WASBS, the following information is required:

  • Storage account name
  • Storage account key
  • Container
  • Relative path
  • Format

DataOS provides the capability to connect to Google Cloud Storage data using Depot. To create a Depot of Google Cloud Storage, in the type field you will have to specify type 'GCS', and utilize the following template:

gcs_v1.yaml
name: {{"sanitygcs01"}}
version: v1
type: depot
tags:
  - {{GCS}}
  - {{Sanity}}
layer: user
depot:
  type: GCS
  description: {{"GCS depot for sanity"}}
  compute: {{runnable-default}}
  spec:
    bucket: {{"airbyte-minio-testing"}}
    relativePath: {{"/sanity"}}
  external: {{true}}
  connectionSecret:
    - acl: {{rw}}
      type: key-value-properties
      data:
        projectid: {{$GCS_PROJECT_ID}}
        email: {{$GCS_ACCOUNT_EMAIL}}
      files:
        gcskey_json: {{$GCS_KEY_JSON}}
Follow these steps to create the depot:

  • Step 1: Create a manifest file.
  • Step 2: Copy the template from above and paste it in a code.
  • Step 3: Fill the values for the atttributes/fields declared in the YAML-based manifest file.
  • Step 4: Apply the file through DataOS CLI.

gcs_v2alpha.yaml
name: {{"sanitygcs01"}}
version: v2alpha
type: depot
tags:
  - {{GCS}}
  - {{Sanity}}
layer: user
depot:
  type: GCS
  description: {{"GCS depot for sanity"}}
  compute: {{runnable-default}}
  gcs:
    bucket: {{"airbyte-minio-testing"}}
    relativePath: {{"/sanity"}}
  external: {{true}}
  secrets:
    - name: {{gcs-instance-secret-name}}-r
      allkeys: true

    - name: {{gcs-instance-secret-name}}-rw
      allkeys: true
Follow these steps to create the depot:

  • Step 1: Create Instance-secret to store the credentials, for more imformation about instance secret, refer to Instance Secret.
  • Step 2: Copy the template from above and paste it in a code.
  • Step 3: Fill the values for the atttributes/fields declared in the YAML-based manifest file.
  • Step 4: Apply the file through DataOS CLI.

The Depot facilitates access to all documents that are visible to the specified user, allowing for text queries and analytics.

Requirements

To establish a connection with Google Cloud Storage (GCS), the following information is required:

  • GCS Bucket
  • Relative Path
  • GCS Project ID
  • GCS Account Email
  • GCS Key

DataOS provides the capability to establish a connection with the Icebase Lakehouse over Amazon S3 or other object storages. We have provided the template for the manifest file to establish this connection. To create a Depot of type ‘S3‘, utilize the following template:

icebase_v1.yaml
version: v1
name: "s3hadoopiceberg"
type: depot
tags:
  - S3
layer: user
description: "AWS S3 Bucket for Data"
depot:
  type: S3
  compute: runnable-default
  spec:
    bucket: $S3_BUCKET        # "tmdc-dataos-testing"
    relativePath: $S3_RELATIVE_PATH           # "/sanity"
    format: ICEBERG
    scheme: s3a       
  external: true
  connectionSecret:
    - acl: rw
      type: key-value-properties
      data:
        accesskeyid: $S3_ACCESS_KEY_ID
        secretkey: $S3_SECRET_KEY
        awsaccesskeyid: $S3_ACCESS_KEY_ID
        awssecretaccesskey: $S3_SECRET_KEY
        awsendpoint: $S3_ENDPOINT
Follow these steps to create the depot:

  • Step 1: Create a manifest file.
  • Step 2: Copy the template from above and paste it in a code.
  • Step 3: Fill the values for the atttributes/fields declared in the YAML-based manifest file.
  • Step 4: Apply the file through DataOS CLI.

icebase_v2alpha.yaml
version: v2alpha
name: "s3hadoopiceberg"
type: depot
tags:
  - S3
layer: user
description: "AWS S3 Bucket for Data"
depot:
  type: S3
  compute: runnable-default
  s3:
    bucket: $S3_BUCKET        # "tmdc-dataos-testing"
    relativePath: $S3_RELATIVE_PATH           # "/sanity"
    format: ICEBERG
    scheme: s3a       
  external: true
  secrets:
    - name: {{icebase-s3-instance-secret-name}}-r
      allkeys: true

    - name: {{icebase-s3-instance-secret-name}}-rw
      allkeys: true
Follow these steps to create the depot:

  • Step 1: Create Instance-secret to store the credentials, for more imformation about instance secret, refer to Instance Secret.
  • Step 2: Copy the template from above and paste it in a code.
  • Step 3: Fill the values for the atttributes/fields declared in the YAML-based manifest file.
  • Step 4: Apply the file through DataOS CLI.

Requirements

To establish a connection with Amazon S3, the following information is required:

  • AWS access key ID
  • AWS bucket name
  • Secret access key
  • Scheme
  • Relative Path
  • Format

DataOS provides the capability to create a Depot of type 'PULSAR' for reading topics and messages stored in Pulsar. This Depot facilitates the consumption of published topics and processing of incoming streams of messages. To create a Depot of type 'PULSAR,' utilize the following template:

pulsar_v1.yaml
name: {{depot-name}}
version: v1
type: depot
tags:
  - {{tag1}}
  - {{tag2}}
owner: {{owner-name}}
layer: user
depot:
  type: PULSAR       
  description: {{description}}
  external: {{true}}
  spec:              
    adminUrl: {{admin-url}}
    serviceUrl: {{service-url}}
    tenant: {{system}}
# Ensure to obtain the correct tenant name and other specifications from your organization.
Follow these steps to create the depot:

  • Step 1: Create a manifest file.
  • Step 2: Copy the template from above and paste it in a code.
  • Step 3: Fill the values for the atttributes/fields declared in the YAML-based manifest file.
  • Step 4: Apply the file through DataOS CLI.

Requirements

To establish a connection with Pulsar, the following information is required:

  • Admin URL
  • Service URL

DataOS provides the capability to connect to Eventhub data using Depot. The Depot facilitates access to all documents that are visible to the specified user, allowing for text queries and analytics. To create a Depot of Eventhub, in the type field you will have to specify type 'EVENTHUB', and utilize the following template:

eh_v1.yaml
name: {{"sanityeventhub01"}}
version: v1
type: depot
tags:
  - {{Eventhub}}
  - {{Sanity}}
layer: user
depot:
  type: "EVENTHUB"
  compute: {{runnable-default}}
  spec:
    endpoint: {{"sb://event-hubns.servicebus.windows.net/"}}
  external: {{true}}
  connectionSecret:
    - acl: r
      type: key-value-properties
      data:
        eh_shared_access_key_name: {{$EH_SHARED_ACCESS_KEY_NAME}}
        eh_shared_access_key: {{$EH_SHARED_ACCESS_KEY}}
    - acl: rw
      type: key-value-properties
      data:
        eh_shared_access_key_name: {{$EH_SHARED_ACCESS_KEY_NAME}}
        eh_shared_access_key: {{$EH_SHARED_ACCESS_KEY}}        
Follow these steps to create the depot:

  • Step 1: Create a manifest file.
  • Step 2: Copy the template from above and paste it in a code.
  • Step 3: Fill the values for the atttributes/fields declared in the YAML-based manifest file.
  • Step 4: Apply the file through DataOS CLI.

eh_v2alpha.yaml
name: {{"sanityeventhub01"}}
version: v2alpha
type: depot
tags:
  - {{Eventhub}}
  - {{Sanity}}
layer: user
depot:
  type: "EVENTHUB"
  compute: {{runnable-default}}
  eventhub:
    endpoint: {{"sb://event-hubns.servicebus.windows.net/"}}
  external: {{true}}
  secrets:
    - name: {{eh-instance-secret-name}}-r
      allkeys: true

    - name: {{eh-instance-secret-name}}-rw
      allkeys: true
Follow these steps to create the depot:

  • Step 1: Create Instance-secret to store the credentials, for more imformation about instance secret, refer to Instance Secret.
  • Step 2: Copy the template from above and paste it in a code.
  • Step 3: Fill the values for the atttributes/fields declared in the YAML-based manifest file.
  • Step 4: Apply the file through DataOS CLI.

Requirements

To establish a connection with Eventhub, the following information is required:

  • Endpoint
  • Eventhub Shared Access Key Name
  • Eventhub Shared Access Key

DataOS allows you to create a Depot of type 'KAFKA' to read live topic data. This Depot enables you to access and consume real-time streaming data from Kafka. To create a Depot of type 'KAFKA', utilize the following template:

kafka_v1.yaml
name: {{depot-name}}
version: v1
type: depot
tags:
  - {{tag1}}
owner: {{owner-name}}
layer: user
depot:
  type: KAFKA                     
  description: {{description}}
  external: {{true}}
  spec:                           
    brokers:
      - {{broker1}}
      - {{broker2}}
    schemaRegistryUrl: {{http://20.9.63.231:8081/}}
Follow these steps to create the depot:

  • Step 1: Create a manifest file.
  • Step 2: Copy the template from above and paste it in a code.
  • Step 3: Fill the values for the atttributes/fields declared in the YAML-based manifest file.
  • Step 4: Apply the file through DataOS CLI.

Requirements

  • To connect to Kafka, you need:

  • To establish a connection to Kafka, you need to provide the following information:

  • KAFKA broker list: The list of brokers in the Kafka cluster. The broker list enables the Depot to fetch all the available topics in the Kafka cluster. Schema Registry URL

DataOS provides the capability to connect to Elasticsearch data using Depot. The Depot facilitates access to all documents that are visible to the specified user, allowing for text queries and analytics. To create a Depot of type ‘ELASTICSEARCH‘, utilize the following template:

es_v1.yaml
name: {{depot-name}}
version: v1
type: depot
tags:
  - {{tag1}}
  - {{tag2}}
owner: {{owner-name}}
layer: user
depot:
  type: ELASTICSEARCH              
  description: {{description}}
  external: {{true}}
  connectionSecret:                
    - acl: rw
      values:
        username: {{username}}
        password: {{password}}
    - acl: r
      values:
        username: {{username}}
        password: {{password}}
  spec:                           
    nodes: {{["localhost:9092", "localhost:9093"]}}
Follow these steps to create the depot:

  • Step 1: Create a manifest file.
  • Step 2: Copy the template from above and paste it in a code.
  • Step 3: Fill the values for the atttributes/fields declared in the YAML-based manifest file.
  • Step 4: Apply the file through DataOS CLI.

es_v2alpha.yaml
name: {{depot-name}}
version: v2alpha
type: depot
tags:
  - {{tag1}}
  - {{tag2}}
owner: {{owner-name}}
layer: user
depot:
  type: ELASTICSEARCH              
  description: {{description}}
  external: {{true}}
  secrets:
    - name: {{sf-instance-secret-name}}-r
      allkeys: true

    - name: {{sf-instance-secret-name}}-rw
      allkeys: true
  elasticsearch:                           
    nodes: {{["localhost:9092", "localhost:9093"]}}
Follow these steps to create the depot:

  • Step 1: Create Instance-secret to store the credentials, for more imformation about instance secret, refer to Instance Secret.
  • Step 2: Copy the template from above and paste it in a code.
  • Step 3: Fill the values for the atttributes/fields declared in the YAML-based manifest file.
  • Step 4: Apply the file through DataOS CLI.

Requirements

To establish a connection with Elasticsearch, the following information is required:

  • Username
  • Password
  • Nodes (Hostname/URL of the server and ports)

DataOS allows you to connect to MongoDB using Depot, enabling you to interact with your MongoDB database and perform various data operations. You can create a MongoDB Depot in DataOS by providing specific configurations. To create a Depot of type 'MONGODB', use the following template:

mongo_v1.yaml
name: {{depot-name}}
version: v1
type: depot
tags:
  - {{tag1}}
  - {{tag2}}
layer: user
depot:
  type: MONGODB                                 
  description: {{description}}
  compute: {{runnable-default}}
  spec:                                          
    subprotocol: {{"mongodb+srv"}}
    nodes: {{["clusterabc.ezlggfy.mongodb.net"]}}
  external: {{true}}
  connectionSecret:                              
    - acl: rw
      type: key-value-properties
      data:
        username: {{username}}
        password: {{password}}
Follow these steps to create the depot:

  • Step 1: Create a manifest file.
  • Step 2: Copy the template from above and paste it in a code.
  • Step 3: Fill the values for the atttributes/fields declared in the YAML-based manifest file.
  • Step 4: Apply the file through DataOS CLI.

mongo_v2alpha.yaml
name: {{depot-name}}
version: v2alpha
type: depot
tags:
  - {{tag1}}
  - {{tag2}}
layer: user
depot:
  type: MONGODB                                 
  description: {{description}}
  compute: {{runnable-default}}
  mongodb:                                          
    subprotocol: {{"mongodb+srv"}}
    nodes: {{["clusterabc.ezlggfy.mongodb.net"]}}
  external: {{true}}
  secrets:
    - name: {{sf-instance-secret-name}}-r
      allkeys: true

    - name: {{sf-instance-secret-name}}-rw
      allkeys: true
Follow these steps to create the depot:

  • Step 1: Create Instance-secret to store the credentials, for more imformation about instance secret, refer to Instance Secret.
  • Step 2: Copy the template from above and paste it in a code.
  • Step 3: Fill the values for the atttributes/fields declared in the YAML-based manifest file.
  • Step 4: Apply the file through DataOS CLI.

Requirements

To connect to MongoDB using DataOS and create a MongoDB Depot, the following information is required:

  • Subprotocol: The Subprotocol of the MongoDB Server
  • Nodes: Node
  • Username: The username for authentication.
  • Password: The password for authentication.

DataOS provides the capability to connect to Opensearch data using Depot. The Depot facilitates access to all documents that are visible to the specified user, allowing for text queries and analytics. To create a Depot of Opensearch, in the type field you will have to specify type ‘ELASTICSEARCH‘, and utilize the following template:

os_v2alpha.yaml
name: {{depot-name}}
version: v1
type: depot
tags:
  - {{tag1}}
  - {{tag2}}
owner: {{owner-name}}
layer: user
depot:
  type: OPENSEARCH             
  description: {{description}}
  external: {{true}}
  connectionSecret:                
    - acl: rw
      values:
        username: {{username}}
        password: {{password}}
    - acl: r
      values:
        username: {{opensearch-username}}
        password: {{opensearch-password}}
  spec:                           
    nodes:
      - {{nodes}}
Follow these steps to create the depot:

  • Step 1: Create a manifest file.
  • Step 2: Copy the template from above and paste it in a code.
  • Step 3: Fill the values for the atttributes/fields declared in the YAML-based manifest file.
  • Step 4: Apply the file through DataOS CLI.

os_v1.yaml
name: {{depot-name}}
version: v2alpha
type: depot
tags:
  - {{tag1}}
  - {{tag2}}
owner: {{owner-name}}
layer: user
depot:
  type: OPENSEARCH           
  description: {{description}}
  external: {{true}}
  secrets:
    - name: {{sf-instance-secret-name}}-r
      allkeys: true

    - name: {{sf-instance-secret-name}}-rw
      allkeys: true
  elasticesearch:                           
    nodes:
      - {{nodes}}
Follow these steps to create the depot:

  • Step 1: Create Instance-secret to store the credentials, for more imformation about instance secret, refer to Instance Secret.
  • Step 2: Copy the template from above and paste it in a code.
  • Step 3: Fill the values for the atttributes/fields declared in the YAML-based manifest file.
  • Step 4: Apply the file through DataOS CLI.

Requirements

To establish a connection with Opensearch, the following information is required:

  • Username
  • Password
  • Nodes (Hostname/URL of the server and ports)

DataOS provides the capability to establish a connection to a database using the JDBC driver in order to read data from tables using a Depot. The Depot facilitates access to all schemas visible to the specified user within the configured database. To create a Depot of type ‘JDBC‘, utilize the following template:

jdbc_v1.yaml
name: {{depot-name}}
version: v1
type: depot
tags:
  - {{tag1}}
owner: {{owner-name}}
layer: user
depot:
  type: JDBC                                      
  description: {{description}}
  external: {{true}}
  connectionSecret:                              
    - acl: rw
      type: key-value-properties
      data:
        username: {{jdbc-username}}
        password: {{jdbc-password}}
    - acl: r
      type: key-value-properties
      data:
        username: {{jdbc-username}}
        password: {{jdbc-password}}
  spec:                                           
    subprotocol: {{subprotocol}}
    host: {{host}}
    port: {{port}}
    database: {{database-name}}
    params:
      {{"key1": "value1"}}
      {{"key2": "value2"}}
Follow these steps to create the depot:

  • Step 1: Create a manifest file.
  • Step 2: Copy the template from above and paste it in a code.
  • Step 3: Fill the values for the atttributes/fields declared in the YAML-based manifest file.
  • Step 4: Apply the file through DataOS CLI.

jdbc_v2alpha.yaml
name: {{depot-name}}
version: v2alpha
type: depot
tags:
  - {{tag1}}
owner: {{owner-name}}
layer: user
depot:
  type: JDBC                                      
  description: {{description}}
  external: {{true}}
  secrets:
    - name: {{sf-instance-secret-name}}-r
      allkeys: true

    - name: {{sf-instance-secret-name}}-rw
      allkeys: true
  jdbc:                                           
    subprotocol: {{subprotocol}}
    host: {{host}}
    port: {{port}}
    database: {{database-name}}
    params:
      {{"key1": "value1"}}
      {{"key2": "value2"}}
Follow these steps to create the depot:

  • Step 1: Create Instance-secret to store the credentials, for more imformation about instance secret, refer to Instance Secret.
  • Step 2: Copy the template from above and paste it in a code.
  • Step 3: Fill the values for the atttributes/fields declared in the YAML-based manifest file.
  • Step 4: Apply the file through DataOS CLI.

Requirements To establish a JDBC connection, the following information is required:

  • Database name: The name of the database you want to connect to.
  • Subprotocol name: The subprotocol associated with the database (e.g., MySQL, PostgreSQL).
  • Hostname/URL of the server, port, and parameters: The server's hostname or URL, along with the - port and any additional parameters needed for the connection.
  • Username: The username to authenticate the JDBC connection.
  • Password: The password associated with the provided username.

Self-signed Certificate (SSL/TLS) Requirement

If you are connecting to relational databases using the JDBC API and encounter self-signed certificate (SSL/TLS) requirements, you can disable encryption by modifying the YAML configuration file. Simply provide the necessary details for the subprotocol, host, port, database, and use the params field to specify the appropriate parameters for your specific source system as shown below:

spec:             # version v1
  subprotocol:
  host: 
  port: 
  database:
  params:
#use params for JDBC type connections where self-signed certificates have been enabled
jdbc:             # version v2alpha
  subprotocol:
  host: 
  port: 
  database:
  params:
#use params for JDBC type connections where self-signed certificates have been enabled

The particular specifications to be filled within params depend on the source system.

DataOS allows you to connect to a MySQL database and read data from tables using Depots. A Depot provides access to all tables within the specified schema of the configured database. You can create multiple Depots to connect to different MySQL servers or databases. To create a Depot of type ‘MYSQL‘, utilize the following template:

Use this template, if self-signed certificate is enabled.

mysql_v1.yaml
name: {{mysql01}}
version: v1
type: depot
tags:
  - {{dropzone}}
  - {{mysql}}
layer: user
depot:
  type: MYSQL
  description: {{"MYSQL Sample Database"}}
  spec:
    subprotocol: "mysql"
    host: {{host}}
    port: {{port}}
    params: # Required
      tls: {{skip-verify}}
  external: {{true}}
  connectionSecret:
    - acl: r
      type: key-value-properties
      data:
        username: {{username}}
        password: {{password}} 
    - acl: rw
      type: key-value-properties
      data:
        username: {{username}}
        password: {{password}}
Follow these steps to create the depot:

  • Step 1: Create a manifest file.
  • Step 2: Copy the template from above and paste it in a code.
  • Step 3: Fill the values for the atttributes/fields declared in the YAML-based manifest file.
  • Step 4: Apply the file through DataOS CLI.

mysql_v2alpha.yaml
name: {{mysql01}}
version: v2alpha
type: depot
tags:
  - {{dropzone}}
  - {{mysql}}
layer: user
depot:
  type: MYSQL
  description: {{"MYSQL Sample Database"}}
  mysql:
    subprotocol: "mysql"
    host: {{host}}
    port: {{port}}
    params: # Required
      tls: {{skip-verify}}
  external: {{true}}
  secrets:
    - name: {{sf-instance-secret-name}}-r
      allkeys: true

    - name: {{sf-instance-secret-name}}-rw
      allkeys: true
Follow these steps to create the depot:

  • Step 1: Create Instance-secret to store the credentials, for more imformation about instance secret, refer to Instance Secret.
  • Step 2: Copy the template from above and paste it in a code.
  • Step 3: Fill the values for the atttributes/fields declared in the YAML-based manifest file.
  • Step 4: Apply the file through DataOS CLI.

Requirements

To connect to a MySQL database, you need the following information:

  • Host URL and parameters: The URL or hostname of the MySQL server along with any additional parameters required for the connection.
  • Port: The port number used for the MySQL connection.
  • Username: The username for authentication.
  • Password: The password for authentication.

If self-signed certificates are not being used by your organization, you can omit the params section within the spec:

name: {{"mysql01"}}
version: v1
type: depot
tags:
  - {{dropzone}}
  - {{mysql}}
layer: user
depot:
  type: MYSQL
  description: {{"MYSQL Sample data"}}
  spec:
    host: {{host}}
    port: {{port}}
  external: true
  connectionSecret:
    - acl: rw
      type: key-value-properties
      data:
        username: {{username}}
        password: {{password}}
name: {{"mysql01"}}
version: v2alpha
type: depot
tags:
  - {{dropzone}}
  - {{mysql}}
layer: user
depot:
  type: MYSQL
  description: {{"MYSQL Sample data"}}
  mysql:
    host: {{host}}
    port: {{port}}
  external: true
  secrets:
    - name: {{nstance-secret-name}}-r
      allkeys: true

    - name: {{instance-secret-name}}-rw
      allkeys: true

DataOS allows you to connect to a Microsoft SQL Server database and read data from tables using Depots. A Depot provides access to all tables within the specified schema of the configured database. You can create multiple Depots to connect to different SQL servers or databases. To create a Depot of type ‘SQLSERVER‘, utilize the following template:

Use this template, if self-signed certificate is enabled.

mssql_v1.yaml
name: {{mssql01}}
version: v1
type: depot
tags:
  - {{dropzone}}
  - {{mssql}}
layer: user
depot:
  type: JDBC
  description: {{MSSQL Sample data}}
  spec:
    subprotocol: {{sqlserver}}
    host: {{host}}
    port: {{port}}
    database: {{database}}
    params: # Required
      encrypt: {{false}}
  external: {{true}}
  hiveSync: {{false}}
  connectionSecret:
    - acl: r
      type: key-value-properties
      data:
        username: {{username}}
        password: {{password}}  
    - acl: rw
      type: key-value-properties
      data:
        username: {{username}}
        password: {{password}}
Follow these steps to create the depot:

  • Step 1: Create a manifest file.
  • Step 2: Copy the template from above and paste it in a code.
  • Step 3: Fill the values for the atttributes/fields declared in the YAML-based manifest file.
  • Step 4: Apply the file through DataOS CLI.

mssql_v2alpha.yaml
name: {{mssql01}}
version: v2alpha
type: depot
tags:
  - {{dropzone}}
  - {{mssql}}
layer: user
depot:
  type: JDBC
  description: {{MSSQL Sample data}}
  jdbc:
    subprotocol: {{sqlserver}}
    host: {{host}}
    port: {{port}}
    database: {{database}}
    params: # Required
      encrypt: {{false}}
  external: {{true}}
  hiveSync: {{false}}
  secrets:
    - name: {{sf-instance-secret-name}}-r
      allkeys: true

    - name: {{sf-instance-secret-name}}-rw
      allkeys: true
Follow these steps to create the depot:

  • Step 1: Create Instance-secret to store the credentials, for more imformation about instance secret, refer to Instance Secret.
  • Step 2: Copy the template from above and paste it in a code.
  • Step 3: Fill the values for the atttributes/fields declared in the YAML-based manifest file.
  • Step 4: Apply the file through DataOS CLI.

Requirements To connect to a Microsoft SQL Server database, you need the following information:

  • Host URL and parameters: The URL or hostname of the SQL Server along with any additional parameters required for the connection.
  • Database schema: The schema in the database where your tables are located.
  • Port: The port number used for the SQL Server connection.
  • Username: The username for authentication.
  • Password: The password for authentication.

If self-signed certificates are not being used by your organization, you can omit the params section within the spec:

name: {{mssql01}}
version: v1
type: depot
tags:
  - {{dropzone}}
  - {{mssql}}
layer: user
depot:
  type: JDBC
  description: {{MSSQL Sample data}}
  spec:
    subprotocol: sqlserver
    host: {{host}}
    port: {{port}}
    database: {{database}}
    params: {{'{"key":"value","key2":"value2"}'}}
  external: {{true}}
  connectionSecret:
    - acl: rw
      type: key-value-properties
      data:
        username: {{username}}
        password: {{password}}
name: {{mssql01}}
version: v2alpha
type: depot
tags:
  - {{dropzone}}
  - {{mssql}}
layer: user
depot:
  type: JDBC
  description: {{MSSQL Sample data}}
  jdbc:
    subprotocol: sqlserver
    host: {{host}}
    port: {{port}}
    database: {{database}}
    params: {{'{"key":"value","key2":"value2"}'}}
  external: {{true}}
  secrets:
    - name: {{nstance-secret-name}}-r
      allkeys: true

    - name: {{instance-secret-name}}-rw
      allkeys: true

DataOS allows you to connect to an Oracle database and access data from tables using Depots. A Depot provides access to all schemas within the specified service in the configured database. You can create multiple Depots to connect to different Oracle servers or databases. To create a Depot of type ‘ORACLE‘, you can use the following template:

oracle_v1.yaml
name: {{depot-name}}
version: v1
type: depot
tags:
  - {{dropzone}}
  - {{oracle}}
layer: user
depot:
  type: ORACLE                                    
  description: {{"Oracle Sample data"}}
  spec:
    subprotocol: {{subprotocol}} # for example "oracle:thin"                                     
    host: {{host}}
    port: {{port}}
    service: {{service}}
  external: {{true}}
    - acl: r
      type: key-value-properties
      data:
        username: {{username}}
        password: {{password}}  
    - acl: rw
      type: key-value-properties
      data:
        username: {{username}}
        password: {{password}}
Follow these steps to create the depot:

  • Step 1: Create a manifest file.
  • Step 2: Copy the template from above and paste it in a code.
  • Step 3: Fill the values for the atttributes/fields declared in the YAML-based manifest file.
  • Step 4: Apply the file through DataOS CLI.

oracle_v2alpha.yaml
name: {{depot-name}}
version: v2alpha
type: depot
tags:
  - {{dropzone}}
  - {{oracle}}
layer: user
depot:
  type: ORACLE                                    
  description: {{"Oracle Sample data"}}
  oracle:
    subprotocol: {{subprotocol}} # for example "oracle:thin"                                     
    host: {{host}}
    port: {{port}}
    service: {{service}}
  external: {{true}}
  secrets:
    - name: {{sf-instance-secret-name}}-r
      allkeys: true

    - name: {{sf-instance-secret-name}}-rw
      allkeys: true
Follow these steps to create the depot:

  • Step 1: Create Instance-secret to store the credentials, for more imformation about instance secret, refer to Instance Secret.
  • Step 2: Copy the template from above and paste it in a code.
  • Step 3: Fill the values for the atttributes/fields declared in the YAML-based manifest file.
  • Step 4: Apply the file through DataOS CLI.

Requirements

To connect to an Oracle database, you need the following information:

  • URL of your Oracle account: The URL or hostname of the Oracle database.
  • User name: Your login user name.
  • Password: Your password for authentication.
  • Database name: The name of the Oracle database.
  • Database schema: The schema where your table belongs.

DataOS allows you to connect to a PostgreSQL database and read data from tables using Depots. A Depot provides access to all schemas visible to the specified user in the configured database. To create a Depot of type ‘POSTGRESQL‘, use the following template:

Use this templates, if self-signed certificate is enabled.

ps_v1.yaml
name: {{postgresdb}}
version: v1
type: depot
layer: user
depot:
  type: JDBC                  
  description: {{To write data to postgresql database}}
  external: {{true}}
  connectionSecret:           
    - acl: r
      type: key-value-properties
      data:
        username: {{username}}
        password: {{password}}  
    - acl: rw
      type: key-value-properties
      data:
        username: {{username}}
        password: {{password}}
  spec:                        
    subprotocol: "postgresql"
    host: {{host}}
    port: {{port}}
    database: {{postgres}}
    params: #Required 
      sslmode: {{disable}}
Follow these steps to create the depot:

  • Step 1: Create a manifest file.
  • Step 2: Copy the template from above and paste it in a code.
  • Step 3: Fill the values for the atttributes/fields declared in the YAML-based manifest file.
  • Step 4: Apply the file through DataOS CLI.

ps_v2alpha.yaml
name: {{postgresdb}}
version: v2alpha
type: depot
layer: user
depot:
  type: JDBC                  
  description: {{To write data to postgresql database}}
  external: {{true}}
  secrets:
    - name: {{sf-instance-secret-name}}-r
      allkeys: true

    - name: {{sf-instance-secret-name}}-rw
      allkeys: true
  postgresql:                        
    subprotocol: "postgresql"
    host: {{host}}
    port: {{port}}
    database: {{postgres}}
    params: #Required 
      sslmode: {{disable}}
Follow these steps to create the depot:

  • Step 1: Create Instance-secret to store the credentials, for more imformation about instance secret, refer to Instance Secret.
  • Step 2: Copy the template from above and paste it in a code.
  • Step 3: Fill the values for the atttributes/fields declared in the YAML-based manifest file.
  • Step 4: Apply the file through DataOS CLI.

Requirements To create a Depot and connect to a PostgreSQL database, you need the following information:

  • Database name: The name of the PostgreSQL database.
  • Hostname/URL of the server: The hostname or URL of the PostgreSQL server.
  • Parameters: Additional parameters for the connection, if required.
  • Username: The username for authentication.
  • Password: The password for authentication.

If self-signed certificates are not being used by your organization, for connection to these storage systems, then you do not need to write additional parameters within the spec section.

name: {{depot-name}}
version: v1
type: depot
tags:
  - {{tag1}}
owner: {{owner-name}}
layer: user
depot:
  type: POSTGRESQL
  description: {{description}}
  external: true
  connectionSecret:                               
    - acl: rw
      type: key-value-properties
      data:
        username: {{posgresql-username}}
        password: {{posgresql-password}}
    - acl: r
      type: key-value-properties
      data:
        username: {{posgresql-username}}
        password: {{posgresql-password}}
  spec:                                          
    host: {{host}}
    port: {{port}}
    database: {{database-name}}
    params: # Optional
      {{"key1": "value1"}}
      {{"key2": "value2"}}
name: {{depot-name}}
version: v2alpha
type: depot
tags:
  - {{tag1}}
owner: {{owner-name}}
layer: user
depot:
  type: POSTGRESQL
  description: {{description}}
  external: true
  secrets:
    - name: {{nstance-secret-name}}-r
      allkeys: true

    - name: {{instance-secret-name}}-rw
      allkeys: true
  postgresql:                                          
    host: {{host}}
    port: {{port}}
    database: {{database-name}}
    params: # Optional
      {{"key1": "value1"}}
      {{"key2": "value2"}}