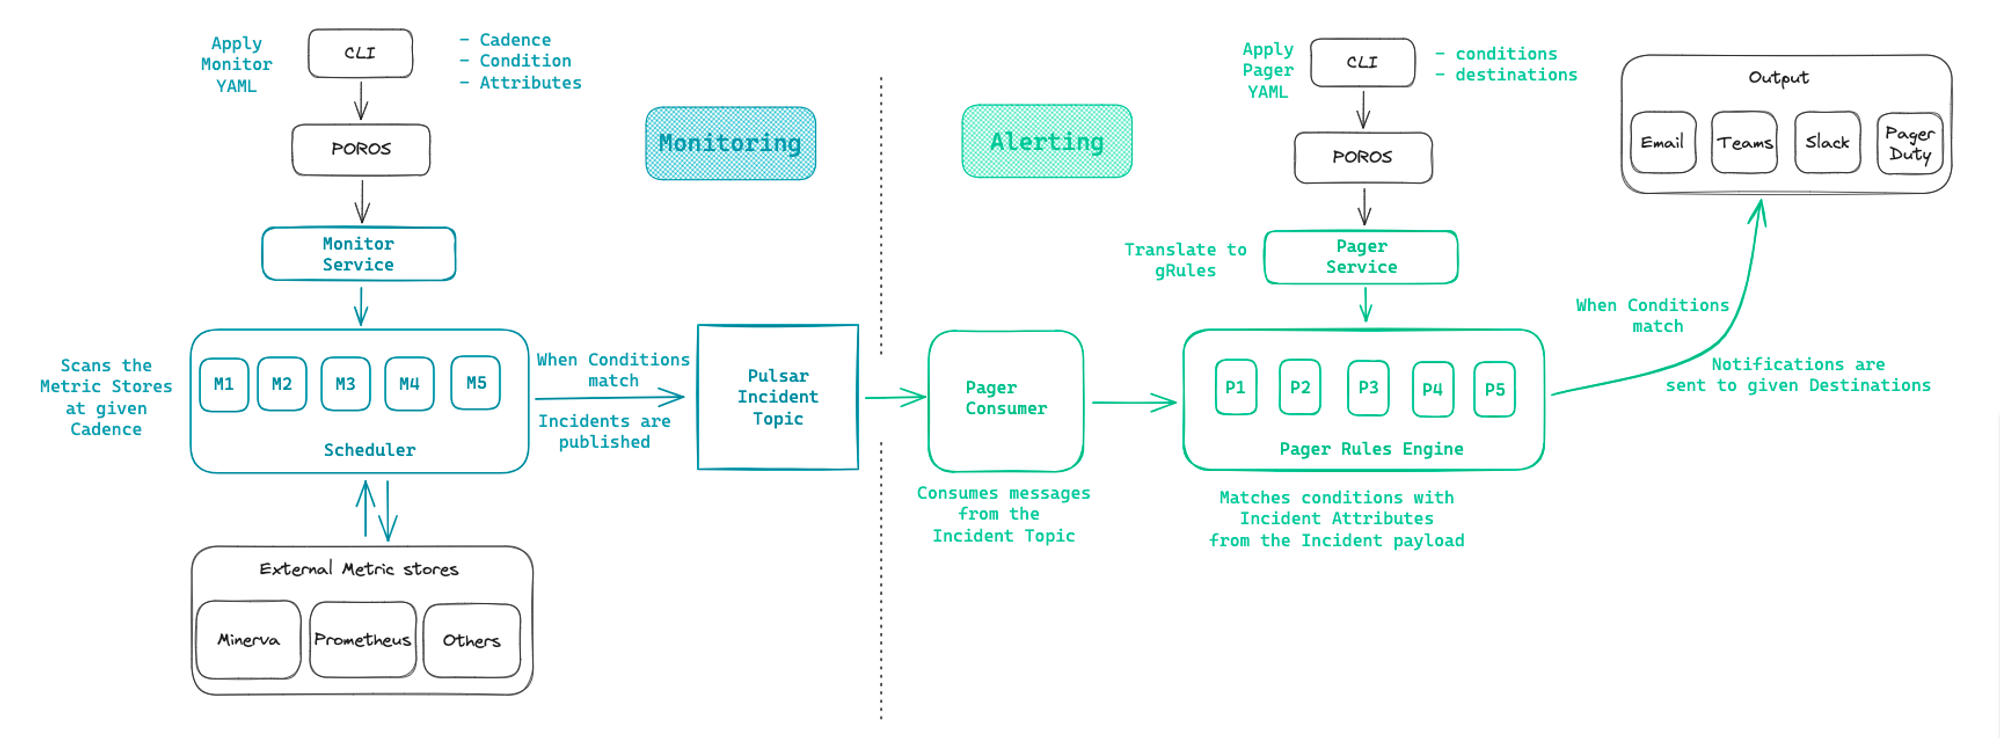
Skip to content

Pager

A Pager in DataOS is a Resource that enables data developers to specify criteria for identifying an incident within the incident stream and delivering it to a user-specified destination. It operates by evaluating pre-defined conditions against incoming incident data from the incident stream. Upon identifying a match, it triggers an alert and delivers it to the specified destination.

The Pager along with Monitor Resource comprise the backbone of the DataOS Observability and enable proactive alerting mechanism in response to specified threshold metrics and events.

  • How to create and manage a Pager?


    Learn how to create and manage a Pager in DataOS.

    Create and manage a Pager

  • How to configure the manifest file of Pager?


    Discover how to configure the manifest file of Pager by adjusting its attributes.

    Pager attributes

  • How does a Pager work?


    Understand the inner workings of a Pager within DataOS.

    Working of a Pager

  • Pager recipes


    Explore examples showcasing the usage of Pager in various scenarios.

    Pager usage examples

How to create and manage a Pager?

Create a Pager manifest

To create a Pager, the first step is to create a Pager manifest file. A sample Pager manifest is given below:

Example Pager manifest
# Resource meta section (1)
name: pager-workflow-runtime-fail-alert
version: v1alpha
type: pager
description: sends alerts to email and teams when a workflow fail to run.

# Pager-specific section (2)
pager:

  # Conditions (3)
  conditions: 
    - valueJqFilter: .properties.name
      operator: equals
      value: workflowrunfailed
    - valueJqFilter: .properties.severity
      operator: equals
      value: high

  # Output (4)
  output:
    email:
      emailTargets:
        - thor@example.com
        - ironman@example.com
    msTeams:
      webHookUrl: https://example.com/webhook
    webHook: 
      url: https://example.com/webhook
      verb: post
      headers:
        'content-type': 'application/json'
      bodyTemplate: |
        {
          "blocks": [
            {
              "type": "header",
              "text": {
                "type": "plain_text",
                "text": ":warning: Incident detected by, {{.Monitor.Name}}!"
              }
            },
            {
              "type": "section",
              "text": {
                "type": "mrkdwn",
                "text": "*Incident Type* - {{.Properties.Severity}} was observed at *Publish Time* - {{.CreateTime}}"
              }
            },
            {
              "type": "section",
              "text": {
                "type": "mrkdwn",
                "text": "{{.Monitor.Description}}"
              }
            }
          ]
        }
  1. Resource meta section within a manifest file comprises metadata attributes universally applicable to all Resource-types. To learn more about how to configure attributes within this section, refer to the link: Attributes of Resource meta section.

  2. Pager-specific section within a manifest file comprises attributes specific to the Pager Resource. This section is further subdivided into: Conditions, and Output section. To learn more about how to configure attributes of Pager-specific section, refer to the link: Attributes of Pager manifest.

  3. Conditions are defined using the information received on the incident payload against which the condition is matched. To learn more about the attributes of conditions, refer to the following link

  4. Output is the destination where the notification is delivered once the alert is triggered by the Pager Service. Learn more about the attributes of output, here.

The Pager manifest file is structurally comprised of the following sections:

Resource meta section

In DataOS, a Pager is categorized as a Resource-type. The Resource meta section within a manifest file comprises metadata attributes universally applicable to all DataOS Resources. This information is stored in the Poros database. The provided codeblock elucidates the requisite attributes for this section:

syntax_resource_pager_meta_section.yaml
# Resource-meta section
name: ${resource-name}
version: v1alpha
type: pager
tags:
  - ${tag1}
  - ${tag2}
description: ${description}
owner: ${userid-of-owner}
layer: user
pager:
  # attributes of pager-specific section
sample_resource_pager_meta_section.yaml
# Resource-meta section
name: alert-pager
version: v1alpha
type: pager
tags:
  - pager
  - slack
description: Pager for Slack
owner: iamgroot
layer: user
pager:
  # attributes of pager-specific section

For more information about the various attributes in Resource meta section, refer to the Attributes of Resource meta section.

Pager-specific section

The Pager-specific section of a Pager manifest comprises attributes-specific to the Pager Resource. This comprise of two separate sections.

Conditions

Conditions are defined using the information received on the incident payload against which the condition is matched. A single condition is a YAML mapping that is uniquely identified by a combination of three different attributes, valueJqFilter, operator and value.

A single condition can be configured within a Pager manifest by the following syntax:

pager:
  conditions:
    - valueJqFilter: ${jq-filter}
      operator: ${operator}
      value: ${value}
pager:
  conditions:
    - valueJqFilter: .properties.name
      operator: equals
      value: workflowrunfailed

Multiple conditions can be configured by specifying them as a list of mappings. Each mapping includes three separate attributes. All specified conditions are evaluated using the AND logic.

pager:
  conditions:
    - valueJqFilter: ${jq-filter}
      operator: ${operator}
      value: ${value}
    - valueJqFilter: ${jq-filter}
      operator: ${operator}
      value: ${value}
    - valueJqFilter: ${jq-filter}
      operator: ${operator}
      value: ${value}
pager:
  conditions:
    - valueJqFilter: .properties.name
      operator: equals
      value: workflowrunfailed
    - valueJqFilter: .properties.severity
      operator: equals
      value: high

The table below describes the various attributes used for defining conditions:

Attribute         Data Type Default Value Possible Value Requirement
conditions mapping none none mandatory
valueJqFilter string none valid jq filter mandatory
operator string none equals mandatory
value string none valid value mandatory

For more information about the below attributes, refer to the link: Attributes of Pager manifest.

Output

An output is the destination where the notification is delivered once the alert is triggered from the Pager Service. Currently the following destinations are supported:

  • Email
  • Microsoft Teams
  • Web Hook
pager:
  conditions:
  # ...attributes of conditions
  output: # mandatory
    email: 
      emailTargets: # mandatory
        - ${first_email}
        - ${second_email}
pager:
  conditions:
    # ...attributes of conditions
  output: # mandatory
    msTeams: 
      webHookUrl: ${web-hook-url} # mandatory

For webhooks that don't require additional authorization parameters

pager:
  conditions: # mandatory
    # ...attributes of condition
  output: # mandatory
    webHook: 
      url: ${webhook-url} # mandatory
      verb: ${http-operation} # mandatory
      headers:  <object> # optional
      bodyTemplate: <string> # optional
pager:
  conditions: # mandatory
    # ...attributes of condition
  output: # mandatory
    webHook: 
      url: https://example.com/webhook # mandatory
      verb: GET # mandatory
      headers:   # optional
        'Content-type': 'application/json'
      bodyTemplate: <string> # optional

For webhooks that require additional authorization parameters

The syntax for providing additional authorization details is provided below:

pager:
  conditions: # mandatory
    # ...attributes of condition
  output: # mandatory
    webHook: 
      url: ${webhook-url} # mandatory
      verb: GET # mandatory
      headers:  <object> # optional
      authorization: # optional
        token: ${token} # optional
        customHeader: ${customHeader} # optional
      bodyTemplate: <string> # optional
pager:
  # conditions specification
  output: # mandatory
    webHook: 
      url: ${webhook-url} # mandatory
      verb: GET # mandatory
      headers:  <object> # optional
      authorization: # optional
        token: ${token} # optional
        customHeader: ${customHeader} # optional
      bodyTemplate: <string> # optional

The table below describes the various attributes used for defining conditions:

Attribute Data Type Default Value Possible Value Requirement
output mapping none none mandatory
webhook string none valid webhook attributes mandatory
url string none valid webhook url mandatory
verb string none POST mandatory
headers string none valid api headers mandatory
authorization string none valid api headers mandatory

For more information about the below attributes, refer to the link below: Attributes of Pager

Applying a Pager manifest

Once you have created a Pager manifest, you can instantiate a Pager Resource-instance within the DataOS using the apply command on the DataOS command line interface. The command is as follows:

dataos-ctl resource apply -f ${yaml-file-path} -w ${workspace-name}

Replace the ${yaml-file-path} and ${workspace-name} with respective absolute or relative file path of the Pager manifest and the Workspace name in which the Resource is to be instantiated.

dataos-ctl resource apply -f resources/pager.yaml -w sandbox
# Expected Output
INFO[0000] 🛠 apply...                                   
INFO[0000] 🔧 applying(sandbox) bundle-pager:v1alpha:pager... 
INFO[0027] 🔧 applying(sandbox) bundle-pager:v1alpha:pager...created 
INFO[0027] 🛠 apply...complete   

Verify Pager Creation

To confirm that your Pager has been successfully created, you can verify it using two methods:

  • Check Pagers in a Workspace: Use the following command to list the Pagers created by you in a specific Workspace:
dataos-ctl get -t pager -w ${workspace-name}
dataos-ctl get -t pager -w sandbox
  • Retrieve All Pagers in a Workspace: To retrieve the list of all Pagers created in the Workspace, add the -a flag to the command:
dataos-ctl get -t pager -w ${workspace-name} -a
dataos-ctl get -t pager -w sandbox -a

You can also access the details of any created Pager through the DataOS GUI in the Resource tab of the Operations App.

Managing a Pager

Debugging a Pager

When a Pager encounters errors, data developers can employ various tactics to diagnose and resolve issues effectively. Here are the recommended debugging techniques:

  • Get Pager details

    • Retrieve detailed information about the Pager to gain deeper insights into its configuration and execution status. This can be accomplished using the following command:

      dataos-ctl resource get -t pager -w ${workspace-name} -n ${pager-name} -d
      
      dataos-ctl resource get -t pager -w sandbox -n alert-pager -d
      
    • Review the output to identify any discrepancies or misconfigurations in the Pager that could be contributing to the error.

  • Check Pager Service Logs

    • Navigate to the Operations App, and switch to its Core Kernel Tab, within the Pods section you will find the Pager API Service pod. By clicking on it you check out the Pod Details, Pod YAML, Pod Logs, and Pod Usage.

    Check Pager Service Logs

    Pager Service pod logs

    • Analyze the logs for any error messages or exceptions that might provide insights into the cause of the issue.

Deleting a Pager

To remove a specific Pager Resource-instance from the DataOS environment, you can use the delete command. There are three methods to delete a Pager:

Method 1: Delete by Name

  • Copy the name of the Lakehouse from the output table of the get command.
  • Use the name as a string in the delete command.
dataos-ctl delete -i "${name to workspace in the output table from get command}"
dataos-ctl delete -i "pager-alert | v1alpha | pager | public"

Method 2: Delete by YAML File

  • Specify the path of the YAML file containing Lakehouse configuration.

  • Use the delete command with the -f flag.

dataos-ctl delete -f ${file-path}
dataos-ctl delete -f /home/pager/v1alpha.yaml

Method 3: Delete by Workspace, Resource-type, and Name

  • Specify the Workspace, Resource-type, and Pager name in the delete command.
dataos-ctl delete -w ${workspace-name} -t pager -n ${pager-name}
dataos-ctl delete -w sandbox -t pager -n pager-alert

After executing the delete command, you will receive a confirmation message indicating successful deletion of the Pager.

How to configure a Pager manifest file?

The Pager manifest file serves as the blueprint for defining the structure and behavior of Pager Resources within DataOS. By configuring various attributes within the the Pager manifest file, data developers can customize the functionality of their Pagers to meet specific requirements. Below is an overview of the key attributes used to configure a the Pager-specific section: Attributes of a Pager manifest.

For details about the Resource meta section, refer to the Attributes of Resource meta section

How does a Pager work?

A Pager within DataOS operates by continuously monitoring the incident stream for occurrences that match predefined criteria, known as conditions. Here's a breakdown of how a Pager functions:

  1. Condition Evaluation: The Pager evaluates incoming incident data against the conditions specified in its manifest file. These conditions typically include attributes like severity, type, name of the incident, etc.

  2. Matching Criteria: When an incident matches all specified conditions, the Pager identifies it as a trigger for an alert. This matching process ensures that only relevant incidents initiate alert notifications.

  3. Alert Triggering: Upon identifying a matching incident, the Pager triggers an alert, notifying designated recipients or systems about the occurrence. The alert can be sent to various destinations such as email, Microsoft Teams, or custom webhooks.

  4. Destination Delivery: Depending on the configuration, the alert is delivered to the specified destination. For example, if the Pager is configured to send alerts via email, it will generate an email containing details of the incident and send it to the designated email addresses.

Working of a Pager

Working of a Pager

Pager recipes