Integrate semantic model with Power BI Desktop and Publish report to the Power BI Service
This document outlines the steps required to integrate Power BI with the semantic model, ensuring a seamless connection to the data product consumption layer.
Prerequisites
Before proceeding with the data gateway configuration, ensure the following components are installed:
-
Power BI Desktop version 2.132.908.0 or later (version released after June 15, 2023).
-
Power BI service account.
-
Npgsql (
v4.0.16version or before). -
Ensure that necessary ports (such as
6432) and services are whitelisted.
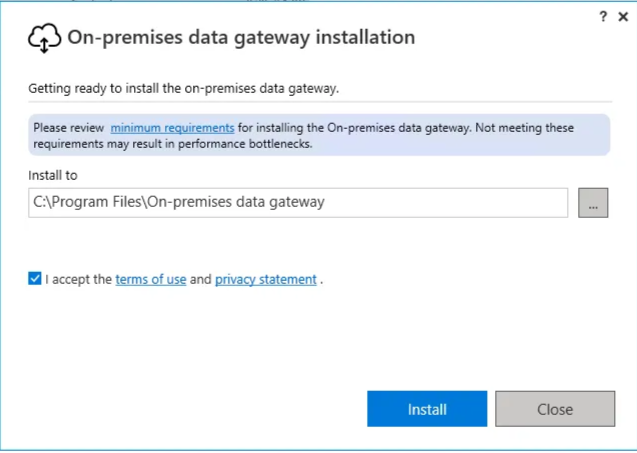
Installing the on-prem data gateway
-
Download the gateway installer from Microsoft.
-
Run the installer, keep the default installation path, accept the terms, and select Install.
-
Enter the email address for your Office 365 organization account, then select Sign in.
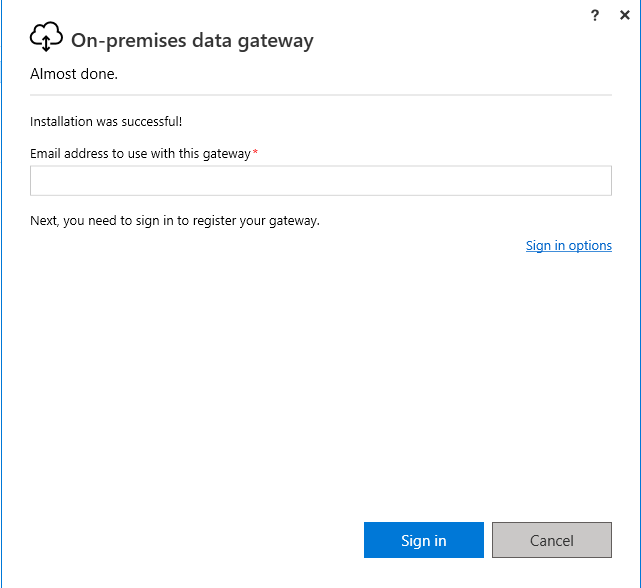
You're now signed in to your account.
-
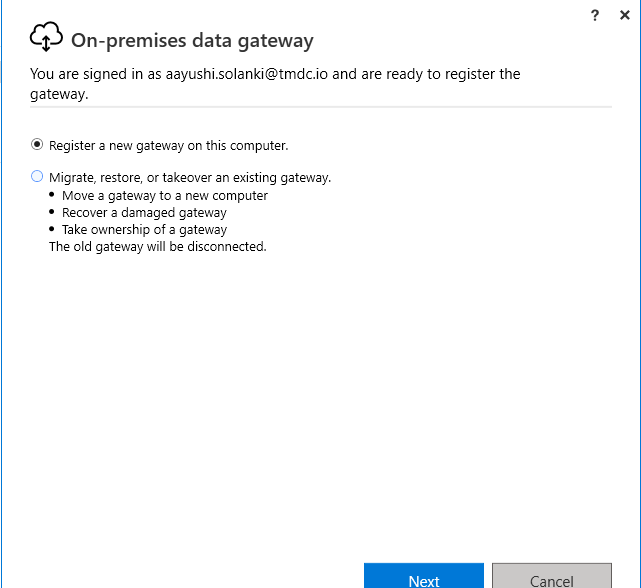
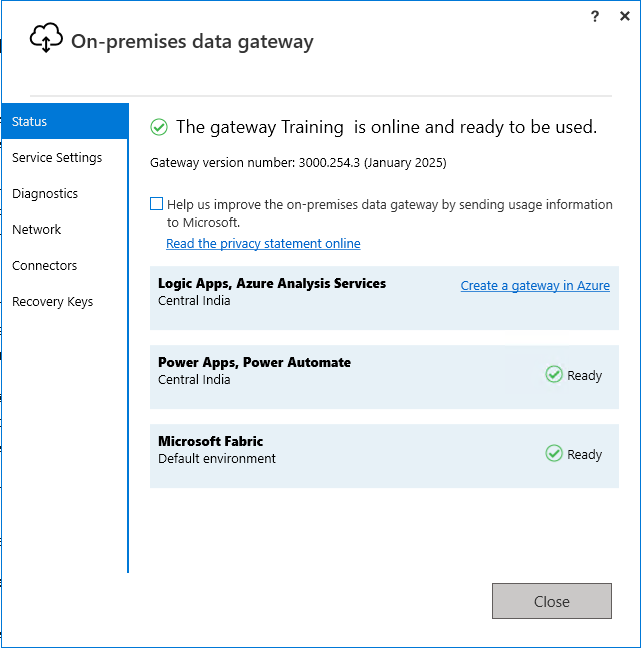
Select Register a new gateway on this computer > Next.
-
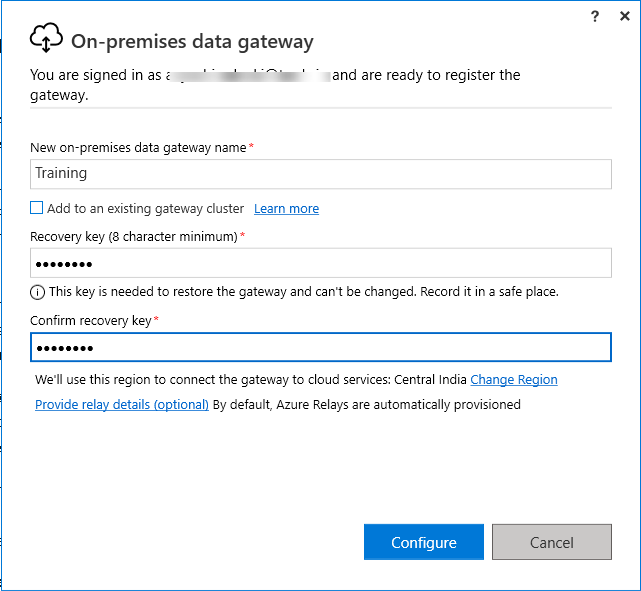
Enter a name for the gateway. The name must be unique across the tenant. Also, enter a recovery key. You'll need this key if you ever want to recover or move your gateway. Select Configure.
-
Review the information in the final window. Select Close.
Now that you've installed a gateway, install a npgsql.
Installing Npgsql for PostgreSQL connectivity
-
Download the
Npgsql.msiinstaller from GitHub Make sure to download thev4.0.16or earlier version. -
Open the installer and click Next to begin the setup.

-
Accept the terms and conditions of use and click Next.

-
Ensure you select 'Npgsql GAC Installation'. Verify that both the default-checked and unchecked files are selected before proceeding.

-
Click 'Install' to begin the installation.

-
Once completed, click Finish to exit the setup wizard.
Create and publish a Power BI Desktop report
Follow the steps below to integrate the productaffinity semantic model with Power BI Desktop, create a basic report, and publish it to the Power BI Service.
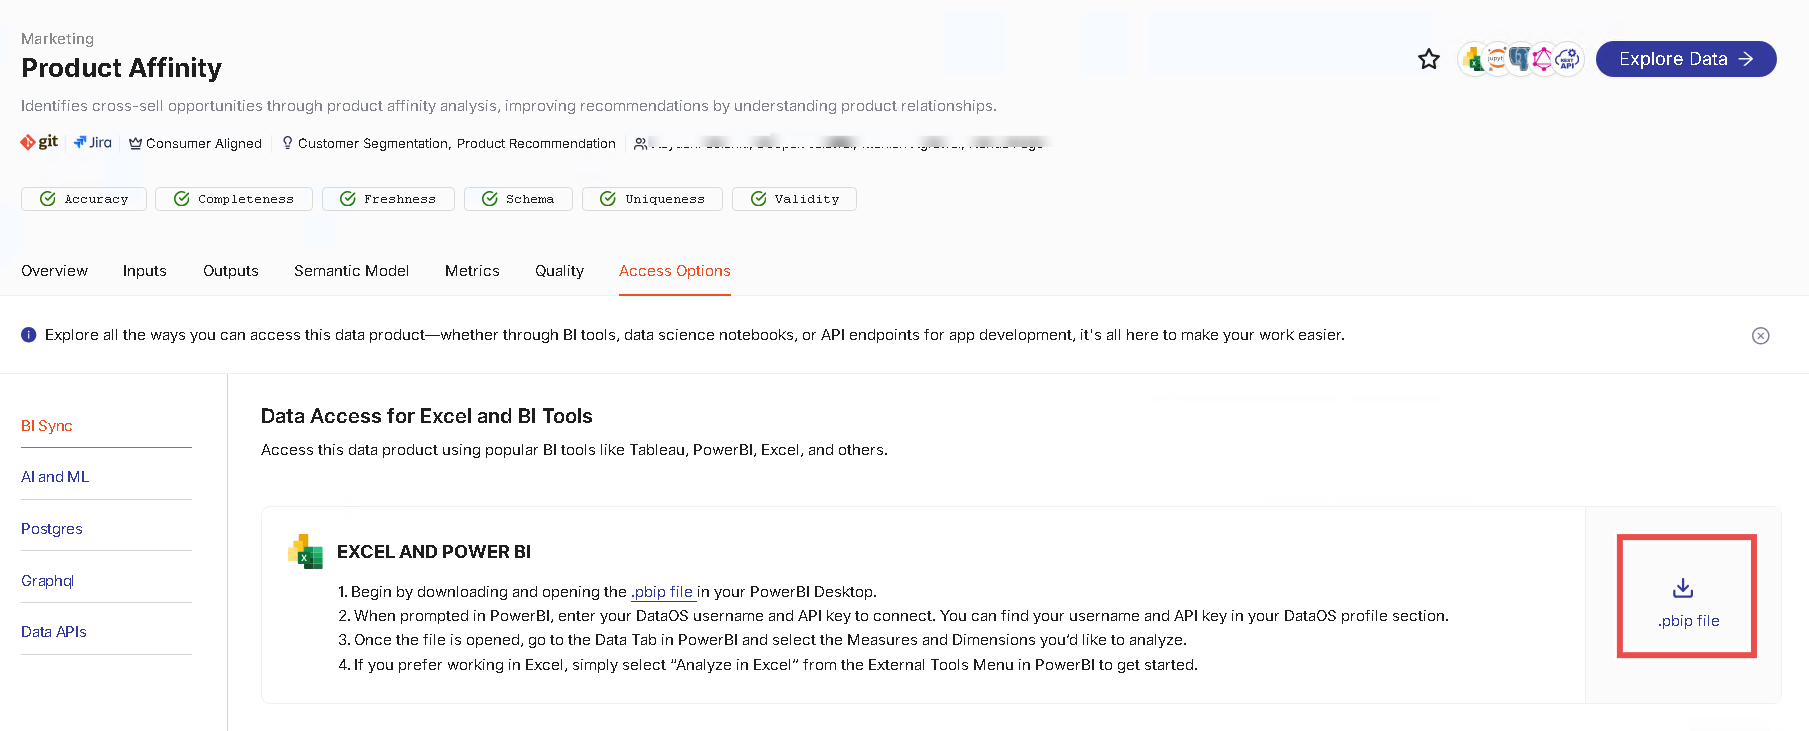
Step 1: Navigate to the BI sync option
In Data Product Hub, choose a Data Product let's say product-affinity Navigate to the Access Options tab on the Data Product Hub application on DataOS. Within a specific Data Product, and under the BI Sync options, select 'Excel and Power BI'. Click on the download icon to download the .pbip file.
Step 2: Extract the files
Once downloaded, locate the ZIP file in your file manager and extract it to your desired destination. The necessary files will then be available.

The folder stores the main components of a Power BI project for syncing the semantic model (here Product Affinity). Here is the brief description of each:
-
public_productaffinity.Report: This folder contains
definition.pbirfile related to the report definition in Power BI. It stores the report metadata such as the version and dataset reference in JSON format. -
public_productaffinity.SemanticModel: This folder contains files that define the underlying data model for Power BI project. The semantic model plays a crucial role in managing how Power BI interacts with data, setting up relationships, and measures.
-
definition.bism: Contains the overall definition of a semantic model and core settings. This file also specifies the supported semantic model definition formats through the 'version' property.
-
model.bim: The model.bim file is a JSON file that contains the Tabular Model Scripting Language (TMSL) definition of a Power BI semantic model. It's used to create a database from scratch by defining objects such as measures, tables, and connection sources.
-
-
public_productaffinity.pbip: The
.pbipfile contains a pointer to a report folder, opening a.pbipopens the targeted report and model.
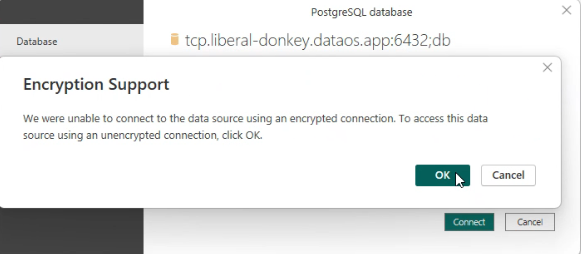
Step 4: Open the file in Power BI and connect
Open the public_productaffinity file in Power BI Desktop. A popup will appear prompting you to enter your 'DataOS username' and 'API key'.
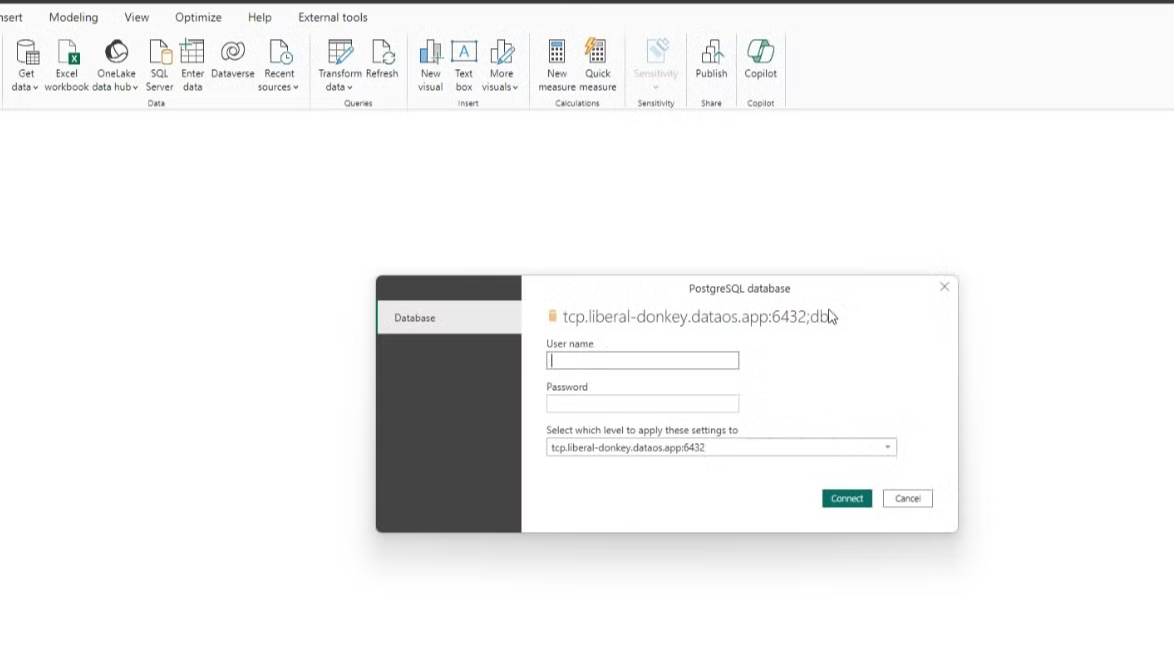
After entering your credentials, click 'Connect'. A confirmation popup will appear; click 'OK' to proceed.
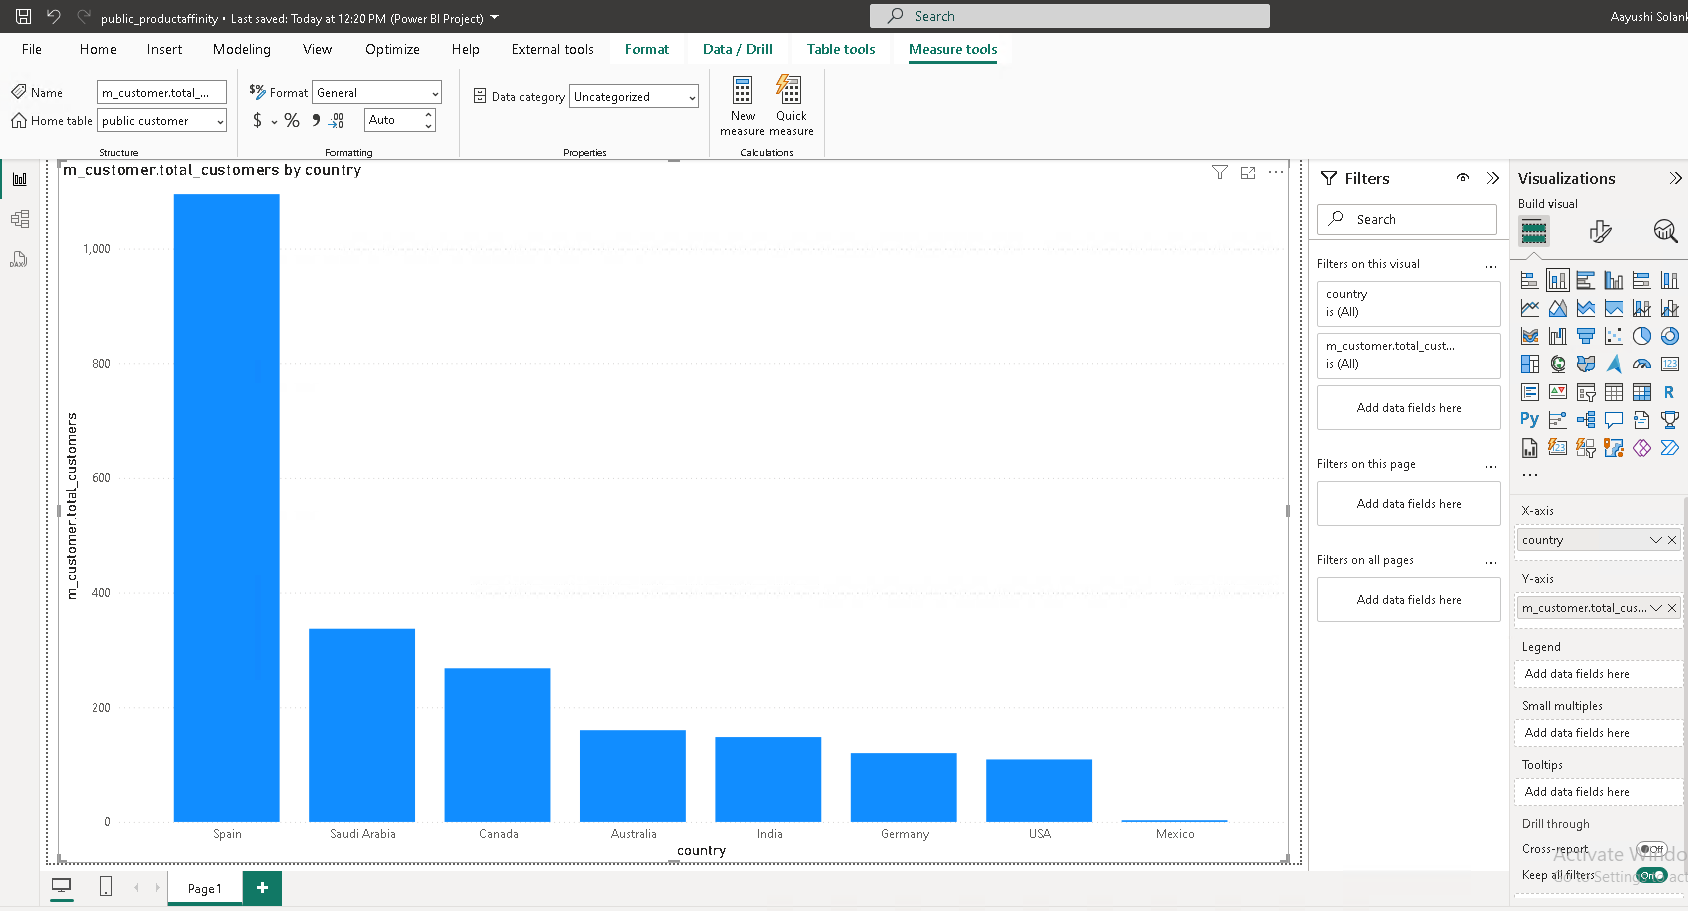
Customize and create your report as required.
Step 5: Publish the report to PowerBI Service Account
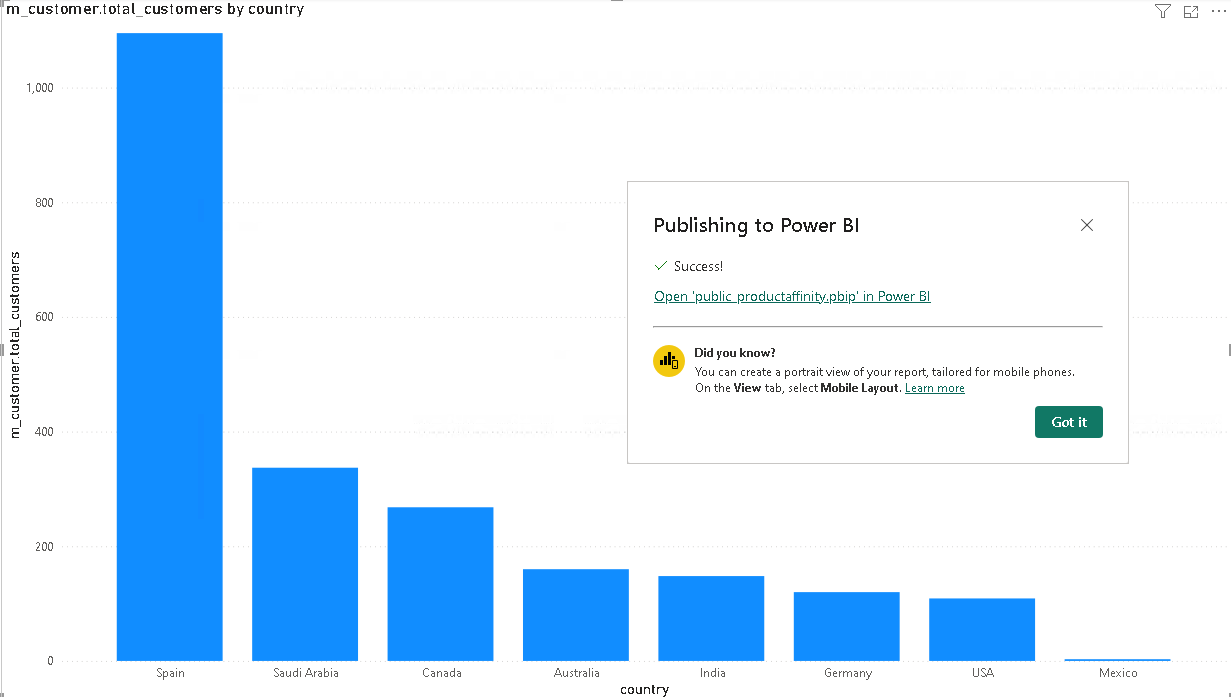
On the Home tab, select Publish.
On the Publish to Power BI screen, choose My Workspace, and then select Select. Sign in to the Power BI service if necessary.
When the Success message appears, select Open productaffinity.pbip in Power BI. If prompted, sign in to your Power BI service account to complete the process.
Configuring a data gateway for PostgreSQL interface
In Power BI Desktop, you connected directly to your on-premises PostgreSQL interface. In the Power BI service, you need a data gateway to act as a bridge between the cloud and your on-premises network. Follow these steps to add your on-premises PostgreSQL interface as a data source to a gateway and connect your semantic model to this data source.
Add a Gateway connection
To connect Power BI to the on-premises PostgreSQL interface via the data gateway, follow these steps:
-
In Power BI Service, navigate to the workspace where the semantic model has been published.
-
Locate the
productaffinitysemantic model in the content list.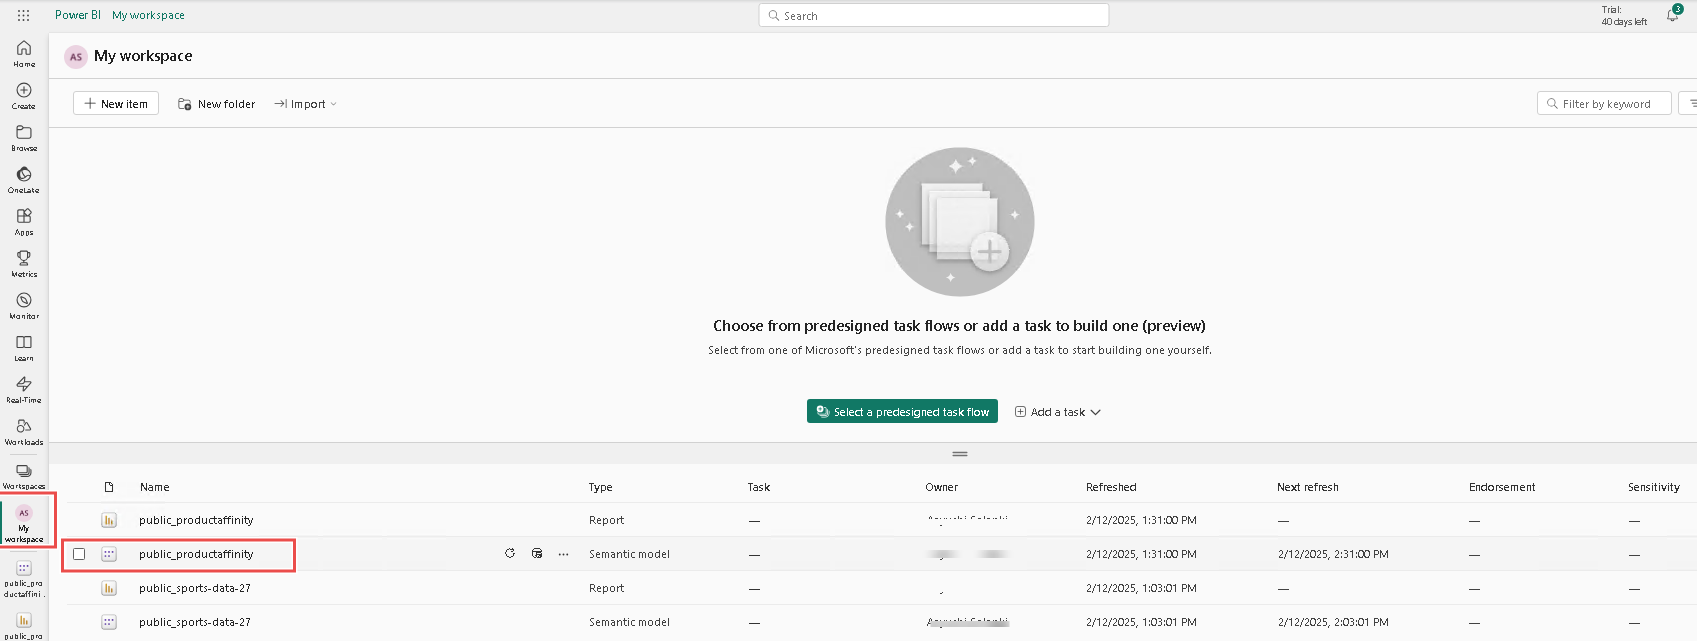
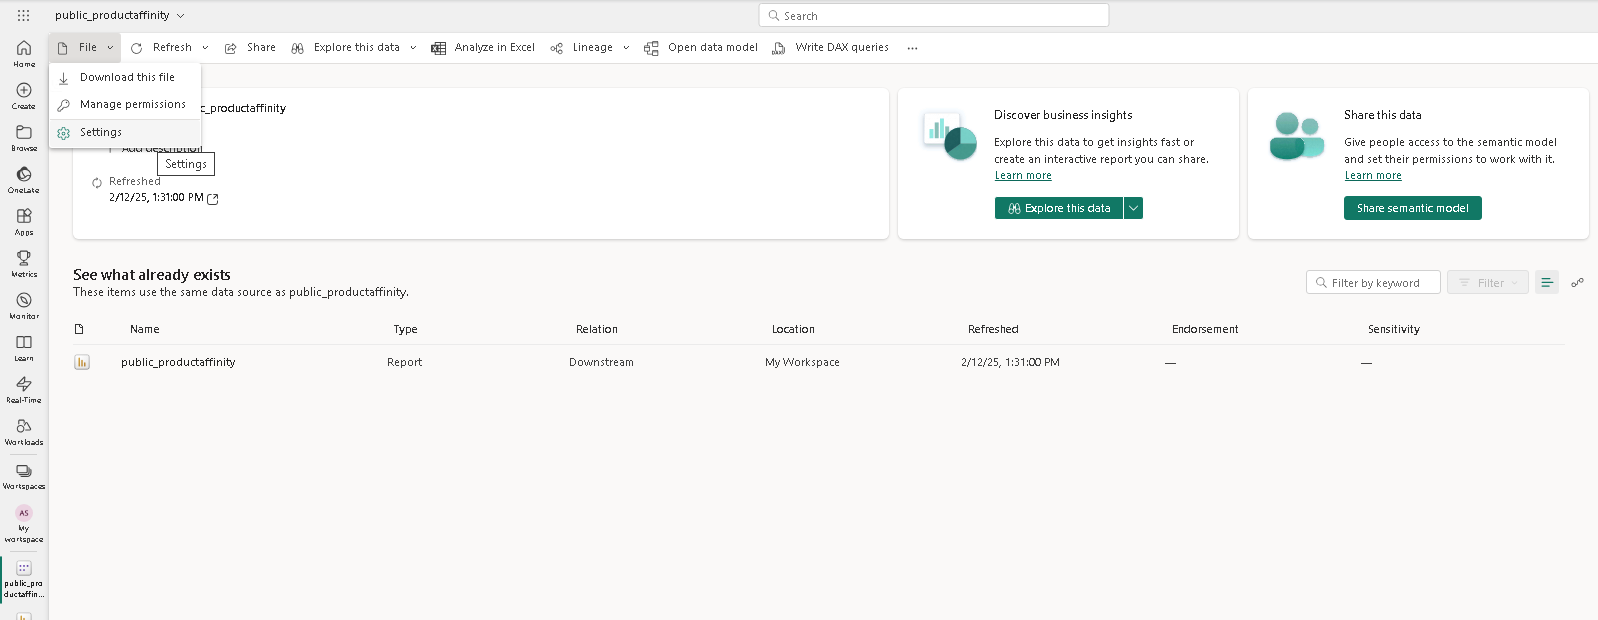
-
From the File dropdown, select Settings.
-
In the Settings screen, locate and expand the Gateway and cloud connections section, and click the Create a connection button.
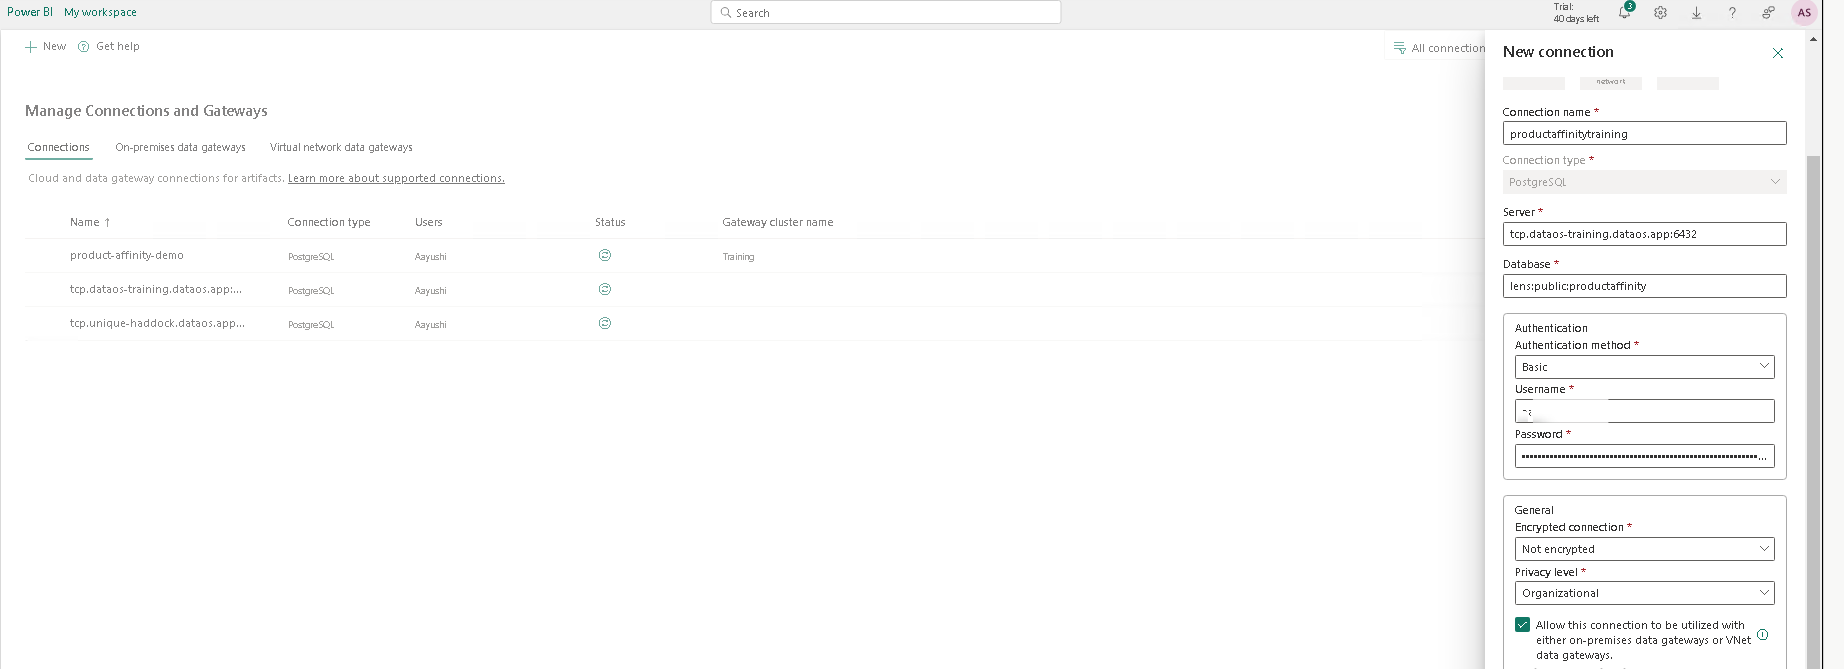
-
A New Connection screen will appear, here ensure On-premises is selected and complete the following fields(some fields are pre-configured):

-
Complete the following fields(some fields are pre-configured):
- Gateway Cluster Name: Enter or verify the configured gateway name.
- Connection Name: Provide a descriptive name (e.g.,
productaffinity-testing). - Connection Type: Ensure PostgreSQL interface is selected.
- Server: Enter the PostgreSQL interface instance (e.g.,
tcp.dataos-training-dataos.app:6432). - Database: Specify the database name (e.g.,
lens:public:productaffinity). - Authentication: Select Basic authentication and enter the UserID and API Key (retrievable from the DataOS profile page).
- General encryption: The encrypted connection should be set to 'Not encrypted'.
After filling out the required fields, click Add to create the connection.
-
In the Settings screen, verify that the data gateway is running under the configured name (e.g.,
productaffinity-testing). Click Apply.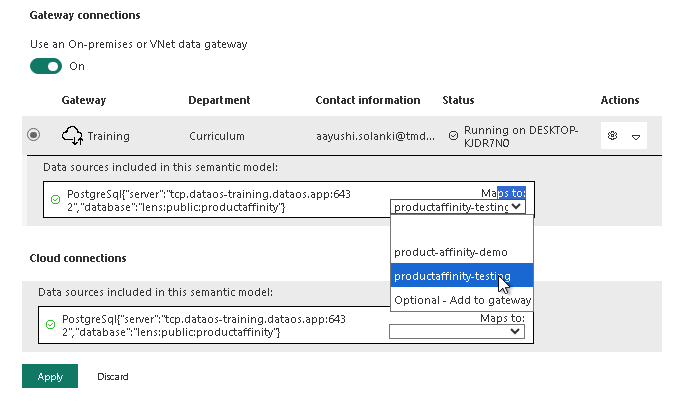
-
Click the
public_productaffinityreport icon to confirm the connection is active.
Supported data types
| Category | Data Types | Support Status |
|---|---|---|
| Dimension | time, string, number, boolean |
Supported |
| Measure | max, min, number, sum, count, boolean, string, time, avg, count_distinct |
Supported |
| Measure | count_distinct_approx |
Not Supported |
| Rolling Window | - | Not Supported (Power BI doesn’t support) |
Important considerations
- In Power BI, measures typically have an 'm_' prefix to indicate they represent a measure. For example, a measure calculating total revenue might be named
m_total_revenue. - The connection is live, meaning any changes to the underlying data will be reflected in Power BI.
- When schema changes occur, such as CRUD operations (Create, Read, Update, Delete) on dimensions, measures, or other elements of the semantic model, a re-sync is required. To prevent losing previously created reports after the re-sync, download the
.pbipfolder from the Data Product Hub, extract the contents, and replace the existing.SemanticModelfolder with the new.SemanticModel.
Best practices
Adhering to best practices ensures you effectively utilize the Data Product Hub and maintain compatibility with the latest features and updates. Following these guidelines will help optimize workflow, enhance performance, and prevent potential issues.
File handling
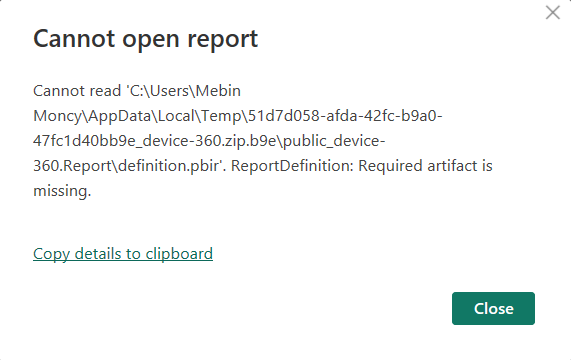
Ensure .pbip folders are fully extracted before opening them. Failure to do so may result in missing file errors, as shown below:
Data retrieval and field selection considerations
It is important to select fields from tables that are directly related or logically joined, as the system does not automatically identify relationships between tables through transitive joins. Selecting fields from unrelated tables may result in incorrect or incomplete results.
Troubleshooting
Connection reset
If you encounter a 'connection reset' error during Power BI Desktop sync as shown below:
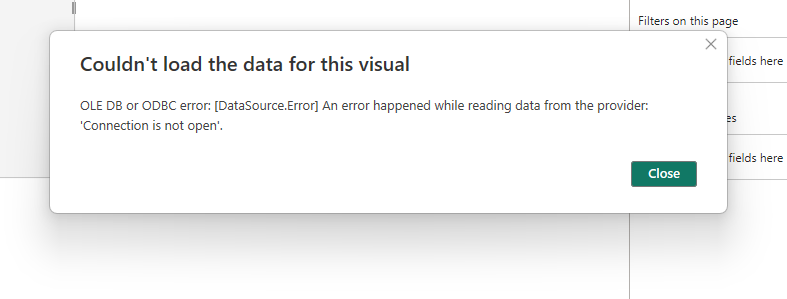
- Go to the Home tab in Power BI Desktop.
- Click the Refresh button in the Queries section.

This should resolve the error and restore the sync.
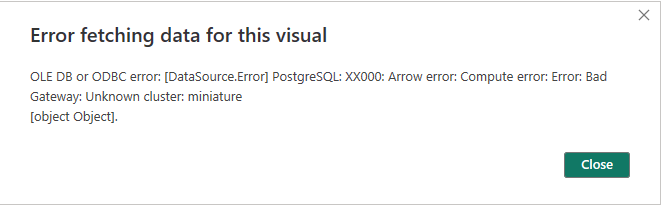
Unknown cluster
Whenever you encounter the error 'unknown cluster:
Limitations
- Power BI fails to handle special characters (e.g.,) when generating queries through the synced semantic model, causing errors in visualizations. Thus, it is best practice to address or remove special characters directly in the data itself.
- Power BI's Direct Query mode does not support creating custom dimensions and measures or querying the rolling window measure due to the lack of date hierarchy.
- DAX functions and Import query mode are not supported.
Governance of semantic model on Power BI Service
Data masking policies are enforced based on the user who creates and registers the gateway connection for the semantic model in PowerBI Service.
FAQs
-
Can models be synced directly to Power BI Service?
No, the semantic model must first be synced via Power BI Desktop. Direct synchronization to the Power BI Service is not supported.
-
How does the Power BI Service connection work?
To establish a connection between the Power BI Service and DataOS, an on-premises data gateway is required. This acts as a secure bridge between Power BI’s cloud environment and on-premises infrastructure hosting the data source.
Prerequisites include:
-
Microsoft Gateway application must be installed and configured.
-
Npgsql driver version 4.0.16 or earlier must be installed. During installation, the “Npgsql GAC Installation” option should be selected.
Connection setup process:
-
Install the Microsoft gateway application and the Npgsql driver.
-
Publish the .pbip report from Power BI Desktop to Power BI Service.
Steps:
-
Navigate to the semantic model and open File > Settings.
-
Enable the on-premises gateway toggle.
-
Create a new connection by specifying a unique connection name.
-
Provide DataOS username and API token for authentication.
-
Set the connection type to "Not encrypted".
-
Map this connection to the configured gateway.
Once these steps are completed, the Power BI Service can communicate with the DataOS semantic model through the gateway.
-
-
How does governance work in Power BI Service?
Governance is enforced through access control and semantic data policies at the gateway connection level.
Access control mechanisms:
Each data product requires a distinct connection setup in Power BI Service. The connection includes specific details such as host, port, and database name for the model. Authentication must be done using a valid DataOS username and API token.
Permission management:
Data masking and filtering policies are applied based on the user who creates the gateway connection. This user must either be the owner of the semantic model or have administrative rights within the workspace. These policies are enforced automatically across dashboards and reports, ensuring secure access and compliance.
-
How does Power BI sync work when syncing Model-First Data Products?
Once the report is published from Desktop to the Power BI Service, a semantic model is created but initially contains no data. To enable data access and interaction:
-
The Power BI On-Premises Data Gateway must be configured to link the published semantic model to its data source in DataOS. This gateway acts as a bridge between the cloud-based Power BI Service and the on-premises PostgreSQL interface exposed by DataOS.
-
Queries from visuals in Power BI Service are routed through the npgsql driver via the gateway to the Postern Service.
-
The Postern Service sends the query to the PgSQL API, which translates and executes it on the relevant Data Sources.
Results are returned along the same path back to Power BI Service for rendering in the dashboard.
-
-
What connection mode does Power BI use to connect to DataOS when working with a ‘model-first data product’?
Power BI uses the DirectQuery mode to connect to DataOS. This connection is established through the Postern service, which routes queries from Power BI Desktop or Service to the appropriate semantic model in Lens. As a result, visuals are refreshed in real-time based on live data, with refresh latency depending on the performance of the data source.
-
Where does the computation happen for the Power BI semantic model sync?
Computation is performed at two levels:
-
Within DataOS, where the Lens service translates semantic queries into the appropriate source-specific SQL syntax.
-
Within the data source itself, where the query is executed and the results are returned.
-
-
What data sources are supported to sync the model-first data product to Power BI?
All data sources that are compatible with Lens-based semantic modeling can be synchronized with Power BI. You can find the full list of supported data sources here.
If you are not using model-first data products and want to connect directly to Power BI use the Presto ODBC Driver.
-
Do we need to register a separate connection for each ‘model-first data product’ in Power BI Service?
Yes, each model-first data product must be registered independently through the Power BI On-Premises Data Gateway. The connection credentials and configuration must be provided for every unique semantic model to ensure secure and isolated access.
-
Do semantic model changes reflect directly in Power BI Service upon refresh?
No, changes made to the Lens-based semantic model do not automatically propagate to the Power BI Service. Users must republish the updated .pbip file from Power BI Desktop to Service to reflect semantic updates in dashboards or reports.
-
Is custom measure and dimension creation supported for model-first data products in Power BI?
No, custom definitions are not supported in Power BI when using model-first data products. All logic must be implemented in the semantic model using Lens. To support frequent measure changes, work directly with physical data. More guidance is available here.
-
What are the known limitations when syncing model-first data products to Power BI?
No direct publishing:
Semantic model updates cannot be published directly from the Lens interface to Power BI Service. Manual download and project replacement are required.
Gateway dependency:
Power BI Service must use the On-Premises Data Gateway and the Npgsql driver to connect with PostgreSQL-based semantic models. PostgreSQL is not supported natively in Power BI cloud-based DirectQuery sources.
Special character handling:
Power BI has limited support for special characters in semantic models. It is recommended to resolve such characters either in the raw dataset or during semantic modeling within DataOS.