Database: First Steps
Create a Database
To create a Database, the first step is to create a Database manifest file. But before creating a Database Resource, ensure you have required use-cases assigned.
Get Appropriate Access Permission Use Case
In DataOS, different actions require specific use cases that grant the necessary permissions to execute a task. You can grant these use cases directly to a user or group them under a tag, which is then assigned to the user. The following table outlines various actions related to Database Resource and the corresponding use cases required:
| Action | Required Use Cases |
|---|---|
| Get | Read Workspaces, Read Resources in User Specified Workspace / Read Resources in User Workspaces (for public and sandbox workspaces) |
| Create | Create and Update Resources in User Workspace |
| Apply | Create and Update Resources in User Workspace |
| Delete | Delete Resources in User Workspace |
| Log | Read Resource Logs in User Workspace |
To assign use cases, you can either contact the DataOS Operator or create a Grant Request by creating a Grant Resource. The request will be validated by the DataOS Operator.
Create a manifest file
To create a Database Resource, data developers can define a set of attributes in a manifest file, typically in YAML format, and deploy it using the DataOS Command Line Interface (CLI) or API. Below is a sample manifest file for Database Resource:
Sample Database manifest
The manifest for creating a Database has the following two sections, each requiring specific configuration:
Resource meta section
In DataOS, a Database is categorized as a Resource-type. The Resource meta section within the manifest file encompasses attributes applicable to all Resource-types. The provided manifest file elucidates the requisite attributes for this section:
To configure a Database Resource, replace the values of name, layer, tags, description, and owner with appropriate values. For additional configuration information about the attributes of the Resource meta section, refer to the link: Attributes of Resource meta section.
Database-specific section
The Database-specific section of a Database manifest comprises attributes-specific to the Database Resource.
database:                            # Specify the resource type
  migrate:
    includes:
      - migrations/
    includesInline:
      migration: |                    # Address to all migrations (relative path)
        CREATE TABLE Product (
        id INT PRIMARY KEY AUTO_INCREMENT,
        name VARCHAR(100),
        price DECIMAL(10, 2),
        description TEXT);
    command: up  # Specify the migration command (e.g., "up" or "drop table")
  compute: runnable-default
Migrate Configuration
The migration in Database Resource typically involves defining changes to a Database schema, such as creating or altering tables, adding or modifying columns, or establishing relationships between tables.
Example migration
    CREATE TABLE user (
    user_id INT PRIMARY KEY,
    username VARCHAR(50),
    email VARCHAR(100),
    created_at TIMESTAMP
    );
    INSERT INTO user (user_id, username, email, created_at) VALUES
    (1, 'JohnDoe', 'john@example.com', '2024-03-29 10:00:00'),
    (2, 'JaneSmith', 'jane@example.com', '2024-03-29 11:00:00'),
    (3, 'AliceJones', 'alice@example.com', '2024-03-29 12:00:00');

    -- Removing the added column
    ALTER TABLE users
    DROP COLUMN IF EXISTS created_at;
There are two ways to define migrations: .
- Embed an external directory for migration.
- Provide the migration within the Database manifest.
To embed an external scripts for migration, create a folder with name say migration. In your migration folder, create a new SQL file, e.g., 001_migration_up.sql, and write the migration script to define the changes to the Database schema.
Inline migration involves embedding migration logic directly within the manifest file. While simpler to implement for small projects, it may lead to complexity for long complex migrations.
📖 Best Practice
- Numeric Prefixing: Prefix filenames with a numeric sequence for a clear execution order.
-
File Naming Format: Use
<anything>.up.sqland<anything>.down.sqlfor migration files.- Example:
Database Migrations
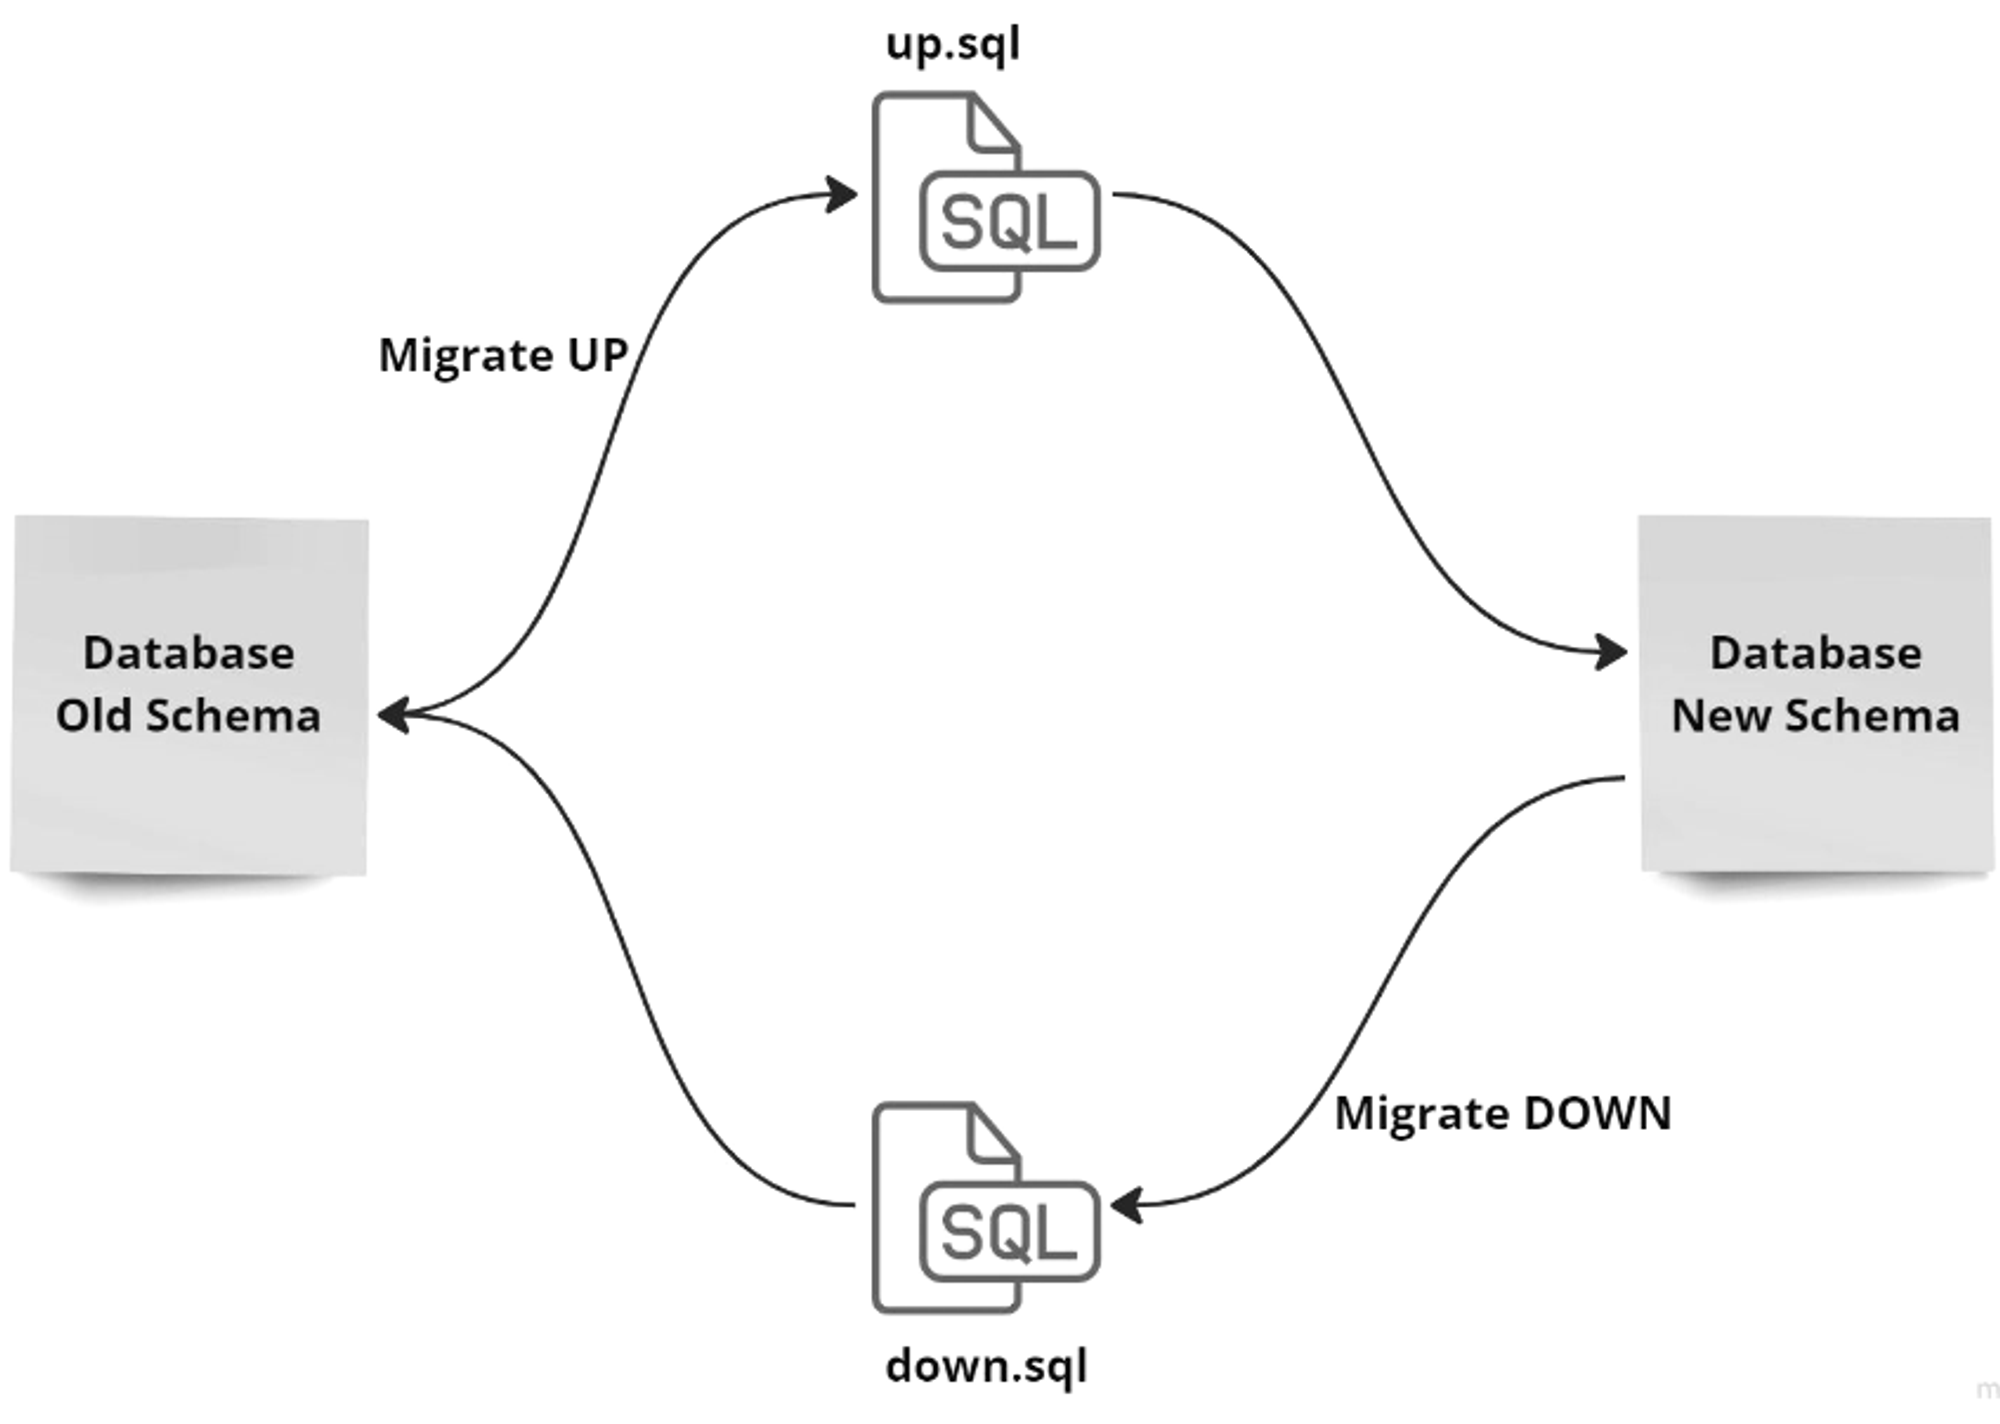
The Database attribute migrate consists of two commands, one to migrate up and another to migrate down. The up migration is responsible for applying changes to the database schema, facilitating the transition to a newer version. Conversely, the down migration serves the purpose of reverting changes made by the "up" migration. This is crucial for scenarios requiring a rollback to a previous version. Below is an example SQL script (001_migration_down.sql) demonstrating actions taken.
Apply the Database manifest
After successfully creating the Database manifest, it’s time to apply manifest. To apply the Database manifest file to create a Resource-instance within the DataOS environment, utilize the apply command.
Manage a Database
Verify Database creation
To check the successful creation of Database in DataOS Workspace use the following two methods:
Check the Database in a Workspace: Use the following command to list the created Database in a specific Workspace:
dataos-ctl resource get -t database -w curriculum

# Expected Output
|    NAME     | VERSION |   TYPE    |  WORKSPACE  | STATUS | RUNTIME |     OWNER       |
|-------------|---------|-----------|-------------|--------|---------|-----------------|
| products_db |   v1    | database  | curriculum  | active |         |     iamgroot    |
|  products   | v1      | database  |   public    | active |         |    wonderwoman  |
|  sampledb01 | v1      | database  |   public    | active |         | captainamerica  |
If the status is ‘active’, re run or use -r to refresh the command to get runtime as ‘succeeded’.
Alternatively, you can also use the following command:
dataos-ctl get -t database -w curriculum

# Expected Output
|    NAME     | VERSION |   TYPE    |  WORKSPACE  | STATUS | RUNTIME |     OWNER       |
|-------------|---------|-----------|-------------|--------|---------|-----------------|
| products_db |   v1    | database  | curriculum  | active |         |     iamgroot    |
|  products   | v1      | database  |   public    | active |         |    wonderwoman  |
|  sampledb01 | v1      | database  |   public    | active |         | captainamerica  |
Retrieve all Databases in a Workspace:
To retrieve the list of all Databases created in the Workspace, add the -a flag to the command:
Getting Database logs
Deleting a Database
As part of best practices, it is recommended to regularly delete Resources that are no longer in use. This practice offers several benefits, and reducing costs.
There are 3 ways to delete Database(or any Resource):
This method deletes database(or any) based on direct specification of type, name, and workspace.
This method deletes based on a specific identifier string obtained from a status query.
Create a Beacon Service
Create a Beacon Service to expose the PostgreSQL database on API. The syntax for the Beacon Service manifest file is provided below:
  version: v1
  name: customers-test1
  type: service
  service:
    replicas: 1
    ingress:
      enabled: true
      stripPath: true
      path: /customersdb/api/v1    # naming of path what you want but formatting is neccessary.
      noAuthentication: true
    stack: beacon+rest
    compute: runnable-default
    envs:
      PGRST_OPENAPI_SERVER_PROXY_URI: https://emerging-hawk.dataos.app/customersdb/api/v1

    stackSpec:
      source:
        type: database
        name: customersdb
        workspace: public
    topology:
      - name: database
        type: input
        doc: customers database connection
      - name: rest-api
        type: output
        doc: serves up the customers database as a RESTful API
        dependencies:
          - database
Apply the Service manifest
Verify Service creation
To check the successful completion of Service use the following command:
dataos-ctl resource get -t service -w curriculum

#Expected output

```bash
      NAME      | VERSION |  TYPE   | WORKSPACE  | STATUS |  RUNTIME  |     OWNER
----------------|---------|---------|------------|--------|-----------|-----------------
  employee-test | v1      | service | curriculum | active | running:1 | iamgroot
  product-test  | v1      | service | curriculum | active | running:1 | iamgroot
  products-test | v1      | service | curriculum | active | running:1 | iamgroot
you can now access the PostgreSQL database using the exposed API by
To validate the outcome, execute a request to the designated URL:
Expected Output
This action will enable verification of the expected result by accessing the provided endpoint.
Deleting a Service
As you deleted Database, in same manner you can delete the Service after use.
There are 3 ways to delete Service(or any Resource):
Next Steps
Database Resource is used to store data on the fly. Your next steps depend upon whether you want to learn about what you can do with the database, here are some how to guides to help you with that process: