Securing Deployed Apps on DataOS
Information
This quick guide covers the implementation of different levels of authentication and authorization for a Streamlit Calculator app. By using DataOS services like Heimdall and Bifrost, the app provides secure and fine-grained access control for its users.
What’s Covered?
The application includes:
- Service-Level Authentication: Ensures users are authenticated with DataOS before accessing the app.
- Application-Level Authorization: Grants access to the Calculator application for authorized users.
- Operation-Level Authorization: Manages specific permissions, such as operations users are allowed to perform (e.g., multiplication, division) based on predicates defined.
Refer to the steps and code walkthrough for Authentication and Authorization Logic.
1. Service Level Authentication
The first step is to ensure that the application user is authenticated as a DataOS user. The code checks for existing credentials stored in the local storage cookies. If no credentials are found, the user is redirected to the DataOS homepage for login.
- Local Storage Cookies: The function retrieves user credentials from cookies and checks if the user is authenticated.
- Redirect Logic: If the user is not authenticated, they are redirected to DataOS for login.
def authenticator(user_info, nav_url = url):
    # Function to authenticate users with DataOS
    if user_info == {}:
        # User is not authenticated, redirect to DataOS homepage
        nav_to(url=nav_url)
    else:
        # User authenticated successfully, allow access to app
        set_to_local_storage_permanent('authenticated', True)
Click here to view the complete Code: authentication.py
'''
This module contains the code for the Authentication screen
'''

# Importing required packages/modules and importing functions from app modules
import streamlit as st, time, os, json
from javascript import set_to_local_storage_permanent, nav_to

def animated_progress_bar():
    '''This function creates the progress bar that we see on authentication screen'''

    # Custom Progress Bar CSS
    st.markdown(""" <style> .stProgress > div > div > div > div { background-color: #0192CD; height: 1px; width: 500px; max-width: 100%; } .stProgress > div > div > div { height: 1px; width: 500px; max-width: 50%; position: absolute; top: 50%; left: 50%; transform: translate(-50%, -50%); } </style>""",unsafe_allow_html=True)

    # Total time of progress bar in seconds
    completion_time = 5
    progress_bar = st.progress(0)
    status_text = st.empty()

    # This loop create the percentage text beneath the progress bar
    for i in range(100):
        sleep_time = completion_time / 100  # Calculate sleep time per iteration
        time.sleep(sleep_time)
        progress_bar.progress(i + 1)
        status_text.markdown(f"<div style='font-family: Inter, sans-serif;padding-top:3px; font-size: 13px; color: var(--primaryTextColor); position: absolute; top: 50%; left: 50%; transform: translate(-50%, -50%);'>{i + 1}% Complete</div>",unsafe_allow_html=True)

# Calling Environment variable
file = open("/etc/dataos/config/secret.conf")
secret_json = json.load(file)

url = secret_json['DATAOS_ENV']

def authenticator(user_info, nav_url = url):
    '''This function compares the value of user_info variable value fetched from local storage in loading_resources.py
      and run conditions based on that.
      User will be redirected to DataOS Home page if he is not a user of DataOS or never performed DataOS login on UI for that environment
      otherwise user will be able to use the app'''

    # CSS for all elements
    st.markdown(f""" <style> @import url('https://fonts.googleapis.com/css2?family=Inter:wght@300&display=swap'); .login-text {{ font-family: 'Inter', sans-serif; font-weight: 300; font-size: 30px; color: var(--primaryTextColor); display: flex; justify-content: center; align-items: center; height: 100%;  }} .success-failure-text {{ font-family: 'Inter', sans-serif; font-weight: 300; font-size: 20px; color: color: var(--primaryTextColor); display: flex; justify-content: center; align-items: center; height: 100%; }} </style> """, unsafe_allow_html=True)

    login_text_col = st.columns([0.35,1.30,.35])
    with login_text_col[1]:

        # Header 1
        st.markdown('<p class="login-text">Please wait, verifying your DataOS Credentials</p>', unsafe_allow_html=True)

        # Calling animated_progress_bar() function to create progress bar on screen after header
        animated_progress_bar()

        # Redirecting user to DataOS Home Page
        if user_info == {}:
            cred_success_col = st.columns([0.35,1.30,.35])
            st.write("")
            st.write("")

            # Redirect/ Login text
            st.markdown('<p class="success-failure-text">Verification failed. Redirecting to DataOS Home Page</p>', unsafe_allow_html=True)
            time.sleep(1.5)

            # Navigating to DataOS Home Page
            nav_to(url=nav_url)

            print("\nAuthentication Failed, Redirecting User to DataOS Home page\n")
        else:
            # Sets authenticated variable in browsers local storage to True, this will prevent this functions execution for authenticated DataOS users
            set_to_local_storage_permanent('authenticated', True)

            cred_success_col = st.columns([0.35,1.30,.35])

            # Redirect/ Login text
            with cred_success_col[1]:
                st.markdown('<p class="success-failure-text">Successfully verified. Starting the app</p>', unsafe_allow_html=True)

            print("\nSuccessfully verified. Starting the app\n")

            # Update Session State so that next page can be loaded
            st.session_state["page"] = 2

            print("\nPage value is now updated to 2\n")

            # Extra delay so that user can see Redirect/ Login text
            time.sleep(2)
            st.rerun()
2. Configuring PEP for App-Level Authorization
You need to configure your application as Policy Enforcement Point (PEP) in Bifrost. While doing this, you can decide who can access the Application or who can perform the specific operations within the application.
Here, we'll demonstrate how to incorporate this logic in the code for a Calculator app. Users will be authorized to perform certain operations, like multiplication and division. We'll define authorization atoms, and configure access permissions on Bifrost. Once this setup is complete, you simply assign the use case to a user in Bifrost to enable access to the application.
To create PEP:
-
Log in to DataOS and navigate to Bifrost application.
-
Click on Heimdall primitives > Providers.

-
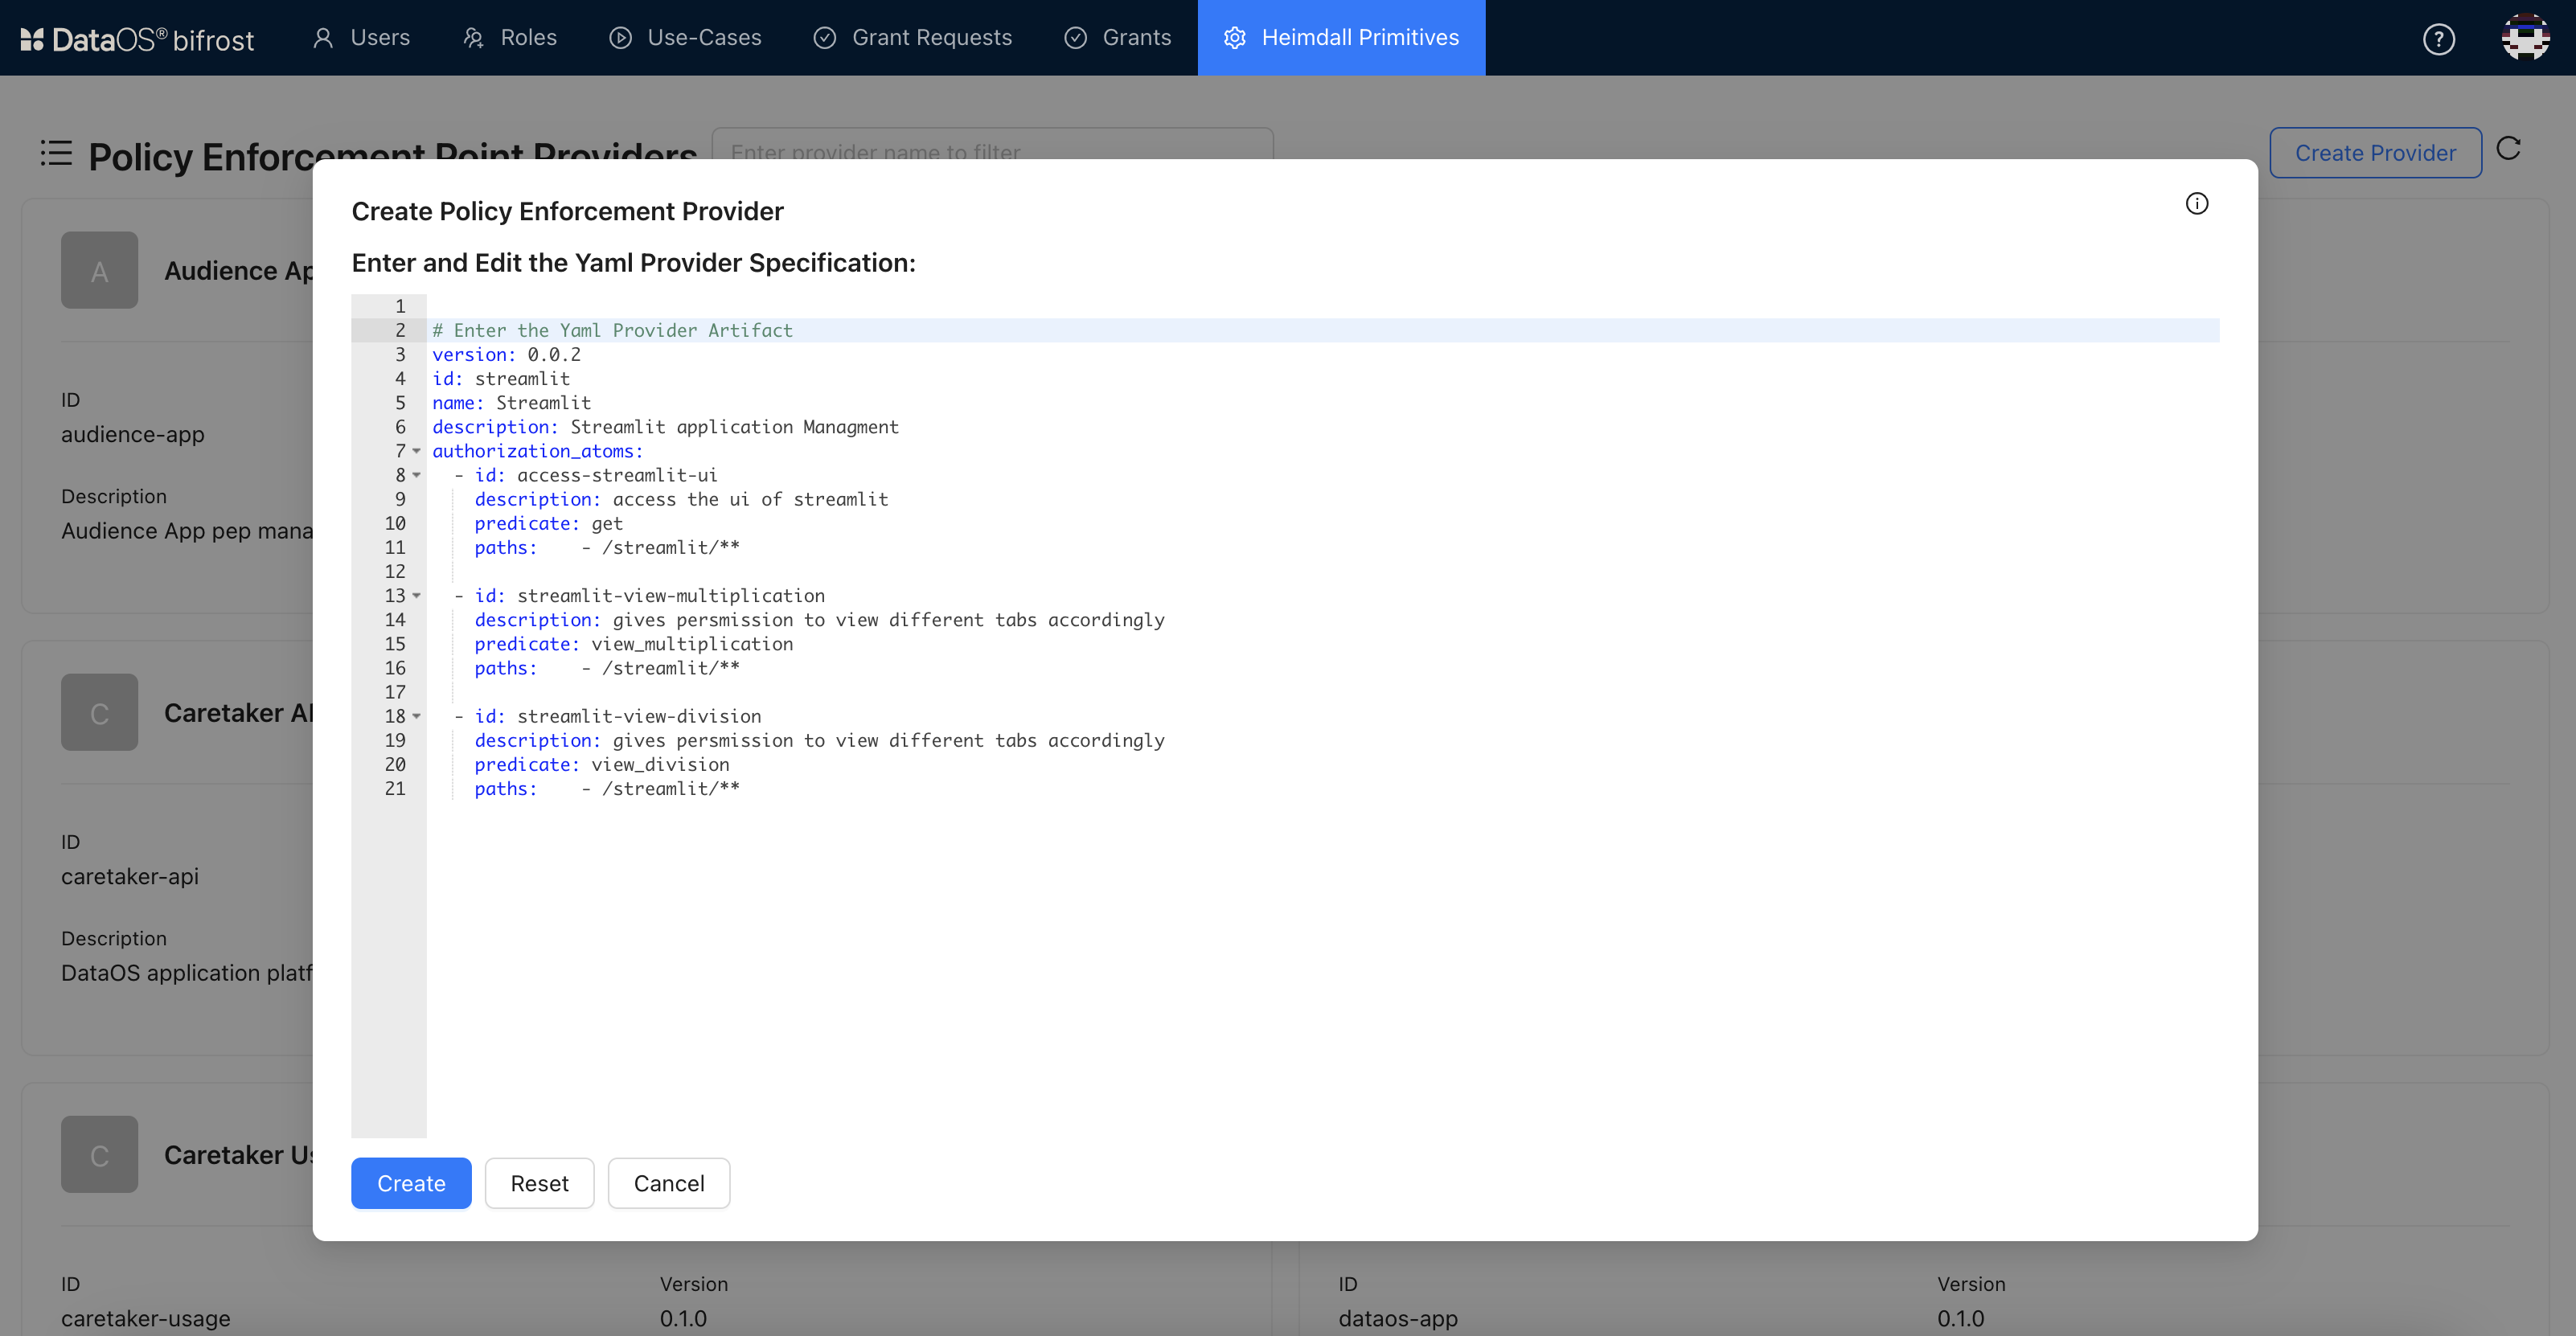
Define the authorization atoms and predicates in the YAML format. For the Calculator app, predicates like
“get","view_multiplication"or"view_division"are defined.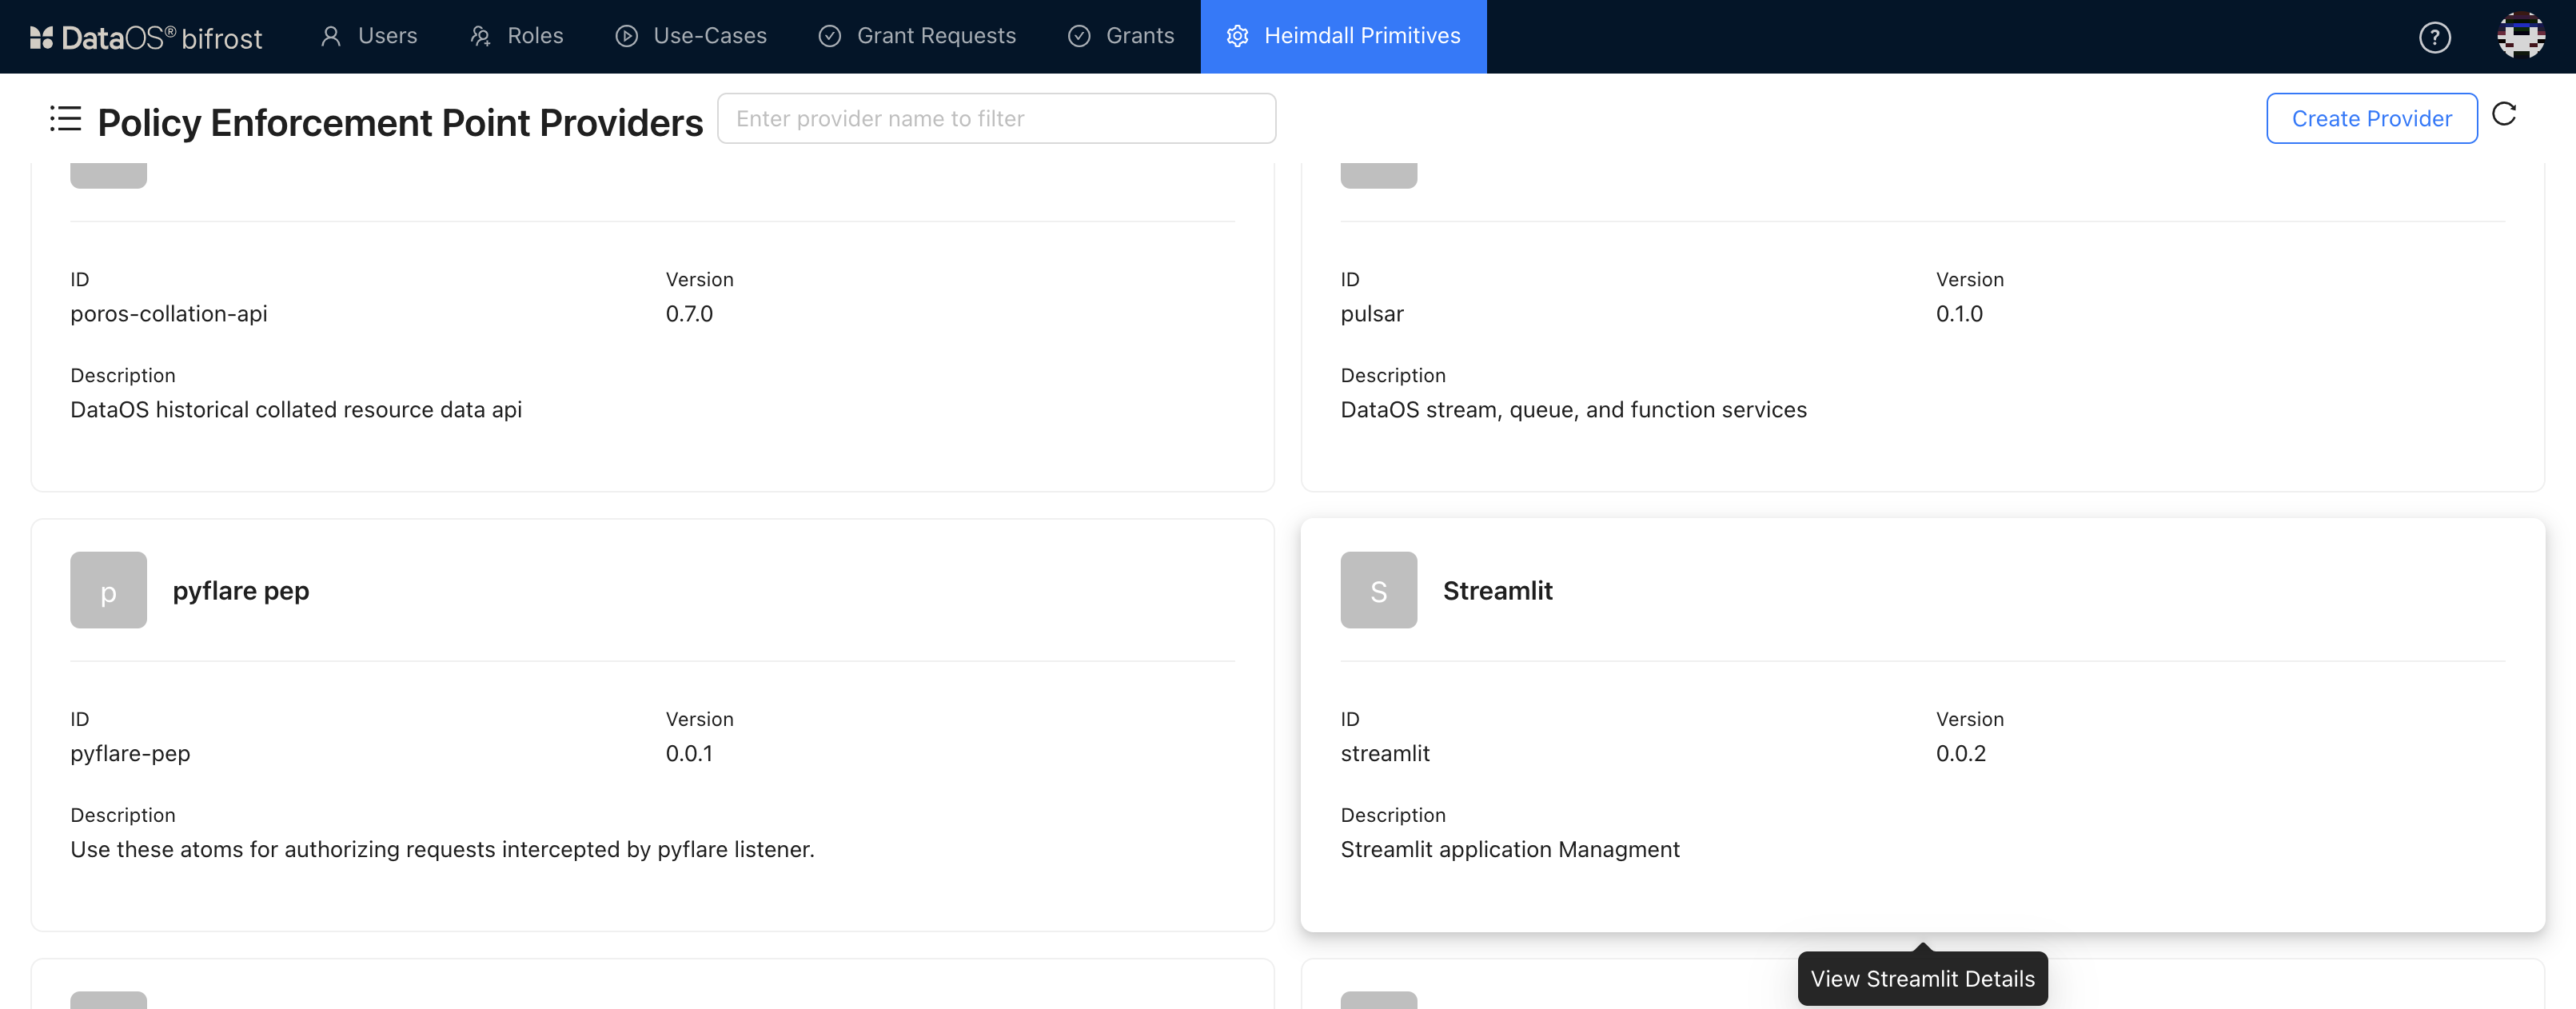
-
Click on Create button. Bifrost PEP created atoms for granular level access.
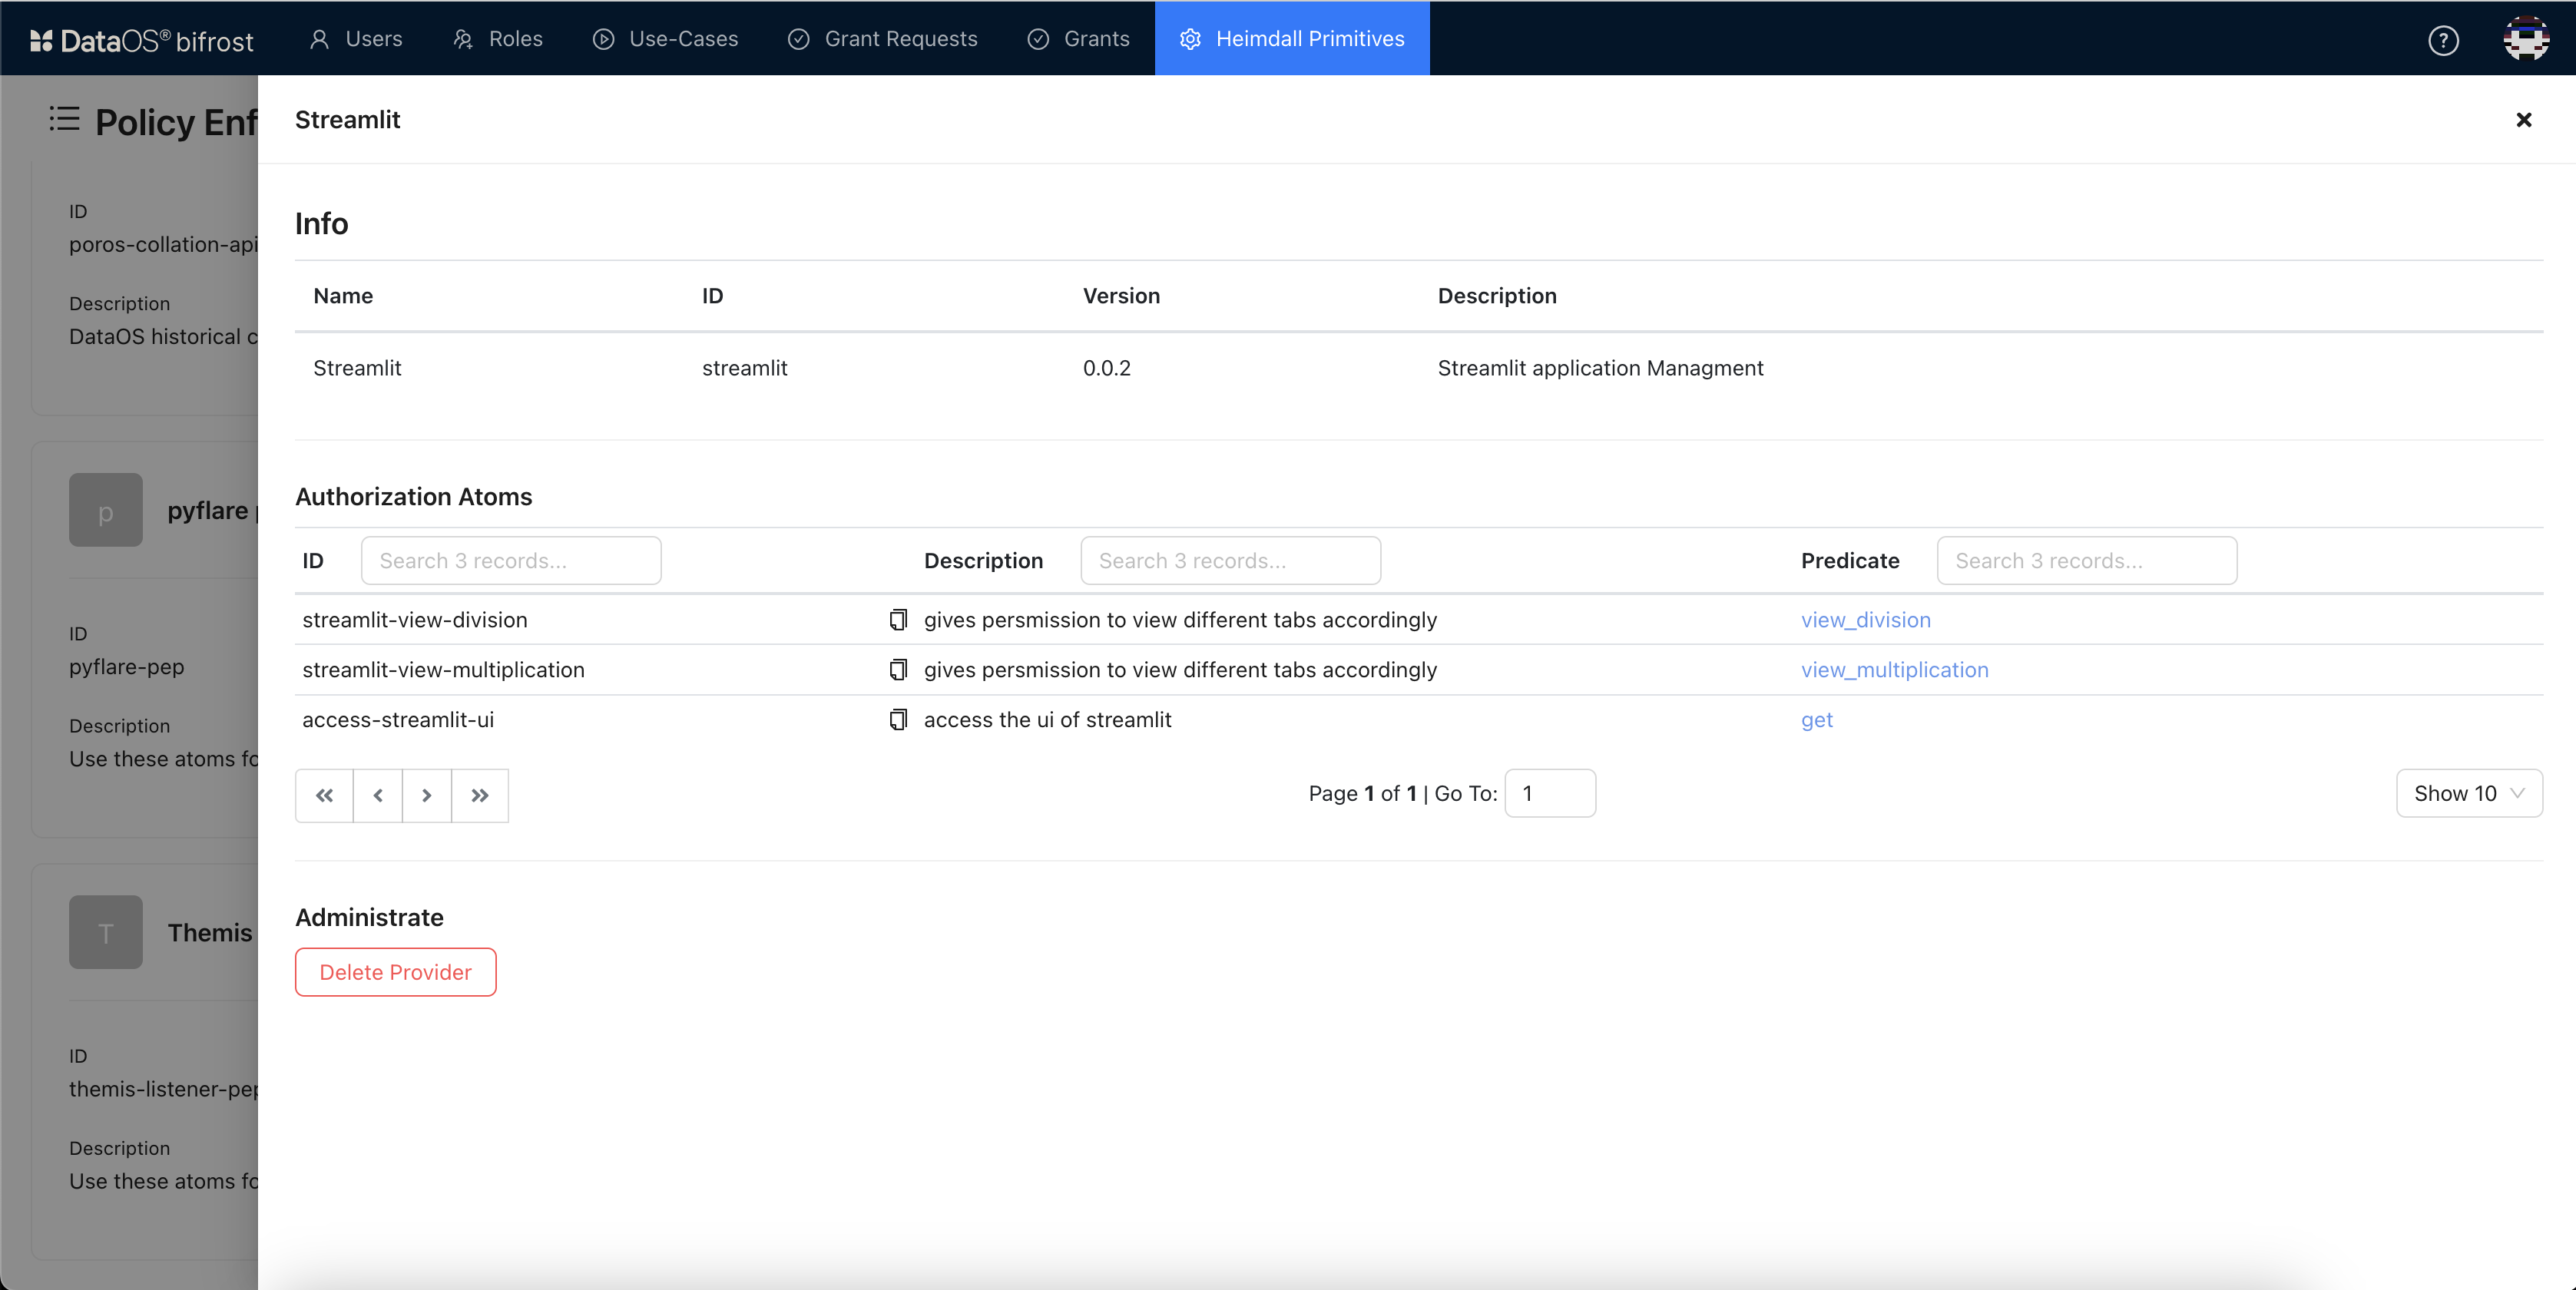
-
You can see the details of atoms created with their respective predicates information.
Click here to see the YAML for PEP.
# Enter the Yaml Provider Artifact
version: 0.0.2
id: streamlit
name: Streamlit
description: Streamlit application Management
authorization_atoms:
  - id: access-streamlit-ui
    description: access the ui of streamlit
    predicate: get
    paths:
    - "${path}"
  - id: streamlit-view-multiplication
    description: gives permission to view different tabs accordingly
    predicate: view_multiplication
    paths:
    - "${path}"
  - id: streamlit-view-division
    description: gives permission to view different tabs accordingly
    predicate: view_division
    paths:
    - "${path}"
3. Defining Use-Cases for Permissions in Bifrost
- Go to the Use-cases tab and click on Create Use-case button.
-
Provide the use-case id and corresponding atoms as defined during PEP creation.
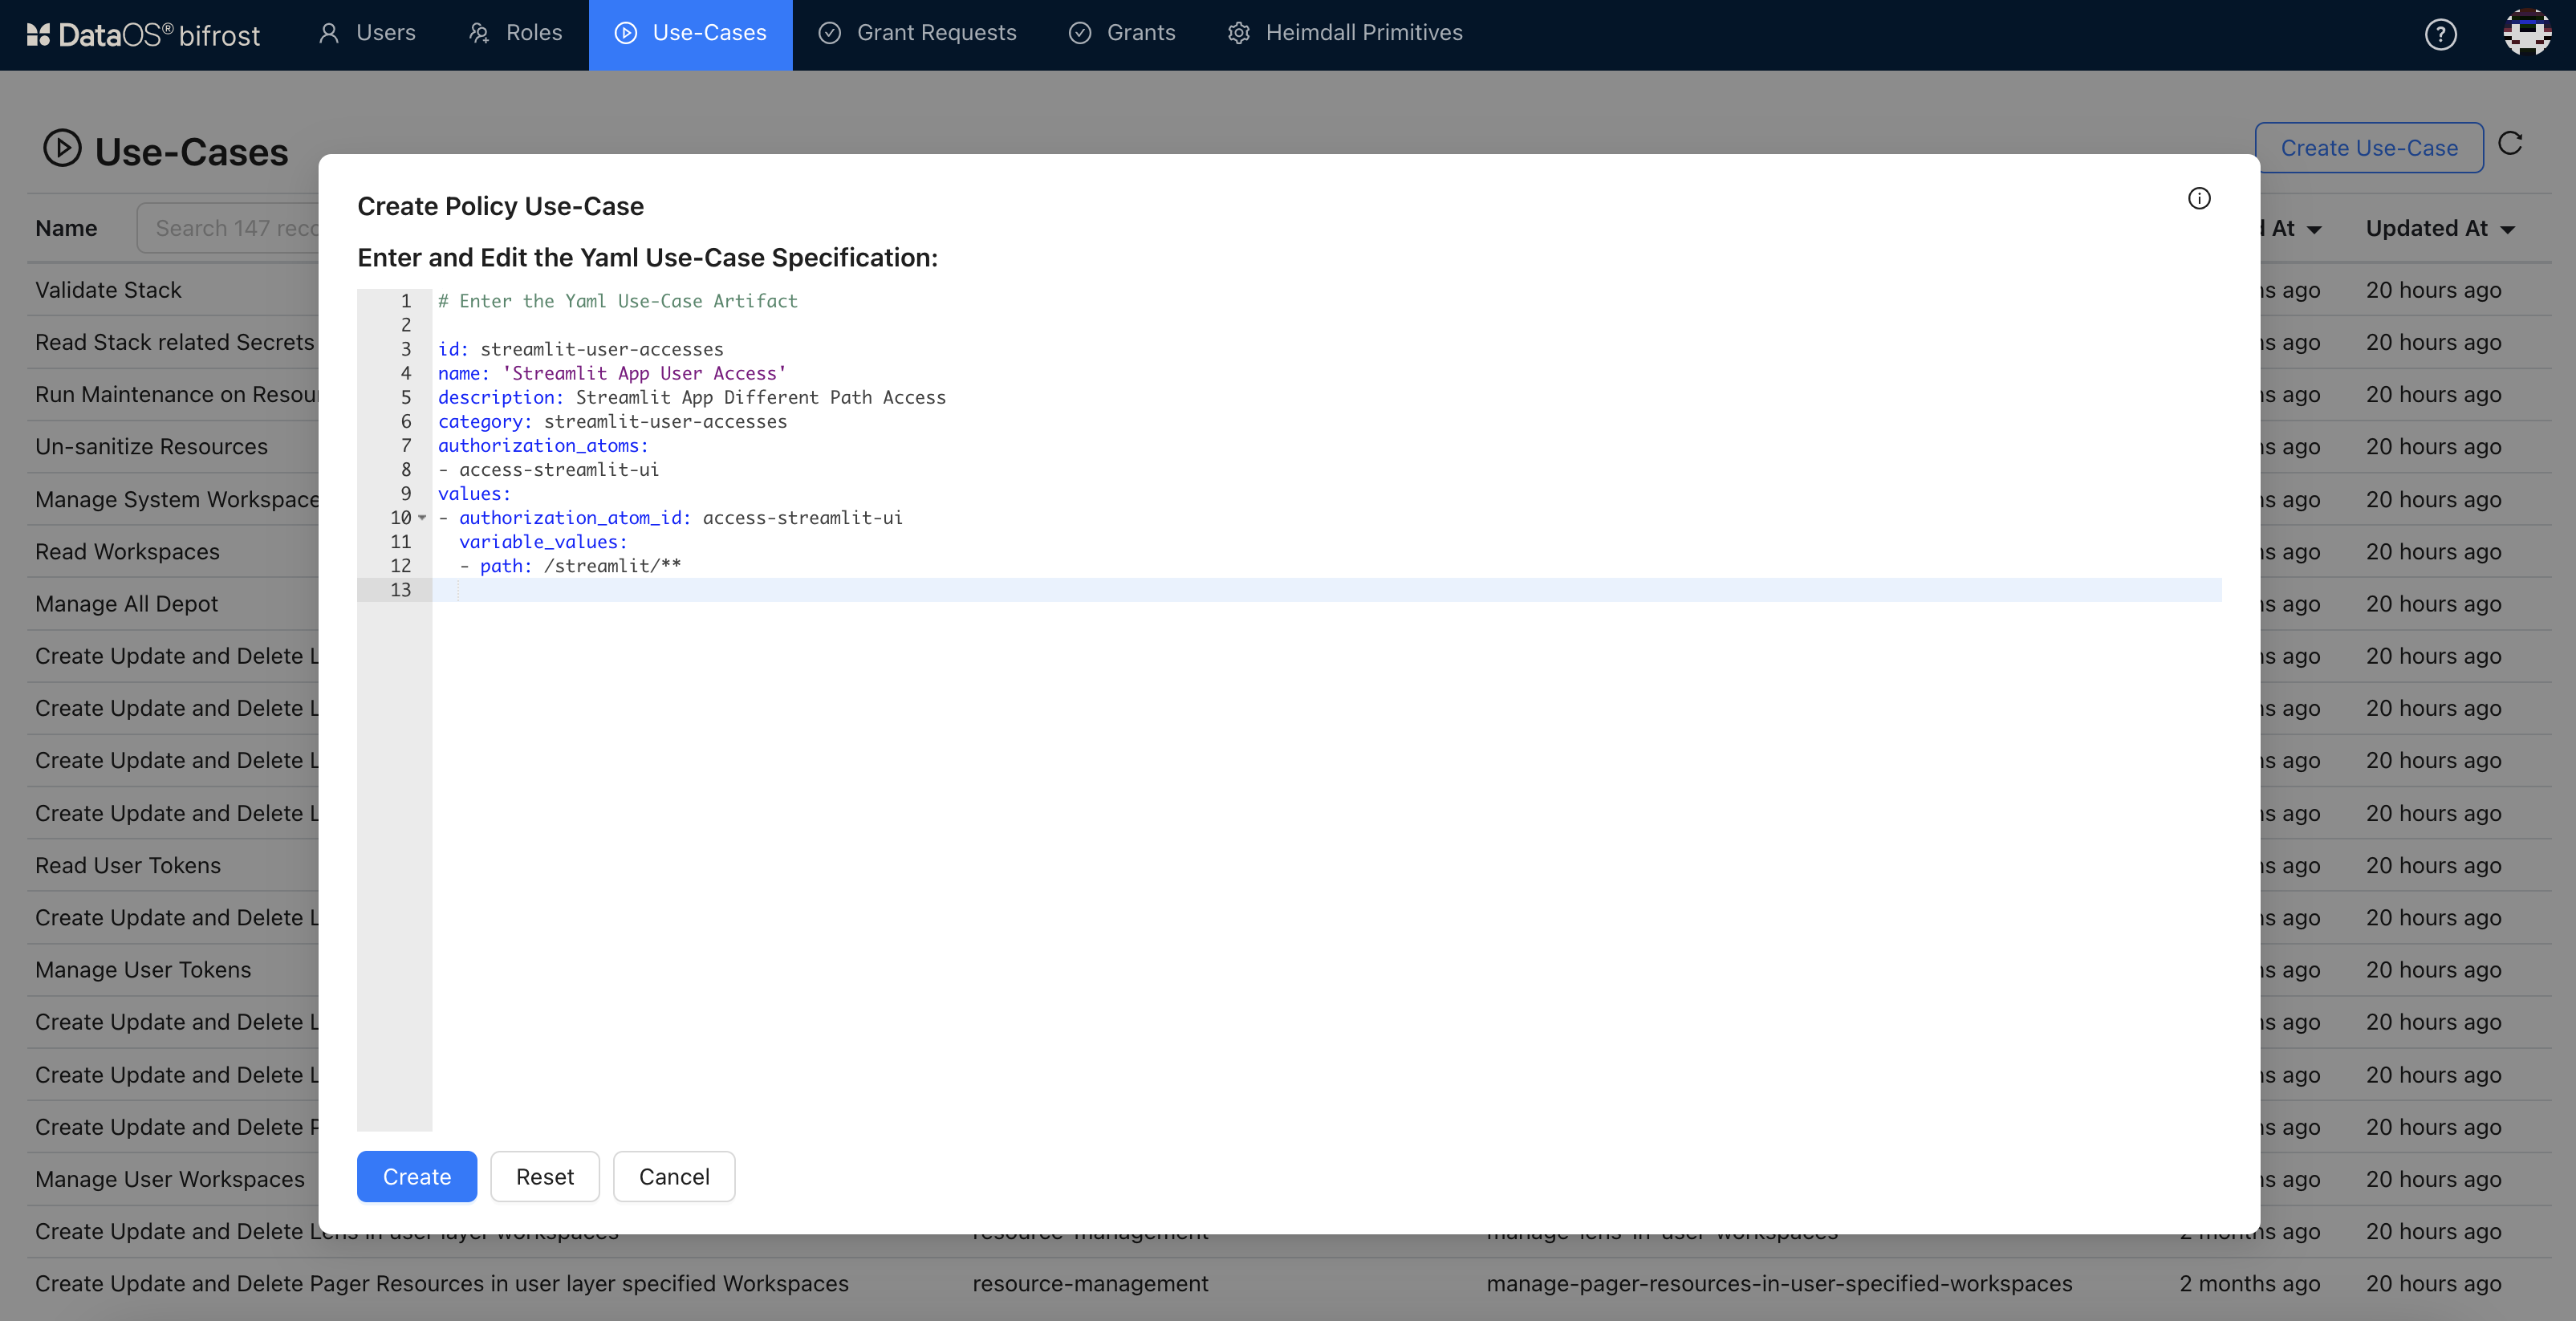
Click here to see the YAML for Use-case.
3. Repeat the process of creating use-cases for the other authorization atoms.# Enter the Yaml Use-Case Artifact id: streamlit-user-accesses name: 'Streamlit App User Access' description: Streamlit App Different Path Access category: streamlit-user-accesses authorization_atoms: - access-streamlit-ui values: - authorization_atom_id: access-streamlit-ui variable_values: - path: /streamlit/**For our application, we have created the following use-cases.
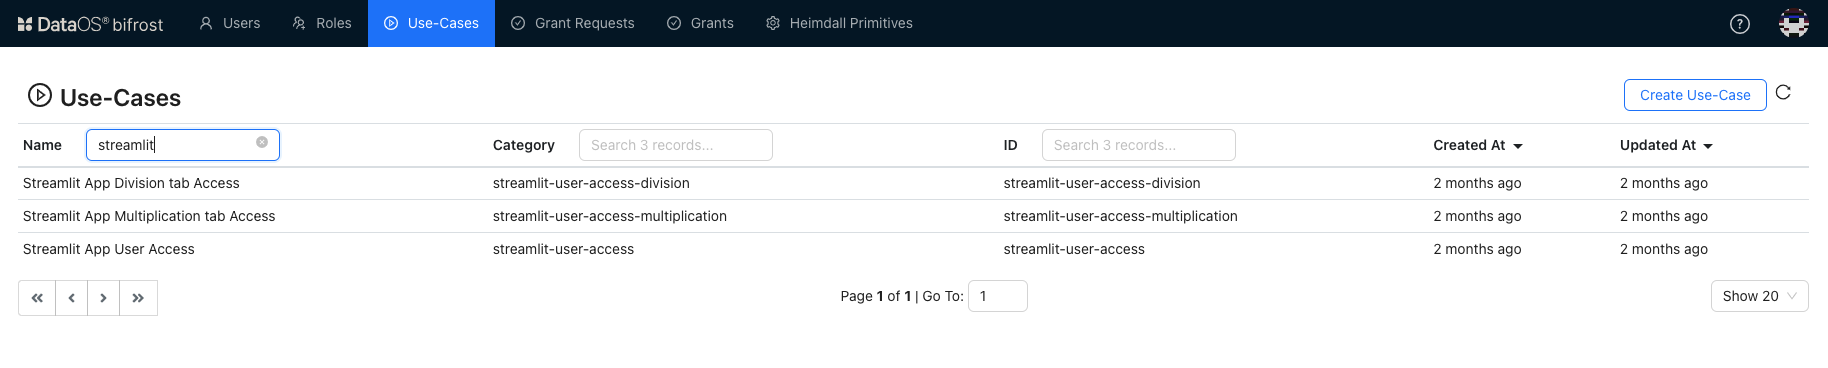
Click here to view the YAML for multiplication operation.
# Enter the Yaml Use-Case Artifact
# Allow multiplication operations
id: streamlit-user-access-multiplication
name: 'Streamlit App multiplication Access'
description: Streamlit App Multiplication Operation Access
category: streamlit-user-access-multiplication
authorization_atoms:
- streamlit-view-multiplication
values:
- authorization_atom_id: streamlit-view-multiplication
  variable_values:
  - path: /streamlit/**
Click here to view the YAML for division operation.
# Enter the Yaml Use-Case Artifact
# Allow division operations
id: streamlit-user-access-division
name: 'Streamlit App multiplication Access'
description: Streamlit App Division Operation Access
category: streamlit-user-access-division
authorization_atoms:
- streamlit-view-division
values:
- authorization_atom_id: streamlit-view-division
  variable_values:
  - path: /streamlit/**
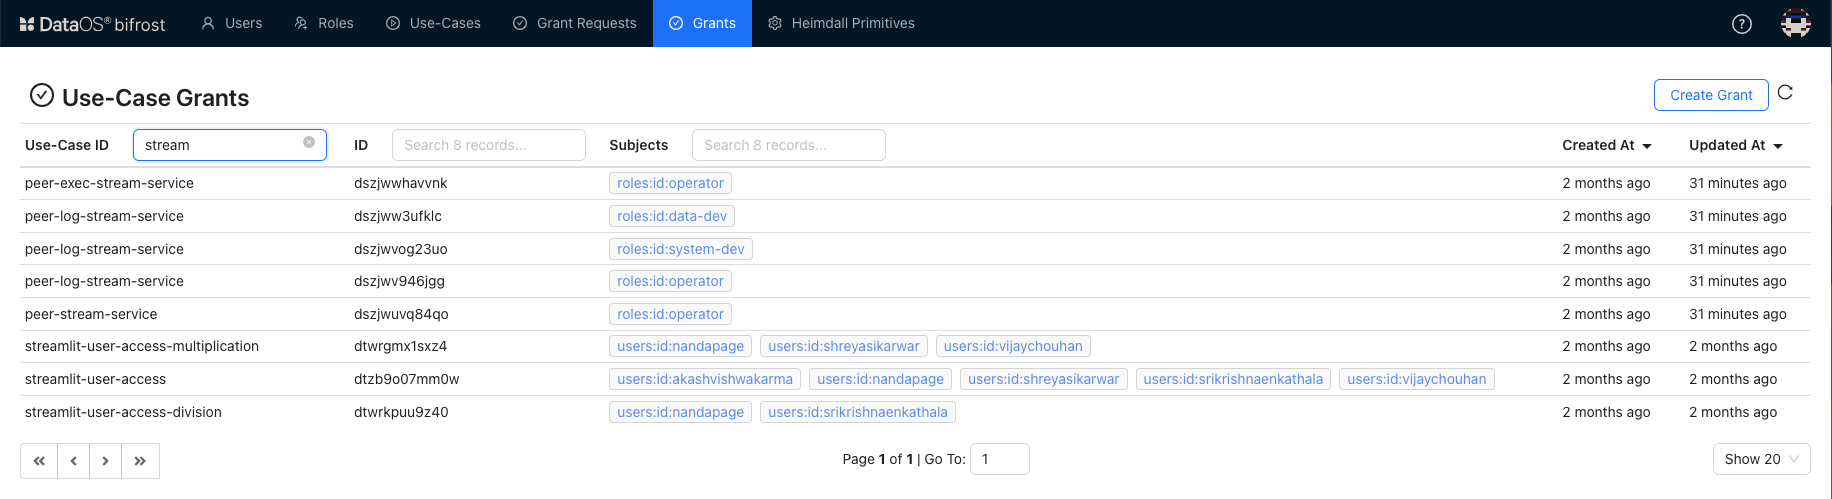
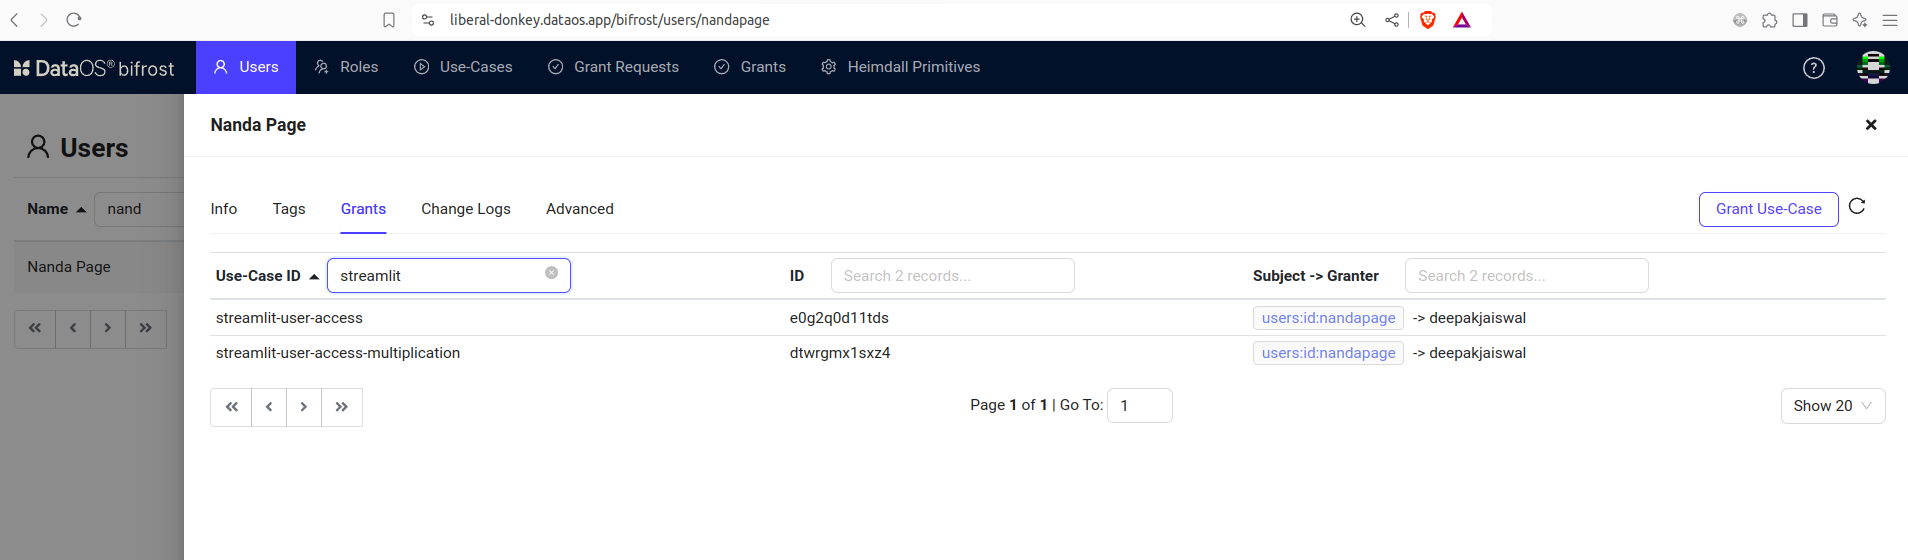
4. Assigning Permissions to Specific Users
Grant these use-cases to different user roles to allow or restrict access.
- Go to Users tab and select the user from the list and select it.
- Click on Grants tab and you will see a list of use-cases assign to this user.
- Now, to allow access, click on Grant Use-case.
-
Select the use-case, you have just created. Enter description to narrow down the list of use-cases.

-
Select the use-case and click on Grant.
- Repeat the process for all the use-cases you want to provide access for.
-
The use-cases are assigned to specific users, and only those users will have access to the app.
5. Implementing Authorization Logic in Your App Code
Now, let’s put this logic into the app.
The authorize_user function in the Calculator application code (calculator.py)checks if the user is allowed to run the application. The authorization is done by calling Heimdall API to verify permissions.
- Heimdall Client: This function uses
HeimdallClientBuilderto create a request and verify if the user has the required permissions to access the app. -
Authorization Request: It includes permissions like
"get"to allow general access to the application.def authorize_user(heimdall_base_url, permissions, tab=""): '''Authorize the user using Heimdall''' auth_request = AuthorizationRequest( token=st.session_state.get('bearer_token', ''), permissions=permissions, context={ "predicate": permissions[0], # "get" , "put" or "post" "object": { "paths": ["/streamlit/**"] } } ) try: # Initialize Heimdall client h_client = HeimdallClientBuilder().set_base_url(heimdall_base_url).build() # Send the authorization request to Heimdall auth_response = h_client.authorize_api.authorize(auth_request) # Check authorization results return auth_response.allow except Exception: st.write("Access Forbidden") return False
6. Granular Operation-Level Authorization Logic
We have defined different use-cases to allow or restrict user actions. The authorization logic checks with Heimdall, DataOS governnce engine, if the user has permissions like "view_multiplication" to access specific features.
This approach ensures that users only access features they’re authorized for.
def multiplication_tab():
    '''Handles multiplication operation with authorization check'''
    if authorize_user(heimdall_url, ["view_multiplication"]):
        # If authorized, allow multiplication
        with st.form("multiplication_form"):
            num1 = st.number_input("Enter first number", value=0.0, key="multiplication_num1")
            num2 = st.number_input("Enter second number", value=0.0, key="multiplication_num2")
            submitted = st.form_submit_button("Calculate")
            if submitted:
                result = num1 * num2
                st.write(f"Result: {result}")
    else:
        st.write("You don't have access to open this tab")
Click here to see the code defined for division operation.
def division_tab():
    '''This function handles division operation'''
    if authorize_user(heimdall_url, ["view_division"]):
        with st.form("division_form"):
            num1 = st.number_input("Enter first number", value=0.0, key="division_num1")
            num2 = st.number_input("Enter second number", value=0.0, key="division_num2")
            submitted = st.form_submit_button("Calculate")
            if submitted:
                if num2 != 0:
                    result = num1 / num2
                else:
                    result = "Error! Division by zero."
                st.write(f"Result: {result}")
    else:
         st.write("You don't have access to open this tab")
Click here to see the complete code for Calculator app.
import streamlit as st
from authentication import authenticator
from loading_resources import *
from support_function import get_svg_data_uri
import json
from heimdall.heimdall_client import HeimdallClientBuilder
from heimdall.models.heimdall_models import AuthorizationRequest

# Set environment variable
with open("/etc/dataos/config/cal_secret.conf") as file:
    secret_json = json.load(file)

dataos_env = secret_json['DATAOS_ENV']
heimdall_url = secret_json['API_ENDPOINT']

# Streamlit page configurations
st.set_page_config(layout='wide', page_title='Calculator', page_icon='icons/logo.png')

# Setting base CSS for the app
with open('css/base.css', 'r') as base_css_file:
    base_css = base_css_file.read()
st.markdown(f'<style>{base_css}</style>', unsafe_allow_html=True)

# Setting Session State Variables
if 'page' not in st.session_state:
    st.session_state.page = 0
if 'authorized' not in st.session_state:
    st.session_state.authorized = False

def authorize_user(heimdall_base_url, permissions):
    '''Authorize the user using Heimdall'''

    token = st.session_state.get('bearer_token', None)

    if not token:
        st.error("Authorization token is missing. Please log in again.")
        return False

    auth_request = AuthorizationRequest(
        token=token,
        permissions=permissions,
        context={
            "predicate": permissions[0],  # "get", "put", or "post"
            "object": {
                "paths": ["/streamlit/**"]
            }
        }
    )
    try:
        # Initialize Heimdall client
        h_client = HeimdallClientBuilder().set_base_url(heimdall_base_url).build()
        # Send the authorization request to Heimdall
        auth_response = h_client.authorize_api.authorize(auth_request)

        if auth_response.allow:
            return True
        else:
            st.error(f"Access Denied: {auth_response.error.message}")
            return False
    except Exception as e:
        st.error(f"Access Forbidden: {str(e)}")
        return False
def addition_tab():
    '''This function handles addition operation'''
    with st.form("addition_form"):
        num1 = st.number_input("Enter first number", value=0.0, key="addition_num1")
        num2 = st.number_input("Enter second number", value=0.0, key="addition_num2")
        submitted = st.form_submit_button("Calculate")
        if submitted:
            result = num1 + num2
            st.write(f"Result: {result}")

def subtraction_tab():
    '''This function handles subtraction operation'''
    with st.form("subtraction_form"):
        num1 = st.number_input("Enter first number", value=0.0, key="subtraction_num1")
        num2 = st.number_input("Enter second number", value=0.0, key="subtraction_num2")
        submitted = st.form_submit_button("Calculate")
        if submitted:
            result = num1 - num2
            st.write(f"Result: {result}")

def multiplication_tab():
    '''This function handles multiplication operation'''
    if authorize_user(heimdall_url, ["view_multiplication"]):
        with st.form("multiplication_form"):
            num1 = st.number_input("Enter first number", value=0.0, key="multiplication_num1")
            num2 = st.number_input("Enter second number", value=0.0, key="multiplication_num2")
            submitted = st.form_submit_button("Calculate")
            if submitted:
                result = num1 * num2
                st.write(f"Result: {result}")
    else:
         st.write("You don't have access to open this tab")

def division_tab():
    '''This function handles division operation'''
    if authorize_user(heimdall_url, ["view_division"]):
        with st.form("division_form"):
            num1 = st.number_input("Enter first number", value=0.0, key="division_num1")
            num2 = st.number_input("Enter second number", value=0.0, key="division_num2")
            submitted = st.form_submit_button("Calculate")
            if submitted:
                if num2 != 0:
                    result = num1 / num2
                else:
                    result = "Error! Division by zero."
                st.write(f"Result: {result}")
    else:
         st.write("You don't have access to open this tab")

def app(user_name, bearer_token):
    '''Main app code with user authentication and additional features'''
    svg_data_uri = get_svg_data_uri('icons/logo_new.svg')
    help_icon = get_svg_data_uri('icons/question-circle.svg')

    with open('css/header.css', 'r') as header_css_file:
        header_css = header_css_file.read()
    st.markdown(f'<style>{header_css}</style>', unsafe_allow_html=True)

    st.title("Calculator")
    tabs = st.tabs(["Addition", "Subtraction", "Multiplication", "Division"])

    with tabs[0]:
        addition_tab()
    with tabs[1]:
        subtraction_tab()
    with tabs[2]:
        multiplication_tab()
    with tabs[3]:
        division_tab()

def main():
    '''Main function - orchestrator for app modules'''
    heimdall_base_url = heimdall_url

    if st.session_state["page"] == 0:
        user_name = ''
        bearer_token = ''
        local_storage_authentication, user_info, user_name, bearer_token = loading_resources()
        st.session_state.user_info = user_info
        st.session_state.username = user_name
        st.session_state.bearer_token = bearer_token

        if local_storage_authentication == {}:
            st.session_state["page"] = 1
        else:
            st.session_state["page"] = 2

    if st.session_state["page"] == 1:
        user_info = st.session_state.get('user_info')
        authenticator(user_info)
    elif st.session_state["page"] == 2:
        # Check if the user has "get" permission to access the application
        if authorize_user(heimdall_base_url, ["get"]):
            st.session_state["authorized"] = True
            app(st.session_state.get('username'), st.session_state.get('bearer_token'))
        else:
            st.write("You are not authorized to access this application. Please contact support")

if __name__ == "__main__":
    main()
With these steps, your Streamlit app will have secure, flexible, and granular access control using DataOS services. Each user will have just the right permissions to work with the app, keeping your data and operations safe.
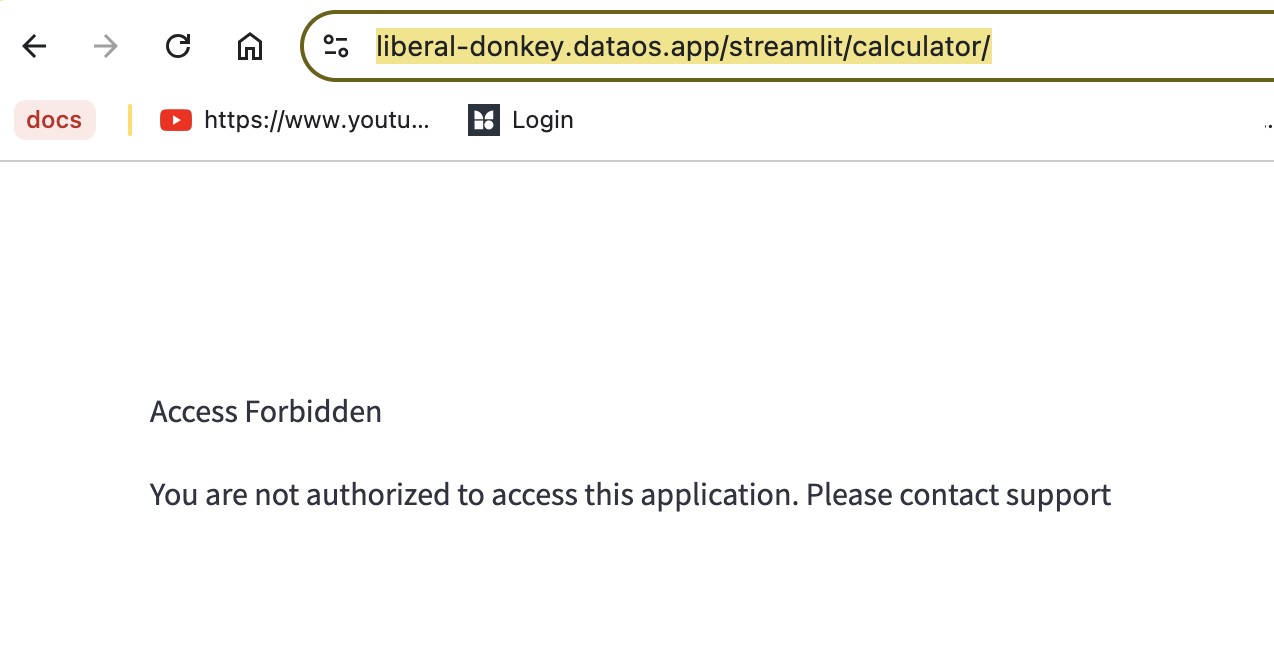
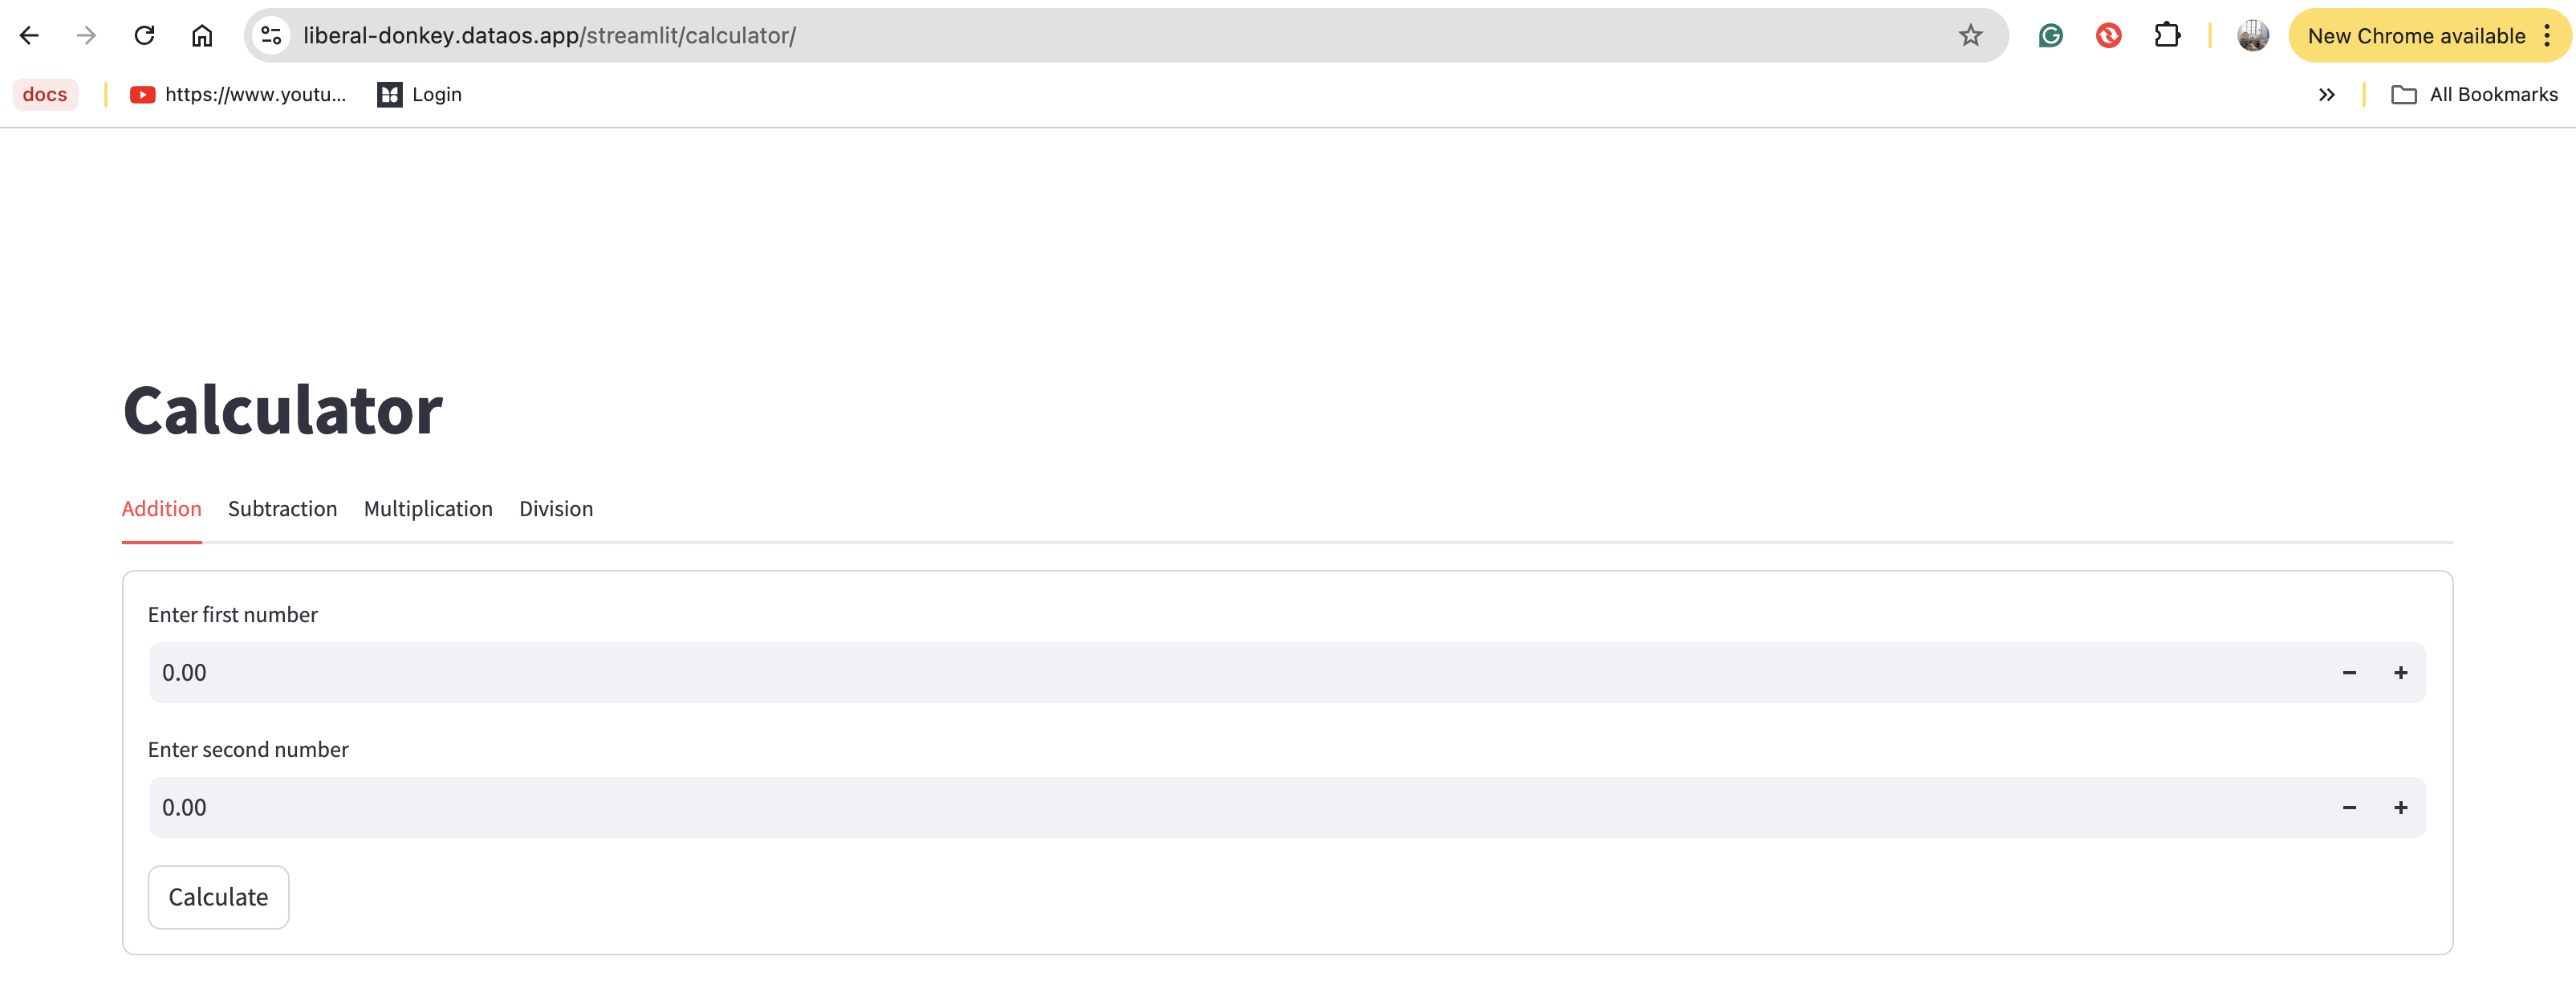
Permissions in Action for Calculator App
-
If a user is not authorized to access the application, they will see the following message:
-
Once authorized, the user will be able to access the application.
-
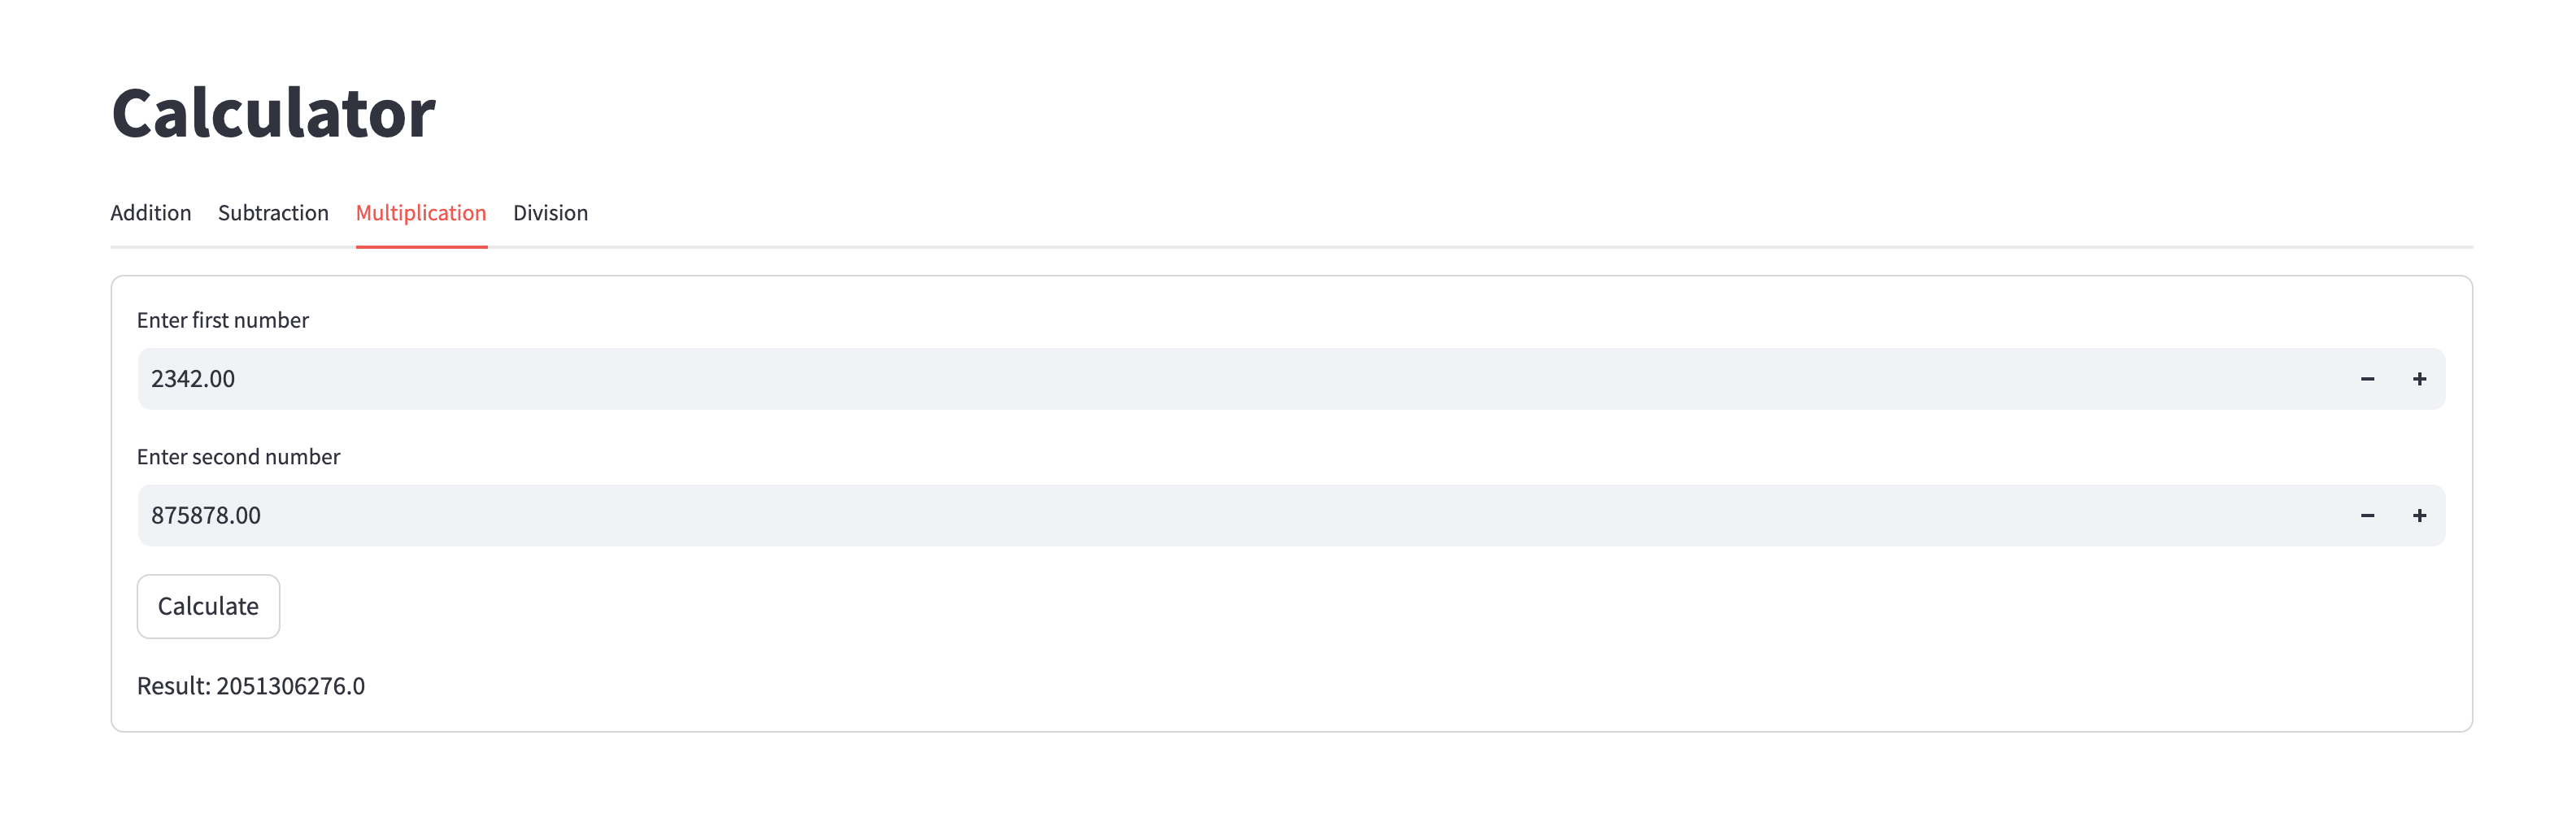
Suppose a user has the following permissions.
-
In this case, they can perform multiplication, as shown below:
-
However, they are not authorized to perform division operations:

On Bifrost, these permission can be managed easily for the users via use-cases, already defined for the application.
Download Application Code
Click on this link- Streamlit Calculator Application to download the entire application code.