Creating Batch Processing Pipelines with Flare
Information
This guide is here to help you build a data pipeline to bring data from different sources into the DataOS data lake using Flare Stack. Let’s get started!
We'll set up an ETL pipeline using Flare Stack's Data Processing capabilities to ingest data from Azure Blob Storage into the DataOS data lake.
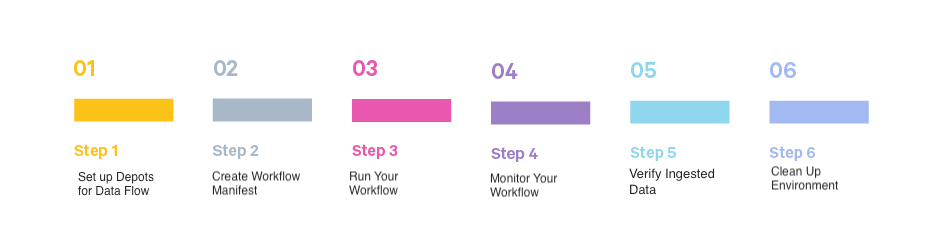
Key Steps
Here are the essential steps to leverage Flare Stack to establish a robust data pipeline, process and transform data efficiently.
Before You Begin
-
Check CLI Installation
Before proceeding, verify that the DataOS CLI is installed on your system. If it is, log in with your credentials and proceed to the next step. If not, refer to the CLI documentation.
-
Get Appropriate Access Permission Use Cases
In DataOS, different actions require specific permissions (use cases) to execute tasks. These use cases can be assigned directly to you or grouped under a tag. Here’s a quick reference for the use cases needed for different actions related to Workflow Resources:
Action Required Use Cases Get Read Workspaces, Read Resources in User Specified Workspace / Read Resources in User Workspaces (for curriculum and sandbox workspaces) Create Create and Update Resources in the User Workspace Apply Create and Update Resources in the User Workspace Delete Delete Resources in User Workspace Log Read Resource Logs in the User Workspace
Step 1: Set up Required Depots
Running a Flare Workflow requires depots for both the source and sink systems to read and write data. If they’re already set up, great! If not, you’ll need to create them. To learn more, click here.
To see all available depots, run this command in the CLI:
✗ dataos-ctl get -t depot -a
INFO[0000] 🔍 get...
INFO[0000] 🔍 get...complete

    NAME          | VERSION | TYPE  | WORKSPACE | STATUS |  RUNTIME  |         OWNER
------------------|---------|-------|-----------|--------|-----------|------------------------

lakehouse           | v2alpha | depot |           | active |           | dataos-manager
kafka1            | v1      | depot |           | active |           | yogeshkhangode
metisdb           | v1      | depot |           | active |           | dataos-manager
postgre01         | v1      | depot |           | active |           | shraddhaade
postgresdepot     | v1      | depot |           | active |           | kanakgupta
redshifttype      | v1      | depot |           | active |           | ashishgupta
retail            | v1      | depot |           | error  | running:1 | anshulthakkar
thirdparty01      | v1      | depot |           | active | running:1 | ramsinghpanwar
thirdparty02      | v1      | depot |           | active | running:1 | mohammadnabeelqureshi
Step 2: Create Flare Workflow Manifest
Use Flare Stack’s powerful data processing features to build a workflow. This will handle the ETL (Extract, Transform, Load) tasks needed to ingest your data. The Flare Workflow Resource is defined using a YAML configuration file.
The manifest YAML file is a comprehensive configuration for setting up and running a data ingestion workflow using Flare Stack. It defines everything from the workflow's metadata to the specific steps needed to transform and load the data into its final destination. Each section plays a crucial role in ensuring the workflow is executed correctly and efficiently, transforming raw data into a structured format ready for analysis.
Manifest (YAML) Sections
-
Metadata: Defines the basic information, versioning,type, etc. for the workflow.
-
Workflow and DAG section: Specifies the title, name, and description of the workflow's DAG (job sequence)
-
Job Specification: Outlines the technical stack and compute environment.
-
Stack Specification: Describes the inputs, outputs, and sequence of data transformation steps, including SQL queries and functions.
a. Input Source(s)
b. Transformation StepsstackSpec: job: explain: true logLevel: INFO inputs: - name: customers_data dataset: dataos://thirdparty01:sports_data/customers/ format: CSV options: inferSchema: truec. Output Destinationsteps: - sequence: - name: customer sql: > SELECT *, CONCAT(Prefix,' ', FirstName,' ', LastName) as customer_name FROM customers_data functions: - name: cleanse_column_names - name: find_and_replace column: annual_income sedExpression: "s/[$]//g" - name: find_and_replace column: annual_income sedExpression: "s/,//g" - name: set_type columns: customer_key: int annual_income: int total_children: int - name: any_date column: birth_date asColumn: birth_date
Here is the complete manifest file.
version: v1
name: wf-test-customer # Workflow name
type: workflow
tags:
- customer
description: Workflow to ingest sports_data customer csv
workflow:
title: customer csv
dag:
- name: sports-test-customer
title: sports_data Dag
description: This job ingests customer CSV into lakehouse
spec:
  tags:
    - customer
  stack: flare:7.0
  compute: runnable-default
stackSpec:
job:
explain: true
inputs:
- name: customers_data
dataset: dataos://thirdparty01:sports_data/customers/
format: CSV
options:
inferSchema: true
logLevel: INFO
  steps:
    - sequence:
      - name: customer
          sql: >
            SELECT *,
              CONCAT(Prefix,' ', FirstName,' ', LastName) as customer_name
          FROM customers_data
          functions:
              - name: cleanse_column_names

              - name: find_and_replace
              column: annual_income
              sedExpression: "s/[$]//g"

              - name: find_and_replace
              column: annual_income
              sedExpression: "s/,//g"

              - name: set_type
              columns:
                  customer_key: int
                  annual_income: int
                  total_children: int

              - name: any_date
              column: birth_date
              asColumn: birth_date
  outputs:
    - name: customer
      dataset: dataos://lakehouse:sports/customers?acl=rw
      format: Iceberg
      title: sports_data
      description: this dataset contains customer data
      tags:
          - customer
      options:
          saveMode: overwrite
Step 3: Run Your Workflow
Once you have created the Workflow manifest file, it's time to apply it and create the Workflow Resource within the DataOS environment.
Validate Your Workflow Manifest
Linter: Before running the workflow, make sure the manifest file is valid. Use the -l flag with the apply command: It will check for correct syntax, indentation, and output references. Provide the file name with the complete path.
Sample output:
✗ dataos-ctl apply -f /Users/Recipes/customertest.yaml -l
...
...
...
****INFO[0001] 🔧 applying wf-test-customer:v1:workflow...valid
INFO[0001] 🛠 apply(public)...lint
INFO[0001] 🛠 apply...nothing
****
In case you encounter errors, check out this link.
Use apply command
Use the apply command to create a workflow from the YAML file.
Creating a workspace in DataOS is optional but recommended for better organization. Workspaces allow you to set up isolated environments for specific projects or teams. By default, all Resources are created in the "public workspace," which is shared and accessible to all users.
Workspace creation
dataos-ctl workspace create -n learn
INFO[0000] 🛠 workspace create(learn:user)...
INFO[0001] 🛠 workspace create(learn:user)...created
✗ dataos-ctl apply -f /Users/Recipes/customertest.yaml -w learn
INFO[0000] 🛠 apply...
INFO[0000] 🔧 applying(learn) wf-test-customer:v1:workflow...
INFO[0002] 🔧 applying(learn) wf-test-customer:v1:workflow...created
INFO[0002] 🛠 apply...complete
Step 4: Monitor Your Workflow
Keep track of your workflow’s runtime information with these commands:
Get Status Information
Use the get command for the workflow information on CLI. This command will list the workflows created by you.
Sample output:
✗ dataos-ctl -t workflow -w learn get
INFO[0000] 🔍 get...
INFO[0001] 🔍 get...complete

        NAME       | VERSION |   TYPE   | WORKSPACE | STATUS | RUNTIME |   OWNER
-------------------|---------|----------|-----------|--------|---------|------------
  wf-test-customer | v1      | workflow | learn     | active | running | nandapage
Get Runtime Information
Use the get runtime command.
dataos-ctl -i "wf-test-customer | v1      | workflow | learn" get runtime
INFO[0000] 🔍 workflow...
INFO[0001] 🔍 workflow...complete

        NAME       | VERSION |   TYPE   | WORKSPACE |    TITLE     |   OWNER
-------------------|---------|----------|-----------|--------------|------------
  wf-test-customer | v1      | workflow | learn     | customer csv | nandapage

    JOB NAME    |   STACK    |       JOB TITLE       | JOB DEPENDENCIES
----------------|------------|-----------------------|-------------------
  system        | dataos_cli | System Runnable Steps |
  test-customer | flare:7.0  | sports_data Dag       |

  RUNTIME | PROGRESS |          STARTED          | FINISHED
----------|----------|---------------------------|-----------
  running | 0/1      | 2024-08-09T17:02:34+05:30 |

               NODE NAME               |   JOB NAME    |                       POD NAME                       | DATA PLANE |     TYPE     |       CONTAINERS        |  PHASE
---------------------------------------|---------------|------------------------------------------------------|------------|--------------|-------------------------|----------
  test-customer-4rg9-0809113233-driver | test-customer | test-customer-4rg9-0809113233-driver                 | hub        | pod-flare    | spark-kubernetes-driver | running
  test-customer-execute                | test-customer | wf-test-customer-4rg9-7hd-test-customer-t-2424012957 | hub        | pod-workflow | main                    | running
Get runtime refresh: (Ctrl+C to exit)
You can see the updates for the workflow progress with -r in the runtime command.
View Logs for Errors
Use the logs along with node information from the previous command output. These logs will help you to troubleshoot issues.
dataos-ctl -i "wf-sports-test-customer | v1 | workflow | learn" --node test-customer-4rg9-0809113233-driver logs
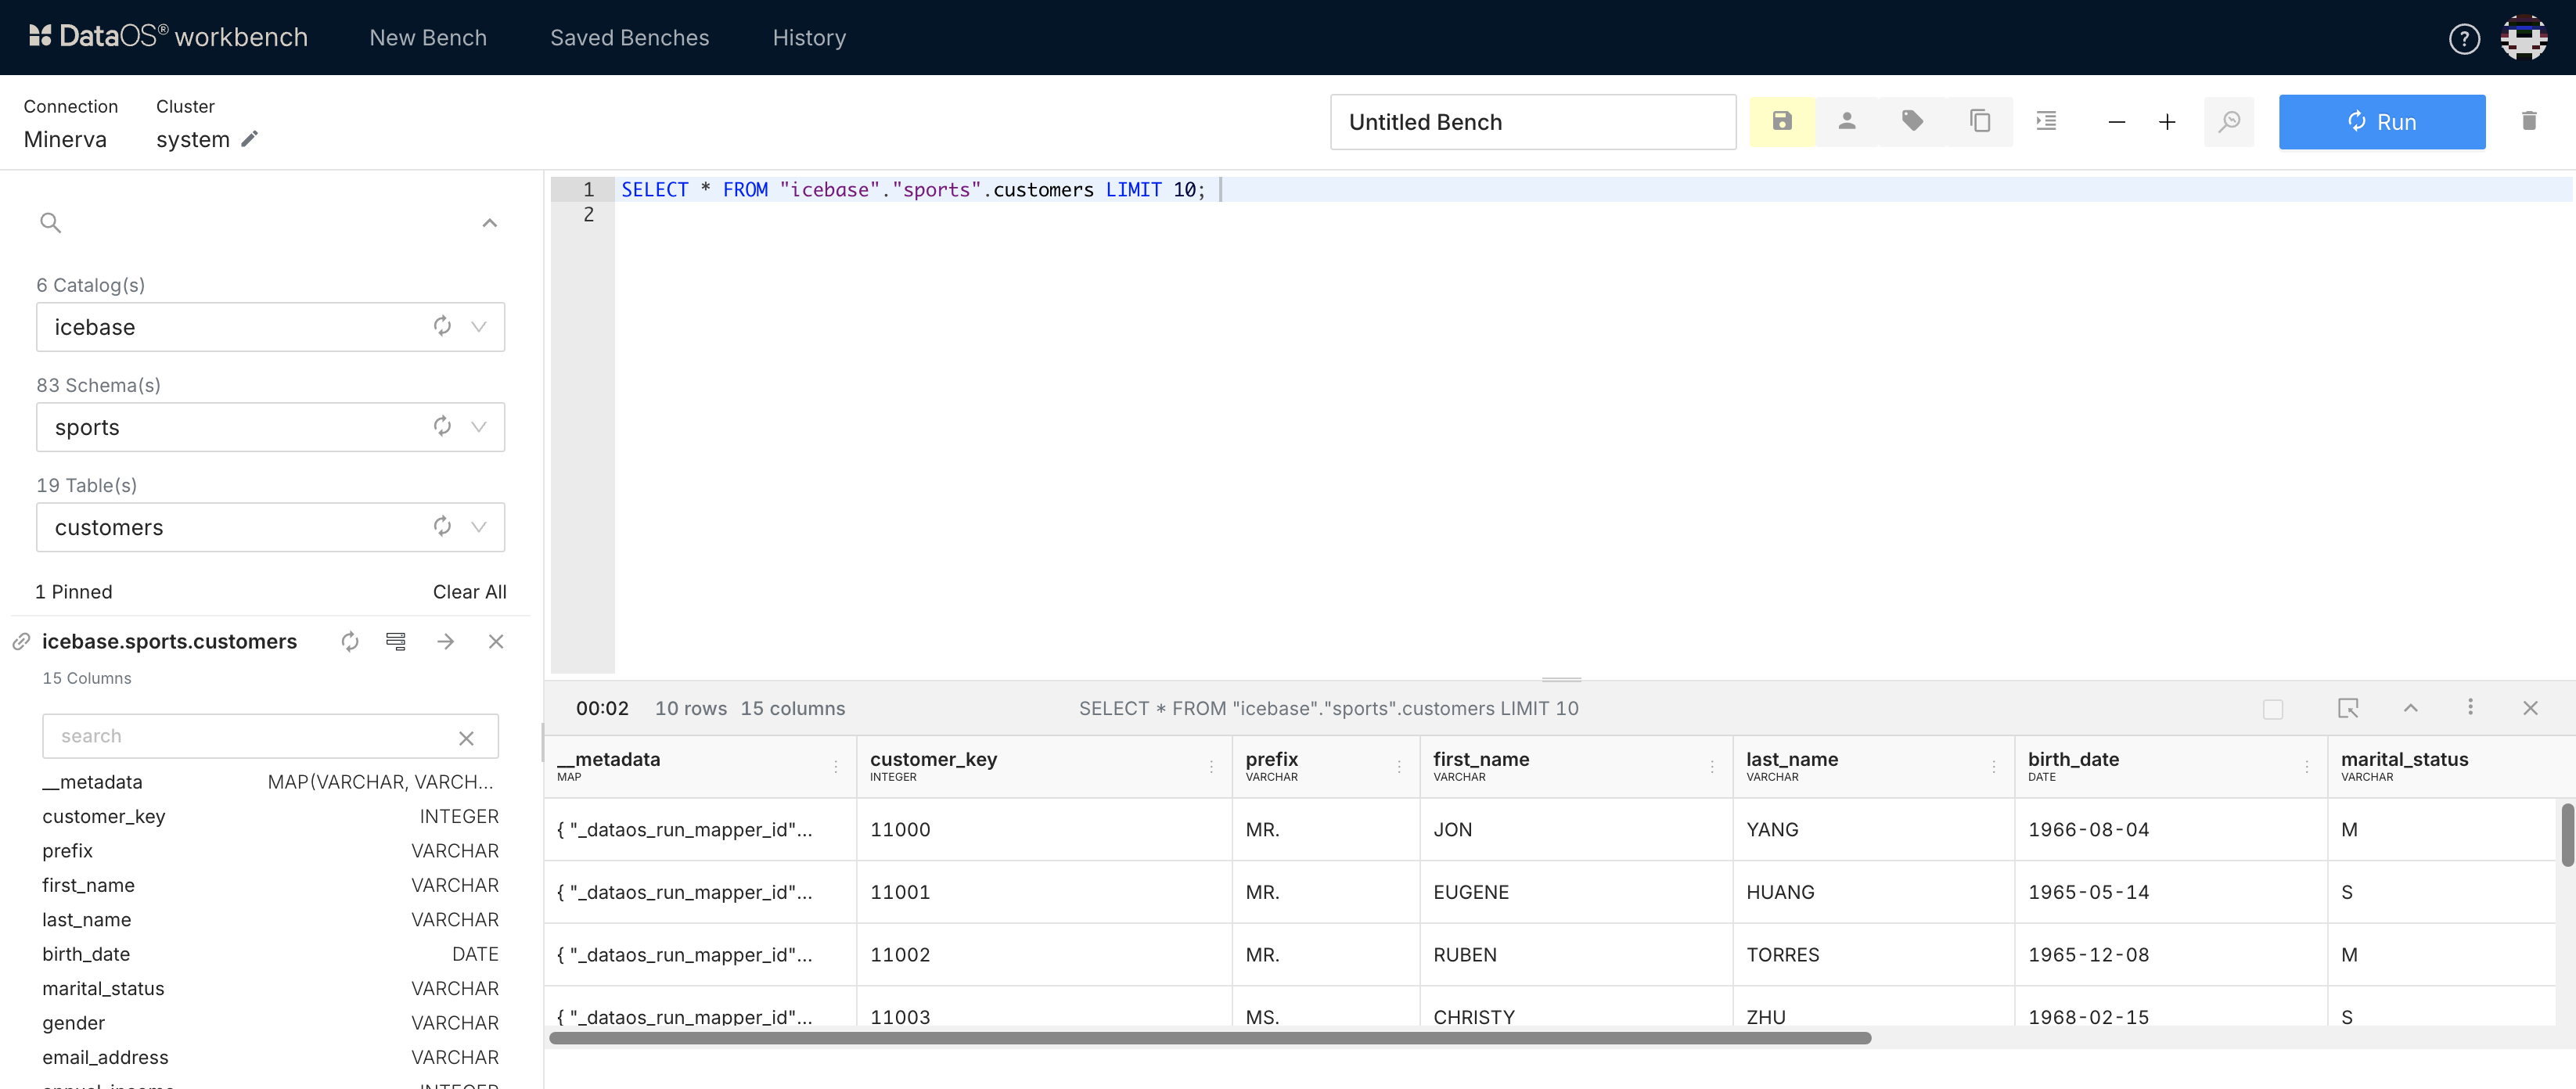
Step 5: Check Ingested Data in Workbench
After your workflow runs successfully, head over to DataOS’s Workbench to explore your newly ingested data.
Step 6: Clean Up
After your job is successfully run, don’t forget to delete it to keep your environment clean: Otherwise, it will stay floating in the environment for three days.