How to design the Data Product?
The design phase of the Data Product development process within DataOS is crucial for ensuring that the final product meets the requirements and delivers value. The phase involves several steps, from initial requirement analysis to the final design iteration. To illustrate this process, we will use a real-life use case: Traffic Source Analysis using Google Analytics.
To design the Data Product, follow the steps outlined below. Depending on the specific Data Product, additional steps may need to be added or skipped:
Identify data sources
In this step, we identify various data sources based on usecase. For instance, in traffic source analysis, data is sourced from Google Analytics to capture website traffic, user behavior, and acquisition channel data using the Google Analytics. Additionally, data is obtained from advertising platforms such as Google Ads or Facebook Ads to access campaign performance metrics. Not all use cases necessitate generating data from scratch, if the organization already possesses the required data in its databases, this step may be skipped.
Data understanding and exploration
To understand the data, you need to set up the data source connection to S3 using Instance Secret and Depot. Let’s see how can you set the data source connection using the Depot for S3. This step is depends on the Data Source.
Create an Instance Secret
To create a Depot without revealing the data source connection credentials, you first need to create an Instance Secret resource which will hold credentials of the S3 source such as accesskeyid, awsaccesskeyid, awssecretaccesskey and secretkey. To create an Instance Secret simply compose a manifest file as shown below.
name: s3depot-r
version: v1
type: instance-secret
description: S3 credentials
layer: user
instance-secret:
  type: key-value-properties
  acl: r
  data:
    accesskeyid: ${access-key-id}
    awsaccesskeyid: ${aws-access-key-id}
    awssecretaccesskey: ${aws-secret-access-key}
    secretkey: ${secret-key}
To know more about the Instance Secret, refer to this.
Create a Depot
To create a Depot in DataOS, simply compose a manifest file for a Depot as shown below:
name: s3depot
version: v2alpha
type: depot
layer: user
depot:
  type: S3
  description: AWS S3 Bucket
  secrets:
    - name: s3depot-r # instance-secret
      allkeys: true

    - name: s3depot-rw # instance-secret
      allkeys: true
  external: false
  compute: query-default
  spec:
    bucket: ga-data
replace the placeholder with the actual values and apply it using the following command on the DataOS Command Line Interface (CLI).
To know more about the Depot refer to this.
Extract the Metadata
Now run the Depot scanner to extract the metadata from the data source. You can then access the metadata on Metis UI. The Scanner manifest file is shown below:
version: v1
name: scan-depot
type: workflow
tags:
  - Scanner
title: {{Scan snowflake-depot}}
description: |
  {{The purpose of this workflow is to scan S3 Depot.}}
workflow:
  dag:
    - name: scan-snowflake-db
      title: Scan snowflake db
      description: |
        {{The purpose of this job is to scan gateway db and see if the scanner works fine with an S3 type of depot.}}
      tags:
        - Scanner
      spec:
        stack: scanner:2.0
        compute: runnable-default
        stackSpec:
          depot: {{s3depot}} # depot name
replace the placeholder with the actual values and apply it using the following command on the DataOS Command Line Interface (CLI).
To know more about the Scanner, refer to this.
Explore the Data
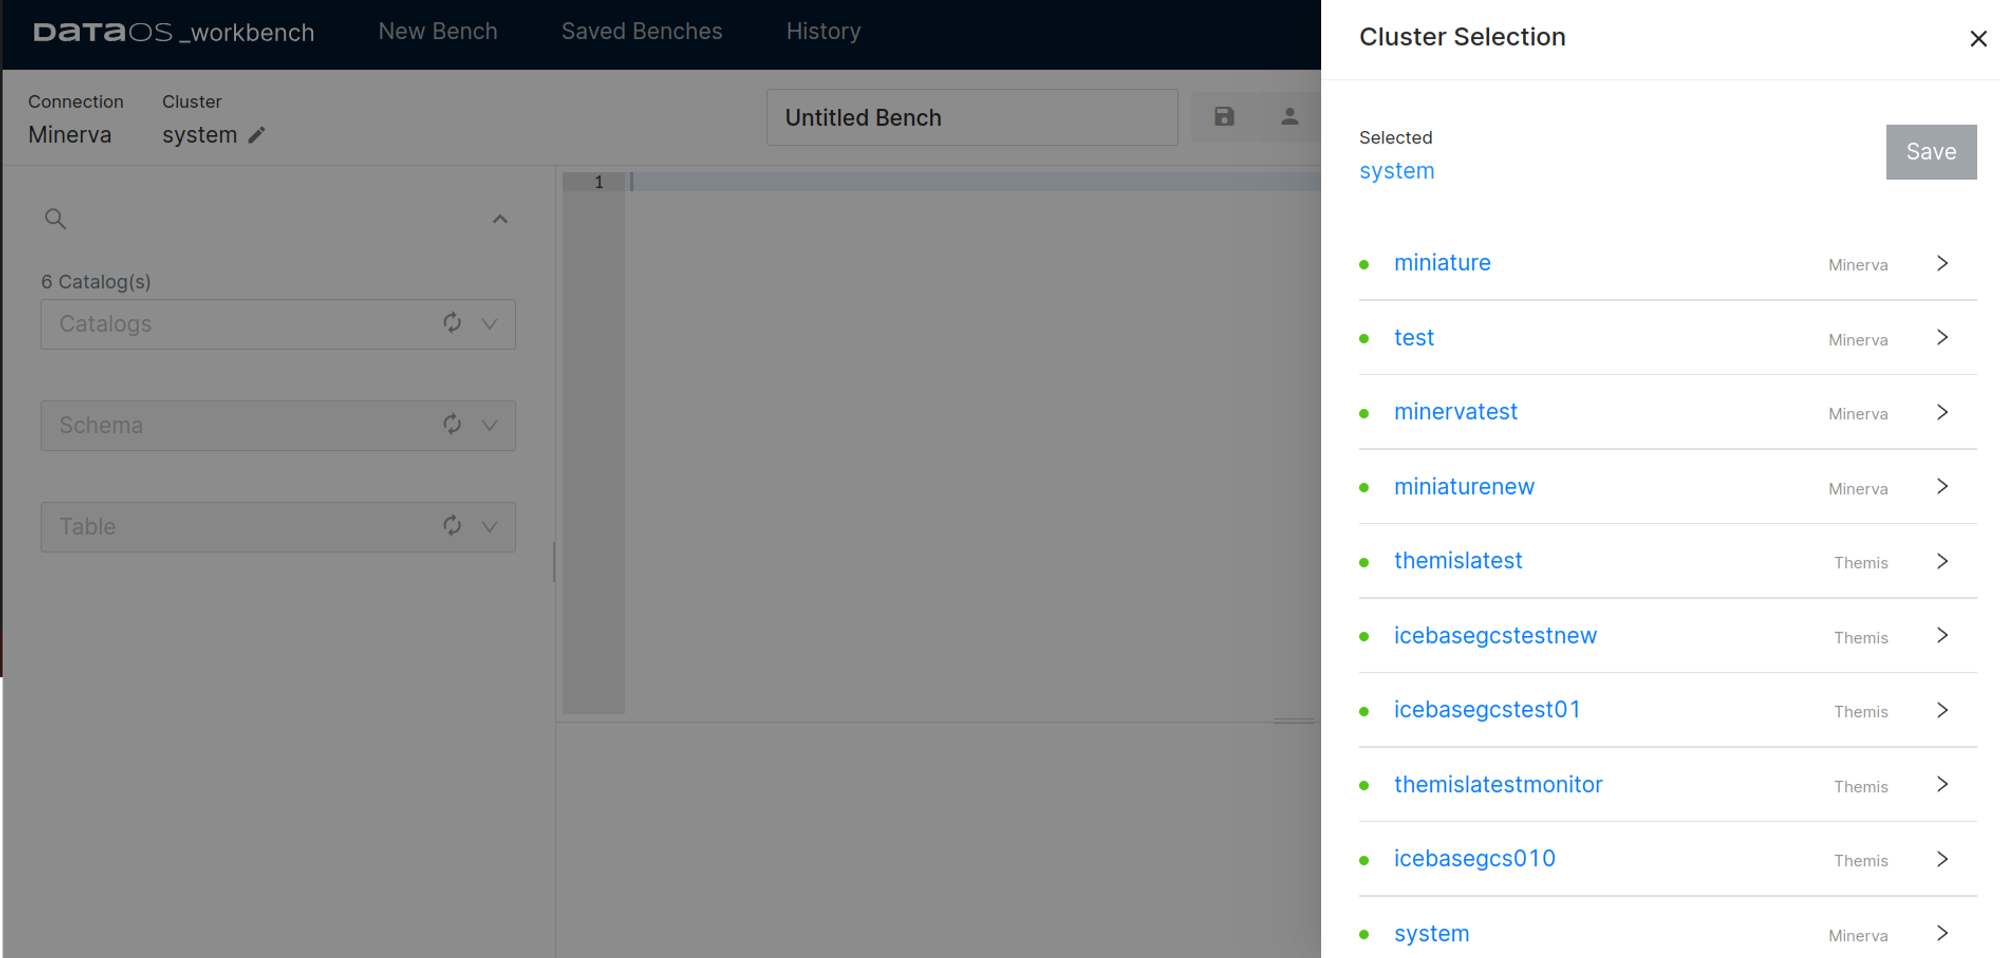
Now for data exploration, you can query the data using the Workbench. To query the data on the Workbench without moving the data to Lakehouse, you first need to create a Minerva or a Themis cluster that will target the Depot. By applying the below manifest file, you can create the Cluster.
version: v1
name: advancedminerva
type: cluster
description: cluster testing
tags:
  - cluster
  - advancedminerva
cluster:
  compute: advanced-query
  runAsUser: minerva-cluster
  maintenance:
    restartCron: '13 1 */2 * *'
  minerva:
    selector:
      users:
        - "**"
      sources:
        - "**"
    replicas: 5
    resources:
      requests:
        cpu: 14000m
        memory: 52Gi
    debug:
      logLevel: INFO
      trinoLogLevel: DEBUG
    coordinatorEnvs:
      CONF__config__query.max-memory-per-node: "38GB"
      CONF__config__query.max-memory: "300GB"
      CONF__config__query.client.timeout: 12m
      CONF__config__query.max-execution-time: 25m #total time taken including queued time + execution time
      CONF__config__query.max-run-time: 30m  #total completion time for query

    workerEnvs:
      CONF__config__query.max-memory-per-node: "38GB"  /23
      CONF__config__query.max-memory: "300GB"
      CONF__config__query.client.timeout: 12m
      CONF__config__query.max-execution-time: 25m    #total time taken including queued time + execution time
      CONF__config__query.max-run-time: 30m        #total completion time for query

    depots:
      - address: dataos://lakehouse:default
        properties:
          iceberg.file-format: PARQUET
          iceberg.compression-codec: GZIP
          hive.config.resources: "/usr/trino/etc/catalog/core-site.xml"
      - address: dataos://redshift:default
      - address: dataos://lensdb:default
      - address: dataos://gateway:public
      - address: dataos://metisdb:public

    catalogs:
      - name: cache
        type: memory
        properties:
          memory.max-data-per-node: "128MB"
replace the placeholder with the actual values and apply it using the following command on the DataOS Command Line Interface (CLI). You can get the Depot address from the Metis.
To know more about the Cluster, refer to this.
Now on Workbench, select your Cluster and query the data.
To know more about Workbench, refer to this.
Design Data Product solution architectures
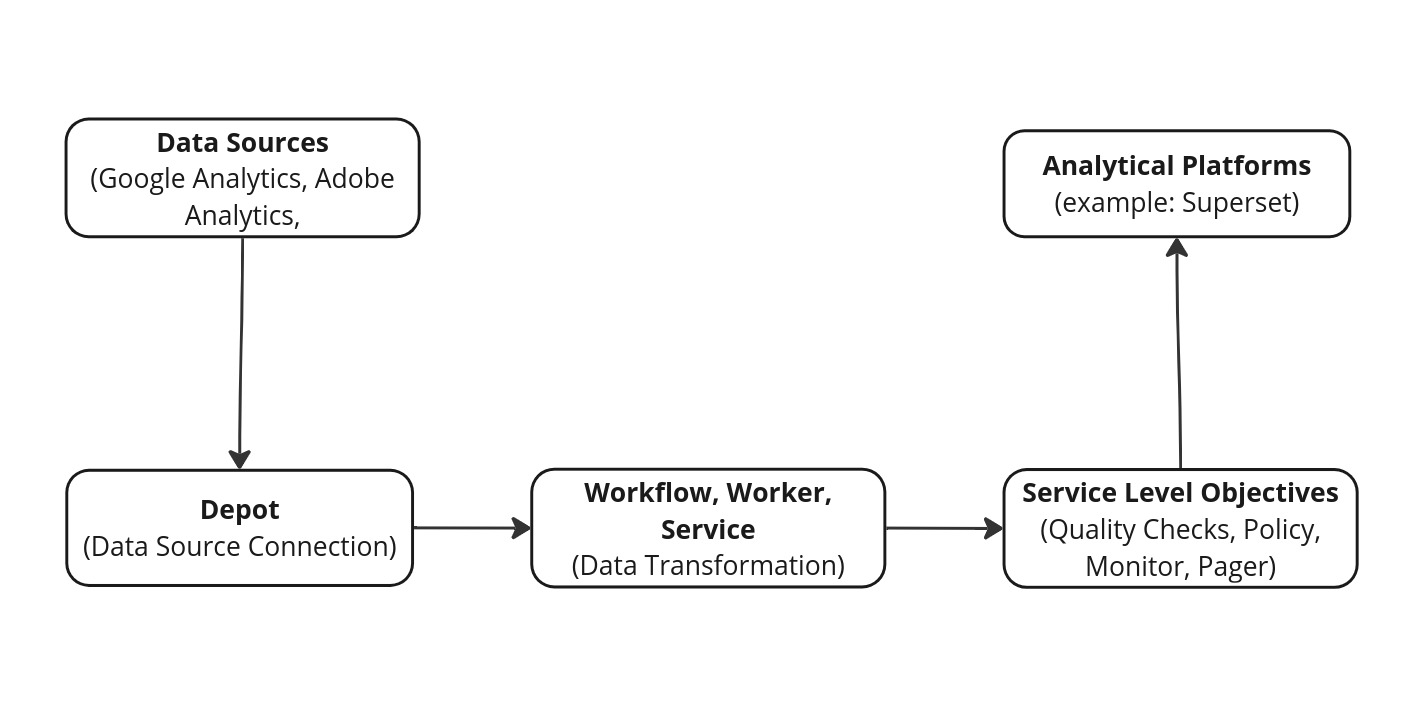
Once you've explored the data, the next step is to plan the architectural design. This involves mapping out how different components, data pipelines, and workflows will integrate. The architecture design should be well-documented with diagrams and clear explanations of how each component interacts and the workflows they support. For data transformation tasks, tools like Flare jobs, SLOs (Service Level Objectives), and UI (User Interface) elements can be utilized to ensure efficient processing and visualization of data insights.
For this particular example, the architectural design phase will also include the analytical elements and features that need to be included in the Traffic Source analysis. You can also define the input and output location in this step itself.
Performance target
Performance targets refer to predefined goals or benchmarks related to the data product's performance metrics. Examples include response time goals, such as achieving 95% of queries processed within 500 milliseconds, throughput targets like sustaining 1000 tasks per minute during peak periods, and resource utilization limits ensuring CPU usage remains below 80%. Quality metrics focus on maintaining data accuracy at 99%, while scalability objectives aim to accommodate a 50% increase in data volume without requiring additional infrastructure. Availability standards are set at achieving 99.99% uptime monthly. These targets guide system design and optimization efforts, aligning technical capabilities with business requirements for consistent performance and reliability.
Validation and Iteration
Once the Data Product design is finalized, it undergoes review sessions with key stakeholders and team members to ensure it meets all defined requirements and goals. Feedback from these sessions is carefully documented. If needed, the design is refined based on this feedback to improve its alignment with requirements. All changes made during this process are noted to ensure continuous improvement of the design phase.
Create the Data Product manifest file
After successfully executing the above steps, you’ll create a manifest file for the Data Product.
Let’s see how you can set up the Data Product.
Begin by creating a manifest file that will hold the configuration details for your Data Product. The structure of the Data Product manifest file is provided below.
# product meta section

name: ${{product-affinity-cross-sell}} # mandatory
version: ${{v1beta}} # mandatory
entity: ${{product}} # mandatory
type: ${{data}} # mandatory
tags:   # optional
  - ${{DPDomain.Sales}}
  - ${{DPDomain.Marketing}}
  - ${{DPUsecase.Customer Segmentation}}
  - ${{DPUsecase.Product Recommendation}}
  - ${{DPTier.DataCOE Approved}}
description: ${{Leverages product affinity analysis to identify cross-sell opportunities, enabling businesses to enhance customer recommendations and drive additional sales by understanding the relationships between products purchased together}} # optional
refs:  # optional
  - title: ${{Workspace Info}} # optional
    href: ${{https://dataos.info/interfaces/cli/command_reference/#workspace}} # mandatory

# data product specific section

v1beta: # mandatory
  data: # mandatory
    meta: # mandatory
      title: ${{Product Affinity & Cross-Sell Opportunity}}
      sourceCodeUrl: ${{https://bitbucket.org/tmdc/product-affinity-cross-sell/src/main/}}
      trackerUrl: ${{https://rubikai.atlassian.net/browse/DPRB-65}}

    collaborators: # optional
      - name: ${{iamgroot}}
        description: ${{developer}}
      - name: ${{iamthor}}
        description: ${{consumer}}

    resource: # mandatory
      refType: ${{dataos}}
      ref: ${{bundle:v1beta:product-affinity-bundle}}

    inputs: # mandatory
      - refType: ${{dataos}}
        ref: ${{dataset:lakehouse:customer_relationship_management:customer}}

      - refType: ${{dataos}}
        ref: ${{dataset:lakehouse:customer_relationship_management:purchase}}

      - refType: ${{dataos}}
        ref: ${{dataset:lakehouse:customer_relationship_management:product}}

    outputs: # optional
      - refType: ${{dataos}}
        ref: ${{dataset:lakehouse:customer_relationship_management:product_affinity_matrix}}

      - refType: ${{dataos}}
        ref: ${{dataset:lakehouse:customer_relationship_management:cross_sell_recommendations}}

    ports: # optional
      lens:
        ref: ${{lens:v1alpha:cross-sell-affinity:public}}
        refType: ${{dataos}}
          meta:
            foo: ${{bar}}
The manifest file of a Data Product can be broken down into two sections:
- Product Meta section
- Data Product-specific section
Product meta section
The Data Product manifest comprises a product meta section outlining essential metadata attributes applicable to all product types. Note that some attributes are optional within this section, while others are mandatory.
# product meta section
name: product-affinity-cross-sell # mandatory
version: v1beta # mandatory
entity: product # mandatory
type: data # mandatory
tags:   # optional
  - DPDomain.Sales
  - DPDomain.Marketing
  - DPUsecase.Customer Segmentation
  - DPUsecase.Product Recommendation
  - DPTier.DataCOE Approved
description: Leverages product affinity analysis to identify cross-sell opportunities, enabling businesses to enhance customer recommendations and drive additional sales by understanding the relationships between products purchased together # optional
refs:  # optional
  - title: 'Workspace Info' # optional
    href: https://dataos.info/interfaces/cli/command_reference/#workspace # mandatory
For more information about the various attributes in the Product meta section, refer to the Attributes of Product meta section.
Data Product-specific section
This section focuses on Data Product-specific attributes, outlining resources, inputs, outputs, and use cases.
# data product specific section
v1beta: # mandatory
  data: # mandatory
    meta: # mandatory
      title: Product Affinity & Cross-Sell Opportunity
      sourceCodeUrl: https://bitbucket.org/tmdc/product-affinity-cross-sell/src/main/
      trackerUrl: https://rubikai.atlassian.net/browse/DPRB-65

    collaborators: # optional
      - name: iamgroot
        description: developer
      - name: iamthor
        description: consumer

    resource: # mandatory
      refType: dataos
      ref: bundle:v1beta:product-affinity-bundle

    inputs: # mandatory
      - refType: dataos
        ref: dataset:lakehouse:customer_relationship_management:customer

      - refType: dataos
        ref: dataset:lakehouse:customer_relationship_management:purchase

      - refType: dataos
        ref: dataset:lakehouse:customer_relationship_management:product

    outputs: # optional
      - refType: dataos
        ref: dataset:lakehouse:customer_relationship_management:product_affinity_matrix

      - refType: dataos
        ref: dataset:lakehouse:customer_relationship_management:cross_sell_recommendations

    ports: # optional
      lens:
        ref: lens:v1alpha:cross-sell-affinity:public
        refType: dataos
Apply the Data Product manifest file
To create a Data Product within the DataOS, use the apply command. When applying the manifest file from the DataOS CLI, apply command is as follows:
Syntax:
Example Usage:
dataos-ctl product apply -f /home/iamgroot/office/firstdp.yaml
# Expected Output:
INFO[0000] 🛠 product apply...
INFO[0000] 🔧 applying data:v1alpha:lens-dp-test...
INFO[0000] 🔧 applying data:v1alpha:lens-dp-test...created
INFO[0000] 🛠 product apply...complete
Once the design meets the requirements, the next phase involves building the Data Product.