Navigating Metis UI
Metis is a one-stop solution for data discoverability and managing all aspects of the data ecosystem. Metis UI helps users search, discover, understand, and trust data assets (tables, topics, dashboards, etc.), DataOS Resources (Workflows, Services, Stacks, etc.) and Data Products that exist for the entire organization. Users can easily collaborate with other team members, inform them about the updates on these assets, observe the changes in the metadata through versions, and accomplish more.
Metis UI Homepage
The homepage of Metis UI showcases a comprehensive overview of activities related to your data entities (Data products, data assets and DataOS Resources). Users can navigate through and interact with these entities for further exploration and management.
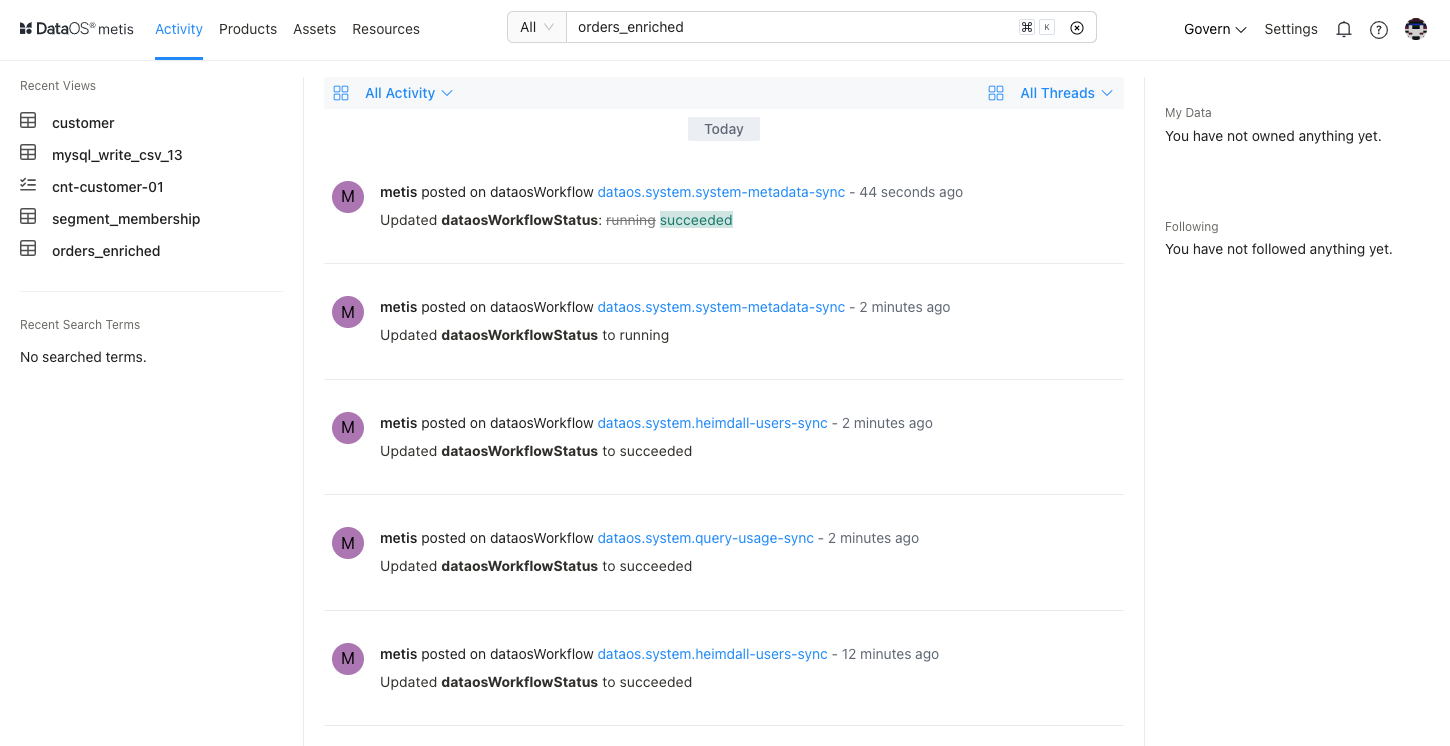
This document will cover the essential details about how to perform various functionalities, such as adding a glossary, starting conversations for collaboration, and many more.
Adding Tag Categories, Tags, and Glossary
Tags and glossary terms are two distinct and impactful features, each serving a unique purpose. Although they may appear similar at first glance, they are designed for different applications. Tags are labels that provide valuable assistance to individuals and groups, acting as helpful aids in discoverability. On the other hand, glossary terms play a crucial role in maintaining consistency across the entire company, ensuring the usage of common vocabulary.
Here are some scenarios where using these terms can be powerful:
- Labeling datasets with concepts that are relevant to the business/industry - Glossary
- Labeling a data asset with sensitivity information (PII, Highly sensitive, etc.)- Tag Category
- Applying Gold/Silver/Bronze data-tier labels based on centrally defined standards- Tag Category
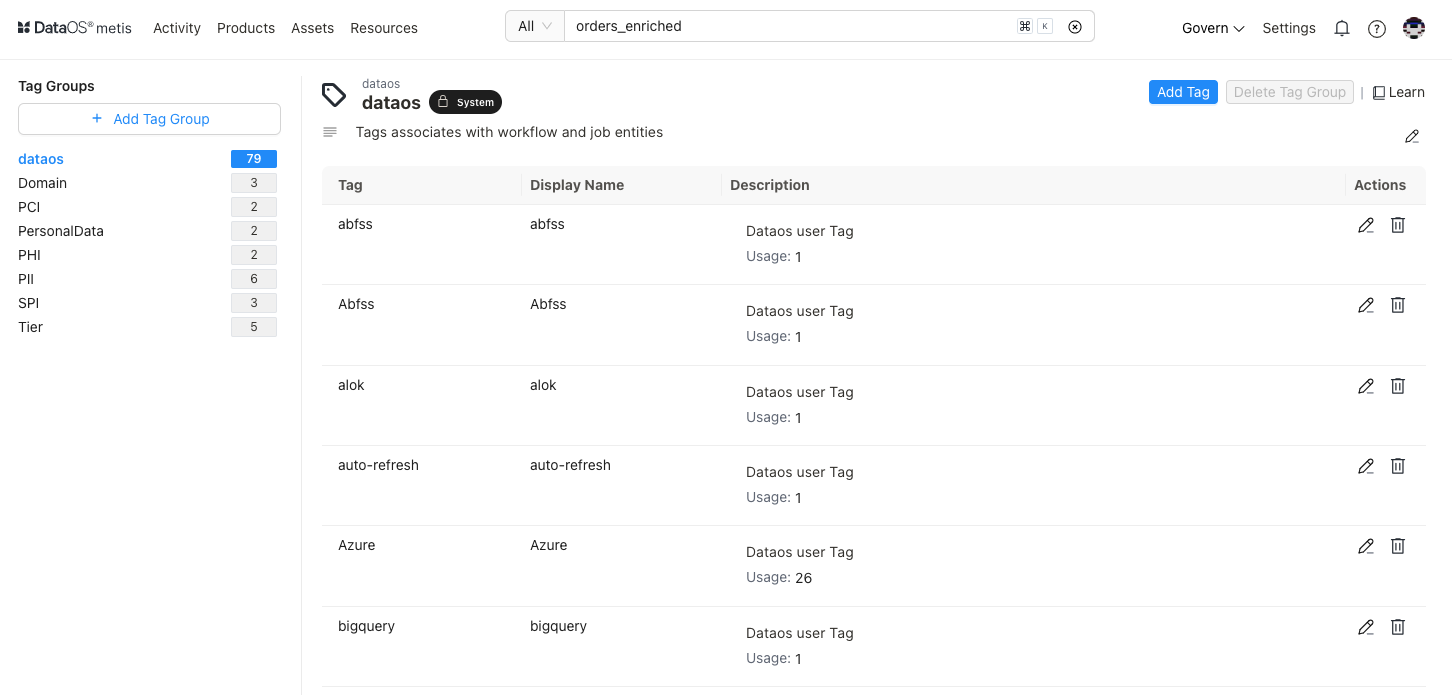
How to Define Tag Groups
- On Metis UI, click on Govern →Tag Groups.
- Clicking on the + Add Tag will open the screen to add a new tag group and its description.
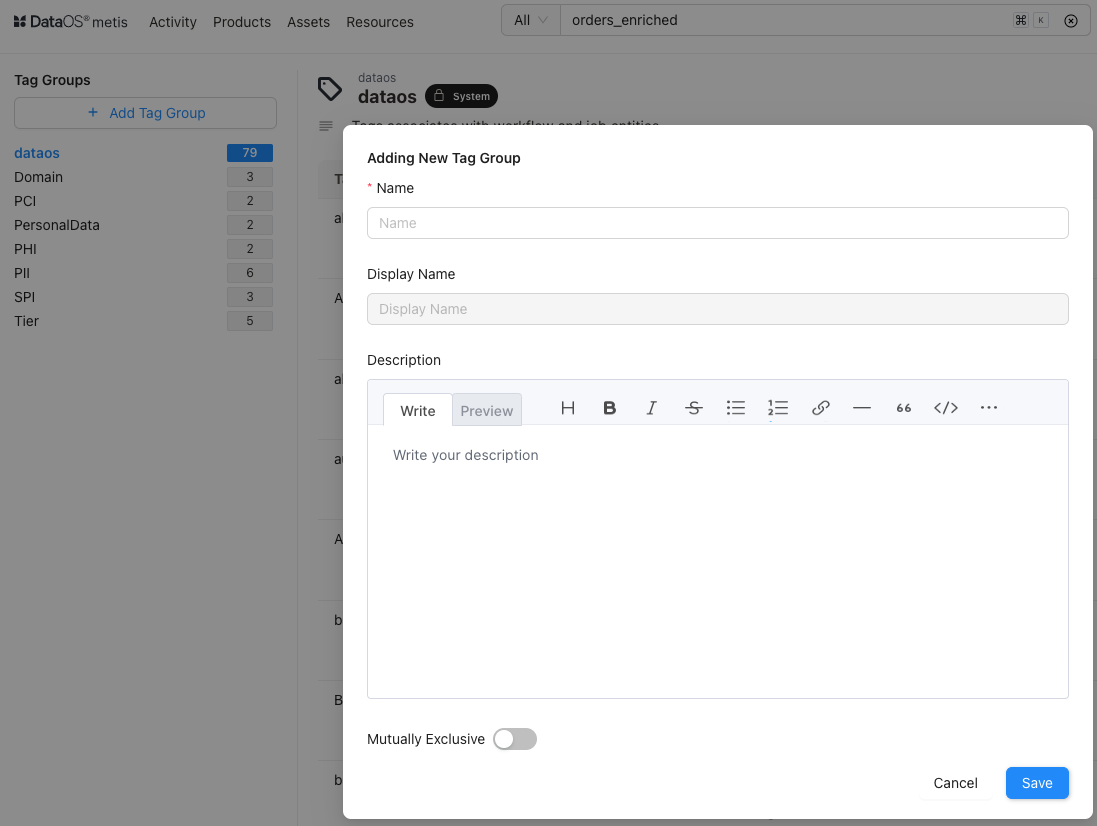
- Enable Mutually Exclusive Property to designate tag groups as mutually exclusive. When a tag group is marked as mutually exclusive, it implies that a metadata entity can be tagged to belong to one of the available tags defined in the group. To learn more, refer to Mutually Exclusive Tag Groups.
- Add new tags with proper descriptions for the newly added category and save them. Now, these tags can be added to the data entities.
How to Create a Glossary
- On Metis UI, click on Govern → Glossary.
- Clicking on + Add Glossary will open up the following form:
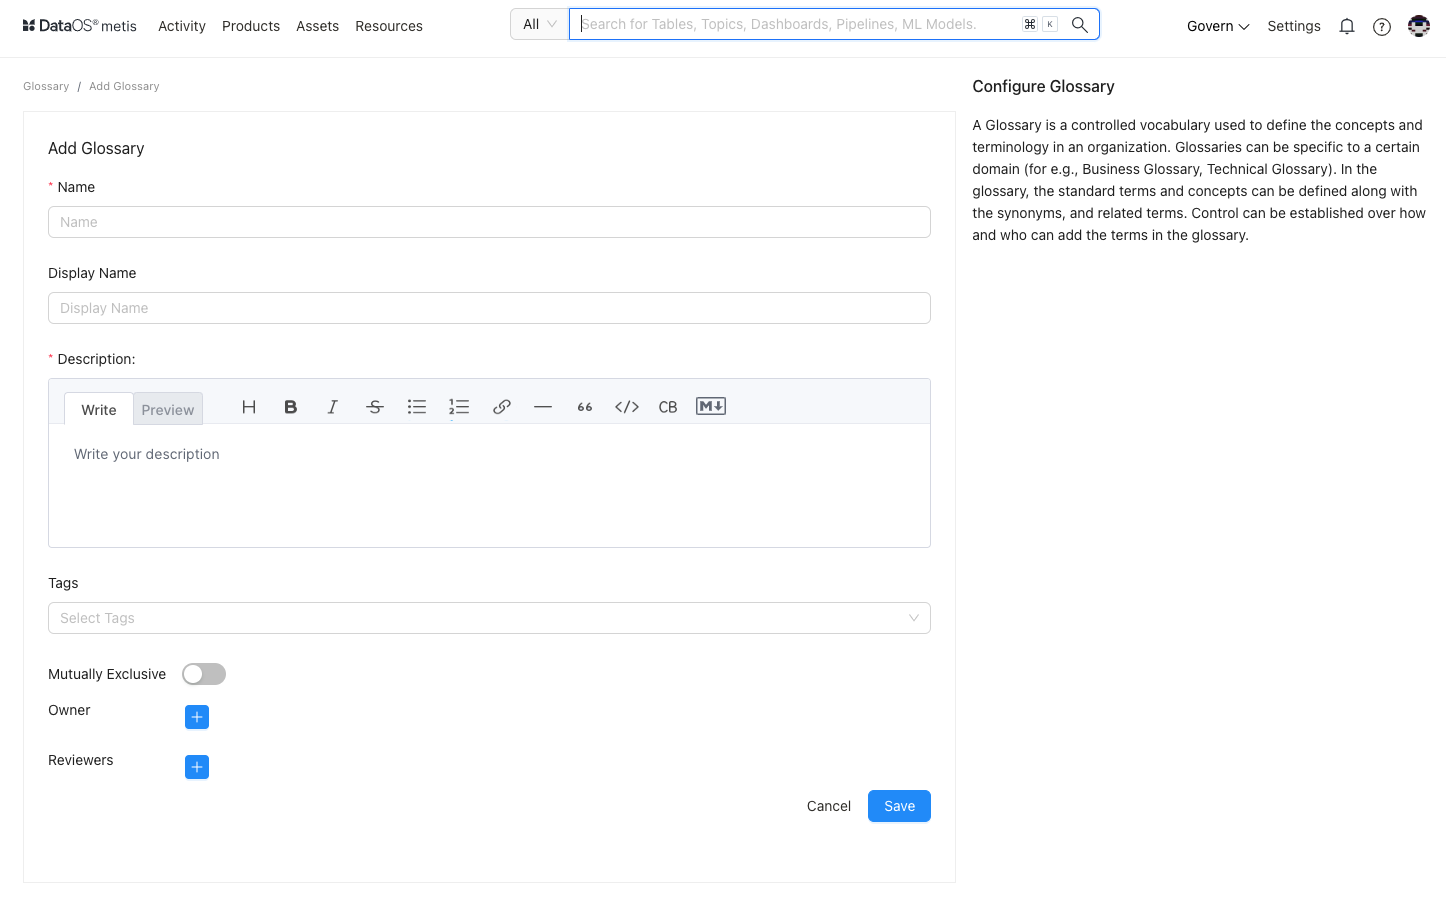
- Enable Mutually Exclusive Property to designate the glossary as mutually exclusive. When a Glossary is marked as mutually exclusive, it implies that a metadata entity can be tagged to any of the single glossary terms. It can not have two or more glossary terms attached to it simultaneously.
- Add owners and reviewers and save it. Your glossary will appear on the left pane.
How to Add Glossary Terms
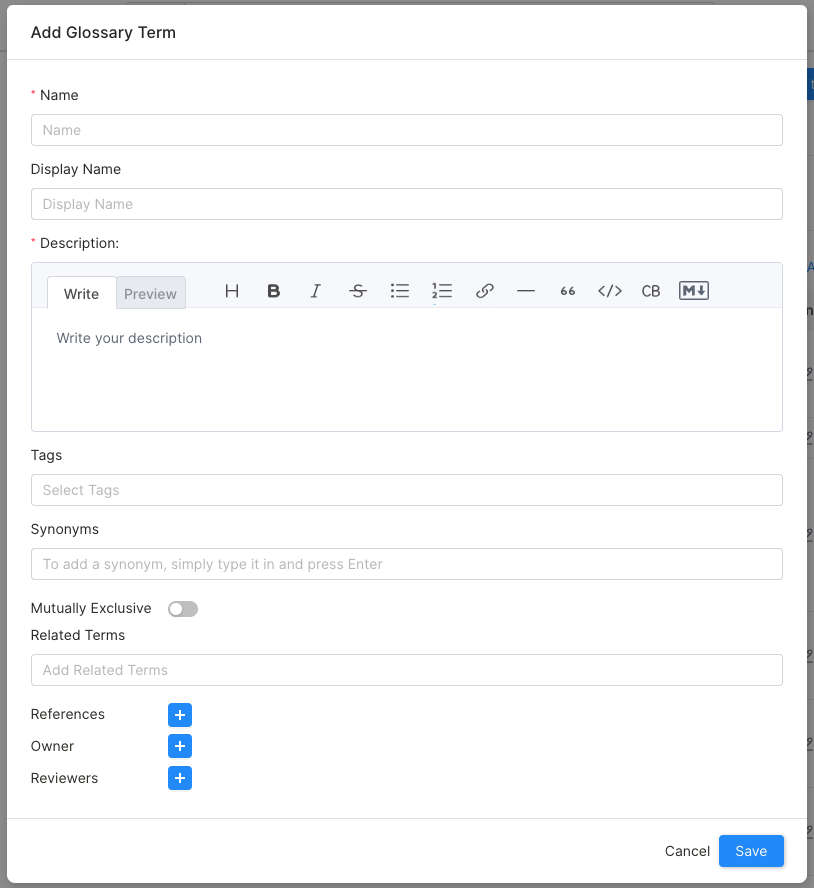
- To create a glossary term, select the newly added glossary on the left pane and then select the Add term button on the page.
- Give this new term a name, which must be unique in the glossary.
> Metis enables you to add rich formatting to glossary term. For example, you can add `bold`, `underline`, or `italic` formatting to the text. You can also create tables, bulleted lists, or hyperlinks to external resources.
>
- You can add synonyms, the other terms used for the same term, such as for customer, you can add client, buyer, etc.
- You can add related terms for the term, such as for customer, you can add related terms ‘loyal’, ‘preferred’, ‘high-importance’, etc.
- Add links from where you inherited the term.
- Add the tags which are already existing in DataOS
- A term also has a set of Reviewers who review and accept the changes to the Glossary. This is to ensure the consistent use of terms across the organization.
How to Bulk Upload Glossary
Metis facilitates a Glossary Bulk Upload feature. During the bulk upload process, Owners and Reviewers can be specified. These designated individuals will then be automatically associated with each glossary term, streamlining the management and oversight of the entire glossary.
To import a glossary into Metis:
-
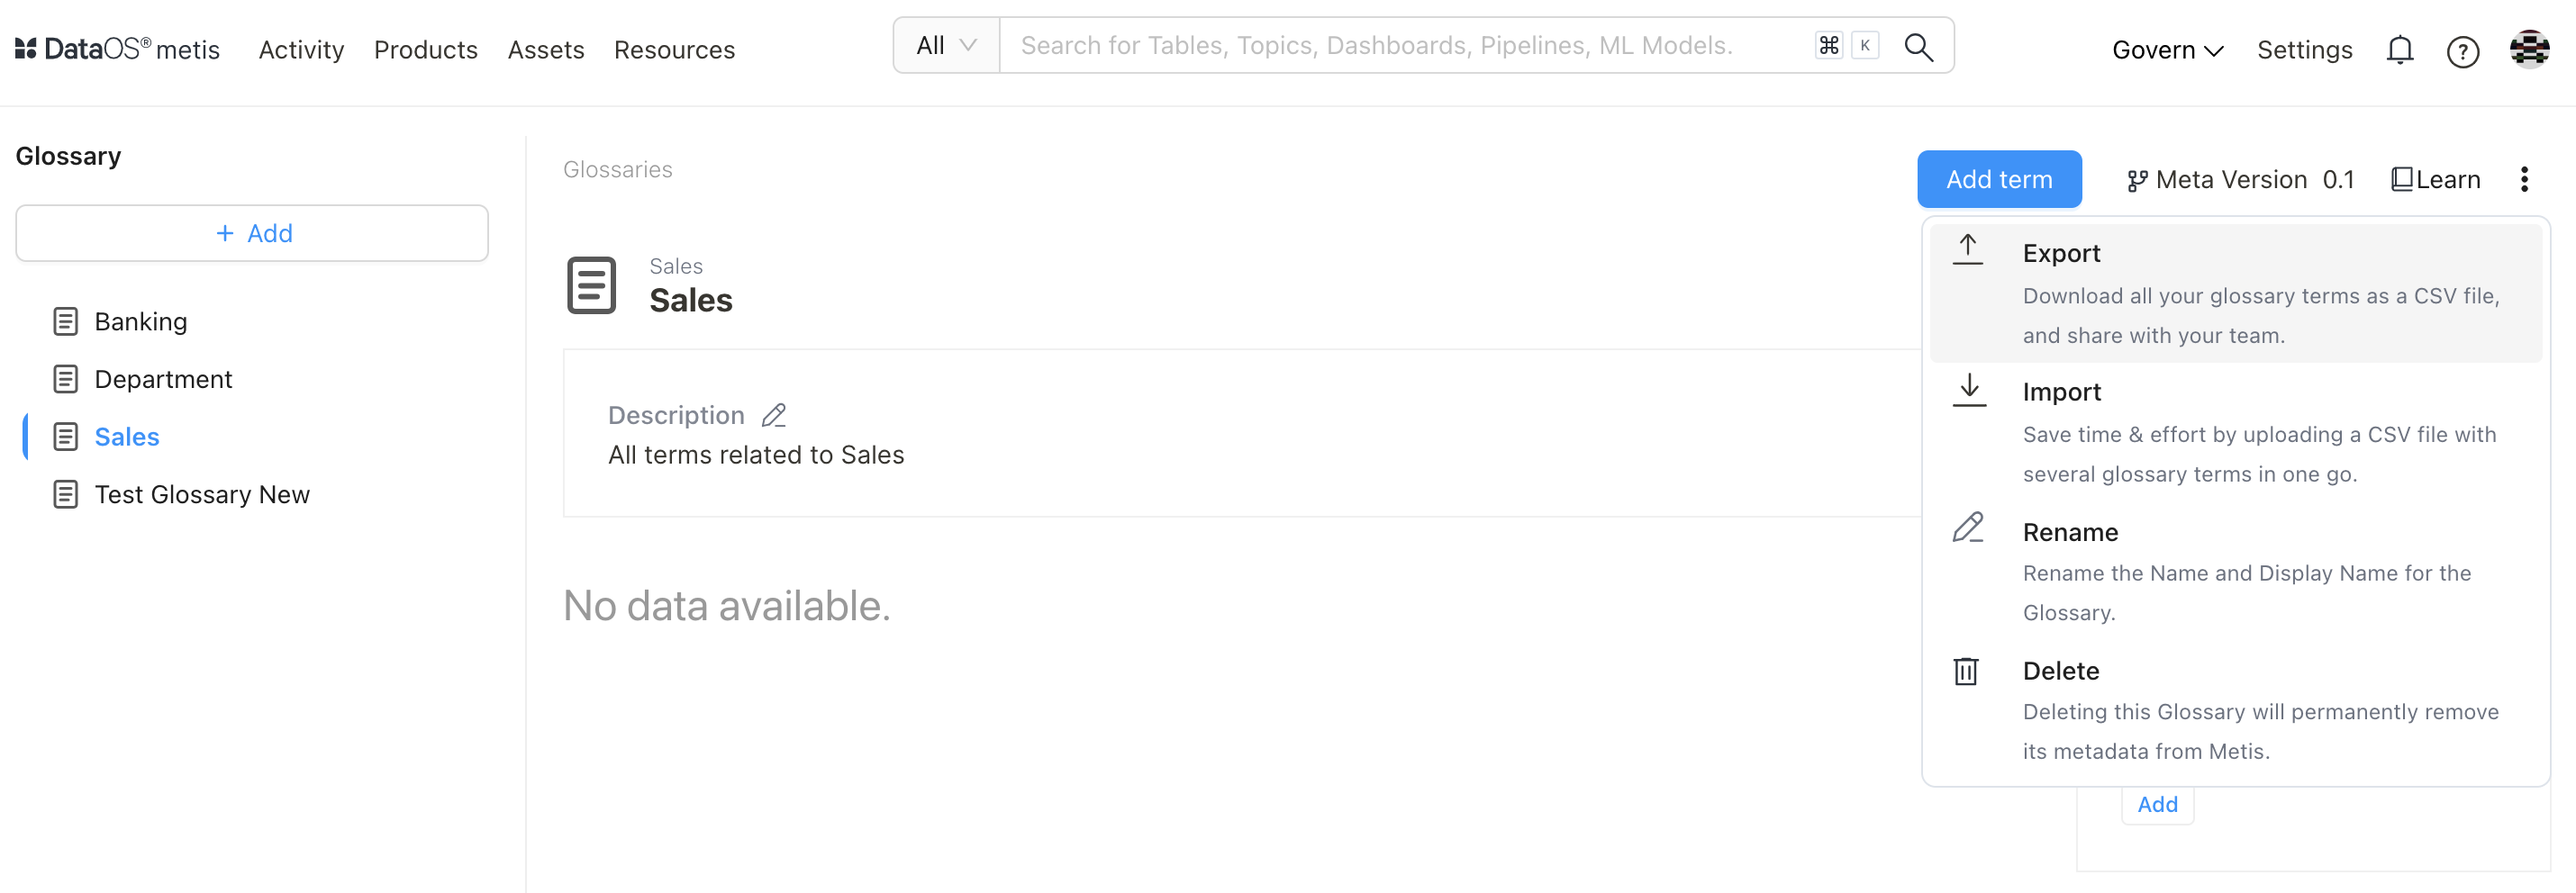
Navigate to Govern > Glossary.
-
Click on the ⋮ icon and Export the glossary file. If you have glossary terms in your Glossary, the same will be exported as a CSV file. If there are no terms in the Glossary, then a blank CSV template will be downloaded.
-
Once you have the template, you can fill in the following details:
- parent - The parent column helps to define the hierarchy of the glossary terms. If you leave this field blank, the Term will be created at the root level. If you want to create a hierarchy of Glossary Terms, the parent details must be entered as per the hierarchy. For example, from the Glossary level,
Banking.Account.Savings Account - name- This contains the name of the glossary term, and is a required field.
- displayName - This contains the Display name of the glossary term.
- description- This contains the description or details of the glossary term and is a required field.
- synonyms - Include words that have the same meaning as the glossary term. E.g., for the term ‘Customer’, the synonyms can be ‘Client’, ‘Buyer’, or ‘Purchaser’. In the CSV file, the synonyms must be separated by a semicolon (;) as in
Client; Buyer;Purchaser - related terms - A term that has a related concept as the glossary term. This term must be available in Metis. E.g., for the term ‘Customer’, the related terms can be ‘Customer LTV (LifeTime Value)’, and ‘Customer Acquisition Cost (CAC)’. In the CSV file, the related terms must contain the hierarchy, which is separated by a full stop (.). Multiple terms must be separated by a semicolon (;) as in
Banking.Account.Savings account;Banking.Debit card - references - Add links from the internet from where you inherited the term. In the CSV file, the references must be in the format (name;url;name;url)
IBM;https://www.ibm.com/;World Bank;https://www.worldbank.org/ - tags - Add the tags which are already existing in Metis. In the CSV file, the tags must be in the format
PII.Sensitive;PersonalData.Personal
- parent - The parent column helps to define the hierarchy of the glossary terms. If you leave this field blank, the Term will be created at the root level. If you want to create a hierarchy of Glossary Terms, the parent details must be entered as per the hierarchy. For example, from the Glossary level,
-
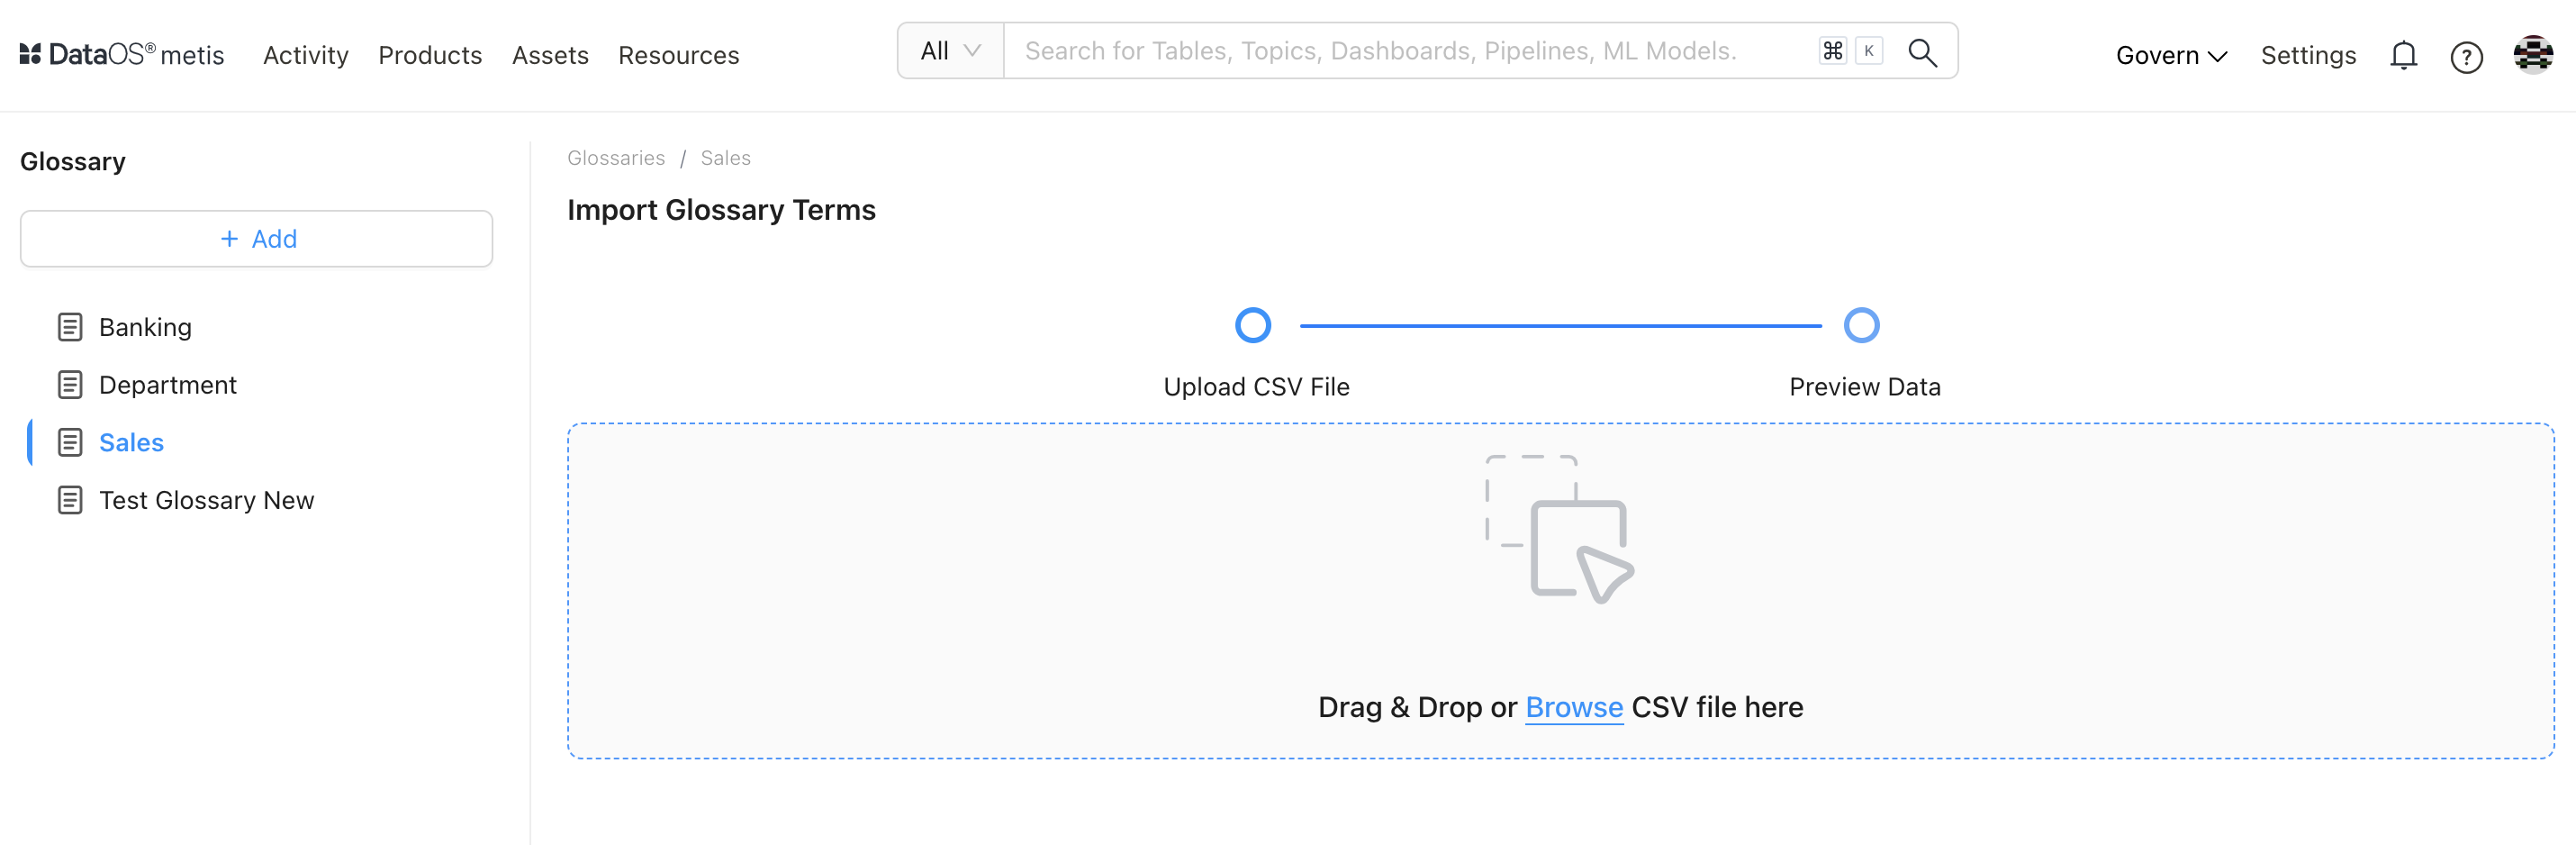
Once you have added the values for the above fields in CSV you can upload it via Import option.
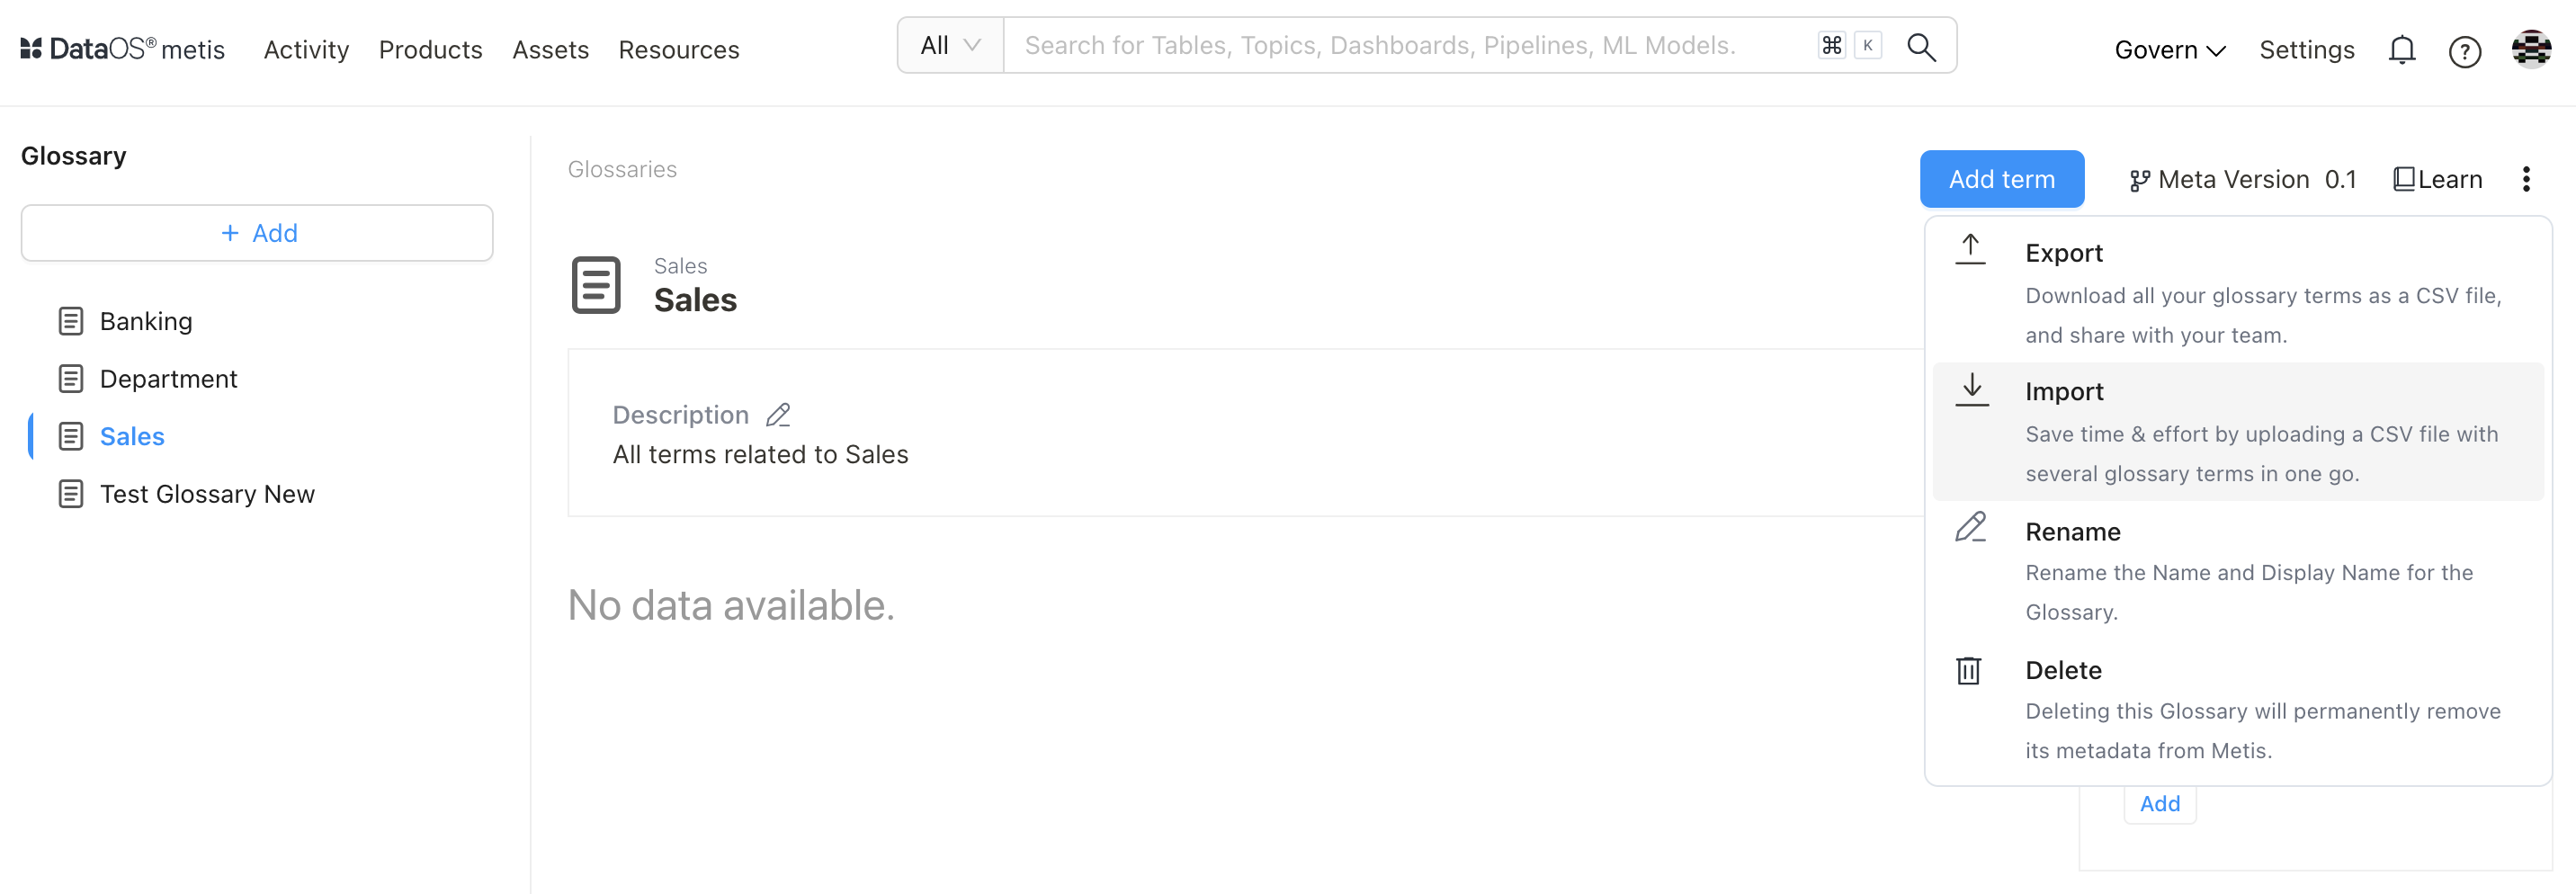
- Choose the file to be uploaded and the Glossary will be populated.
How to Add Tags to DataOS entities
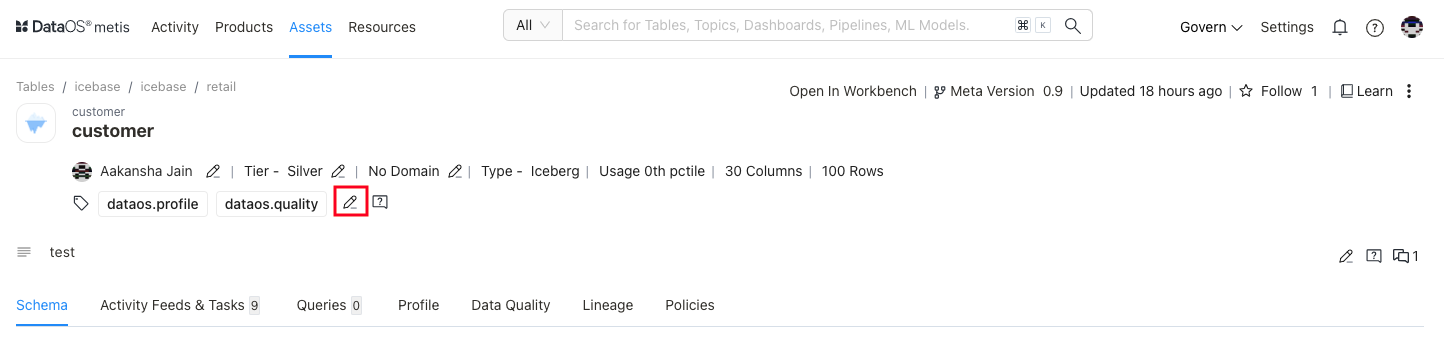
On the DataOS entity detailspage, click on the highlighted Edit icon. Choose a tag from a list of tags defined in Metis for various categories.
How to Add Tag Tiers
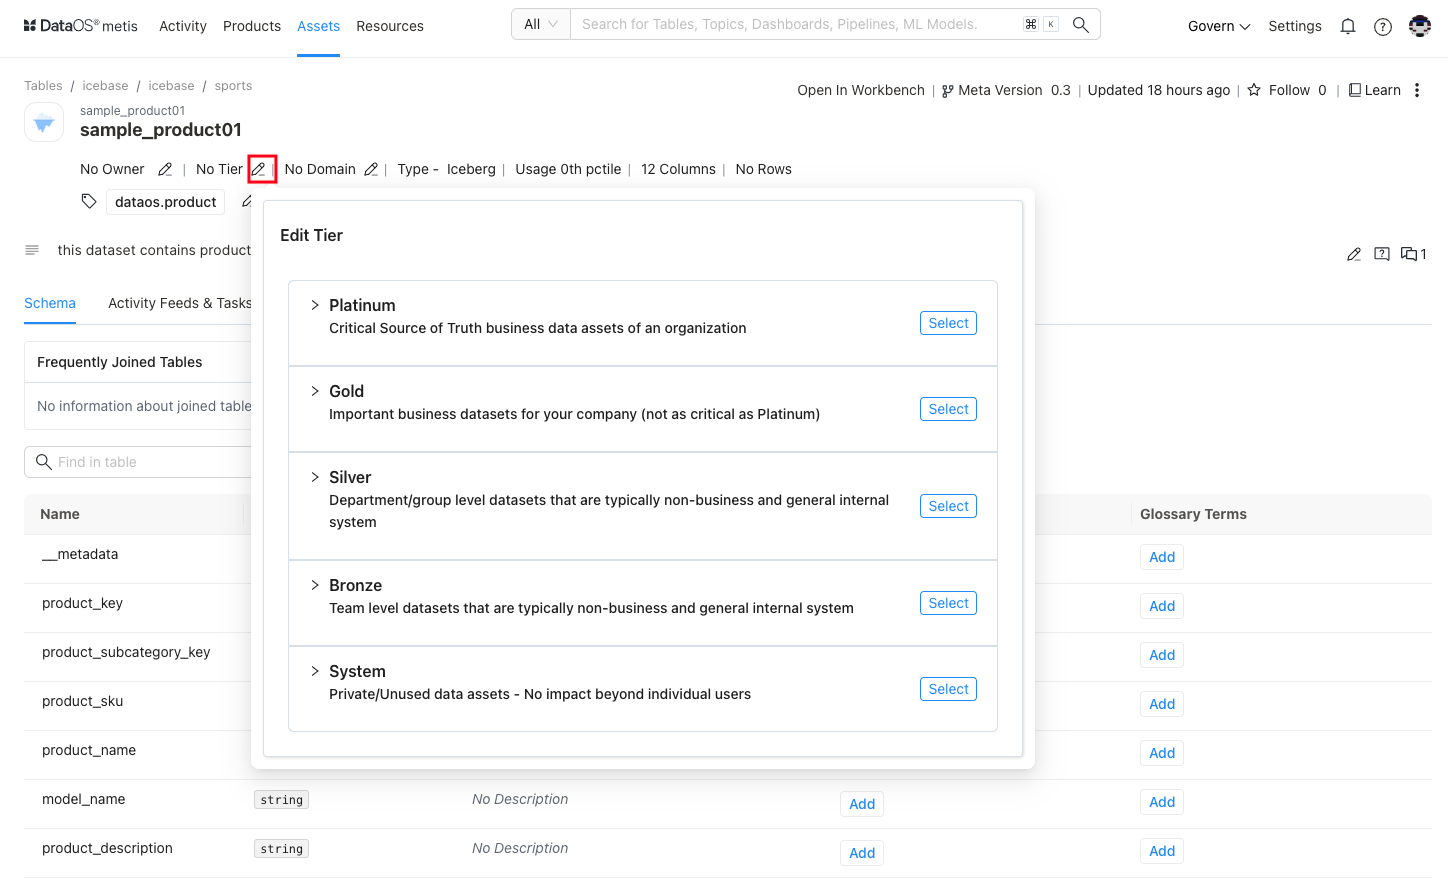
On the DataOS entity detailspage, click on the edit icon next to the Tag Tier.
How to Collaborate with Team Members
Start Conversations
You can collaborate with your team by starting conversation threads and asking for dataset descriptions or tags for an entity by clicking the chat icon. Metis enables you to easily ask any questions that you might have about an entity.
You can create and reply to entire conversation threads around various activities across any DataOS entity. You can also add reactions with emojis.
- On the entity DataOS entity detailspage, click on the highlighted icon for conversations. The number on it denotes the messages in the conversation thread. The right pane will show the conversations.

- A side pane will open.

-
Clicking on the + sign will open the editor for the new conversation.
-
You can also add conversation threads to the columns of your dataset.

Create Announcements
This feature helps in informing the entire team (or other users) about the changes to the data, such as deprecation, deletion, or schema changes so that other team members are prepared to handle the impact.
These announcements can be scheduled with a start date and an end date. All the users following your data are notified in Activity Feeds about the announcement.
- On the DataOS entity details page, click on the vertical three-dot menu to get the option to add an announcement for the asset.

- Clicking on the Add Announcements button will open the dialog box to enter the details, such as title, description, start and end date.
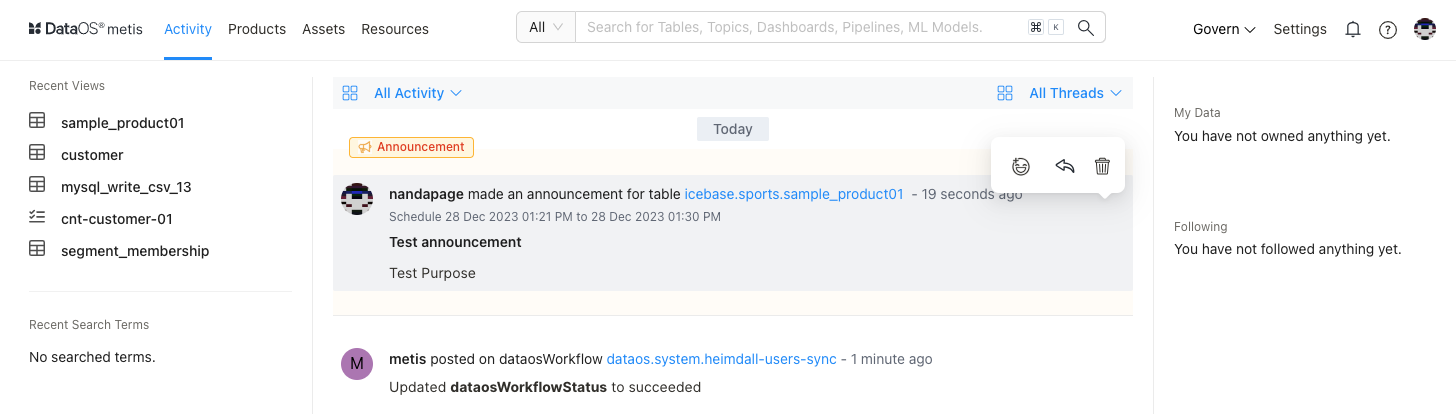
- On Metis UI, under ‘All Activity’, users can view the announcements. Users can add reactions using emojis and reply to the announcement.
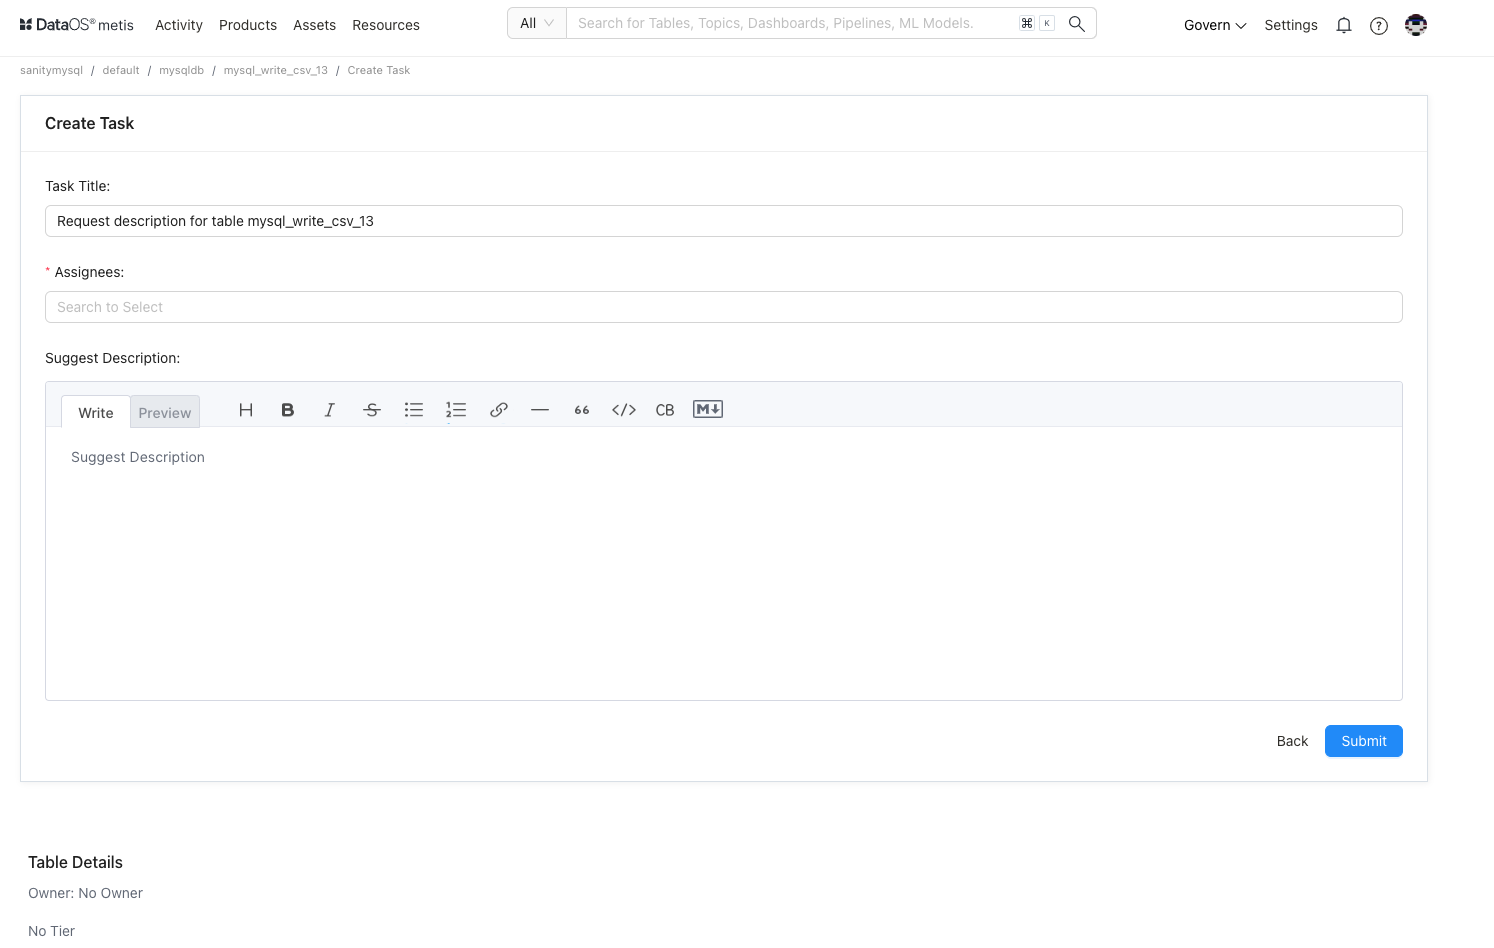
Create Tasks for Team Members
You can create tasks for requesting updates on data assets, such as creating tags or updating the description of a data asset and assigning the task to an appropriate user or team.
- On the DataOS entity detailspage, click on the highlighted icon to get the option to add a task.

- Create the task and provide the description for it. You also need to assign team members by adding @ symbol. This task will appear in Activities for the assignee.
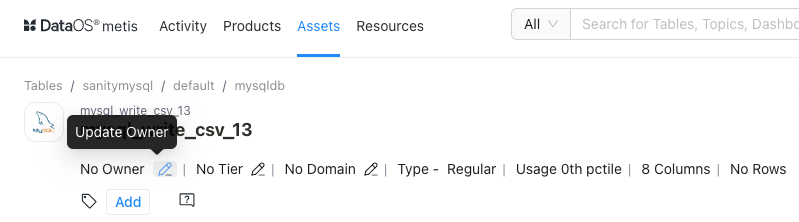
How to Manage Ownerships
On the DataOS entity detailspage, click on the edit icon next to No Owner. You can add the team or individual person as an owner of the data asset.
How to Create Roles and Policies
The Metis administrator has to decide on the roles users must be given along with the set of permissions for the roles. Permissions are a set of rules pertaining to various metadata operations that can be performed using Metis UI and APIs. These permissions are part of the policies corresponding to each role. When users are assigned roles, they automatically get the permissions defined for the roles.
Pre-defined Roles and Policies
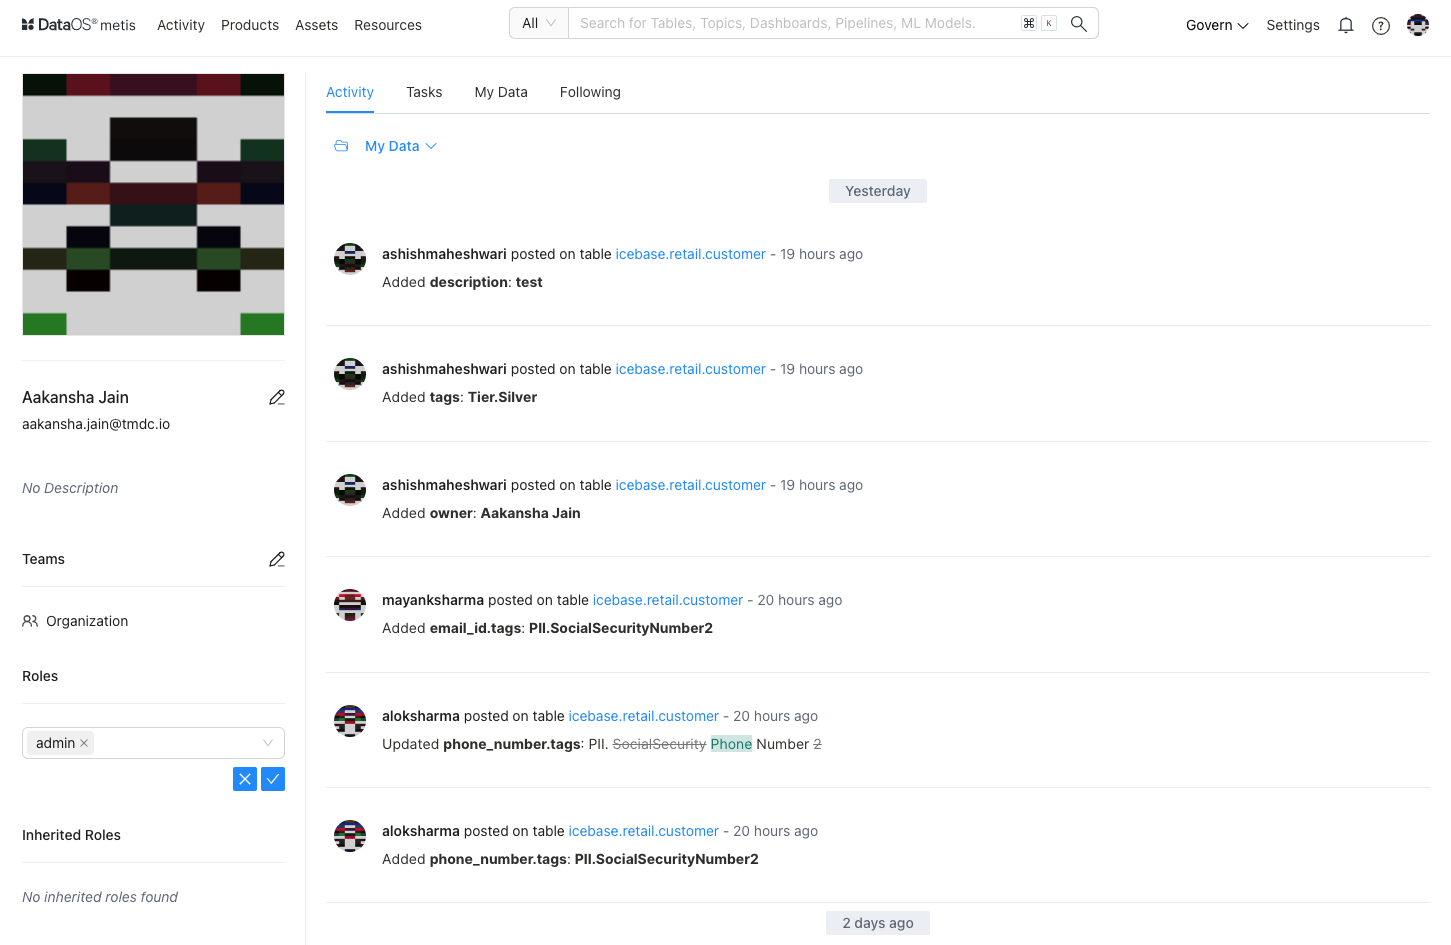
How to Add Configured Roles for Users
Roles can be assigned from the user profile on the Metis UI.
- On the Metis UI page, navigate to the Settings tab.
- Clicking on the Users in the left pane will show the list of users. Open the specific user’s profile. In the left pane, edit the roles given to the user. A drop-down list will show the configured roles to choose from.
How to Get Data Profile Information
Data profiling workflow analyzes the valid formats, null and inconsistent values within data to uncover anomalies and redundancies to achieve higher data quality. It uses basic statistics to gain insight about the validity of the data. The Data Profile scan workflow reads data profiling statistics and saves this information into Metis DB, which can be accessed on Metis UI.
- Search the dataset for which you want to view the data profiling results.
- Click on the Profiler & Data Quality tab on the DataOS entity detailspage.
- You will see the data profiling statistics for the columns. It gives data types, null values %, distinct value %, and unique values % for each column. It also shows you ‘value count’, which helps you to know the completeness and missing values for the column before you use the data for critical business use cases.
- Click on a column to see more details on the statistical distribution of its values. You need to select the time period to see all the test results run for the particular column of the dataset.
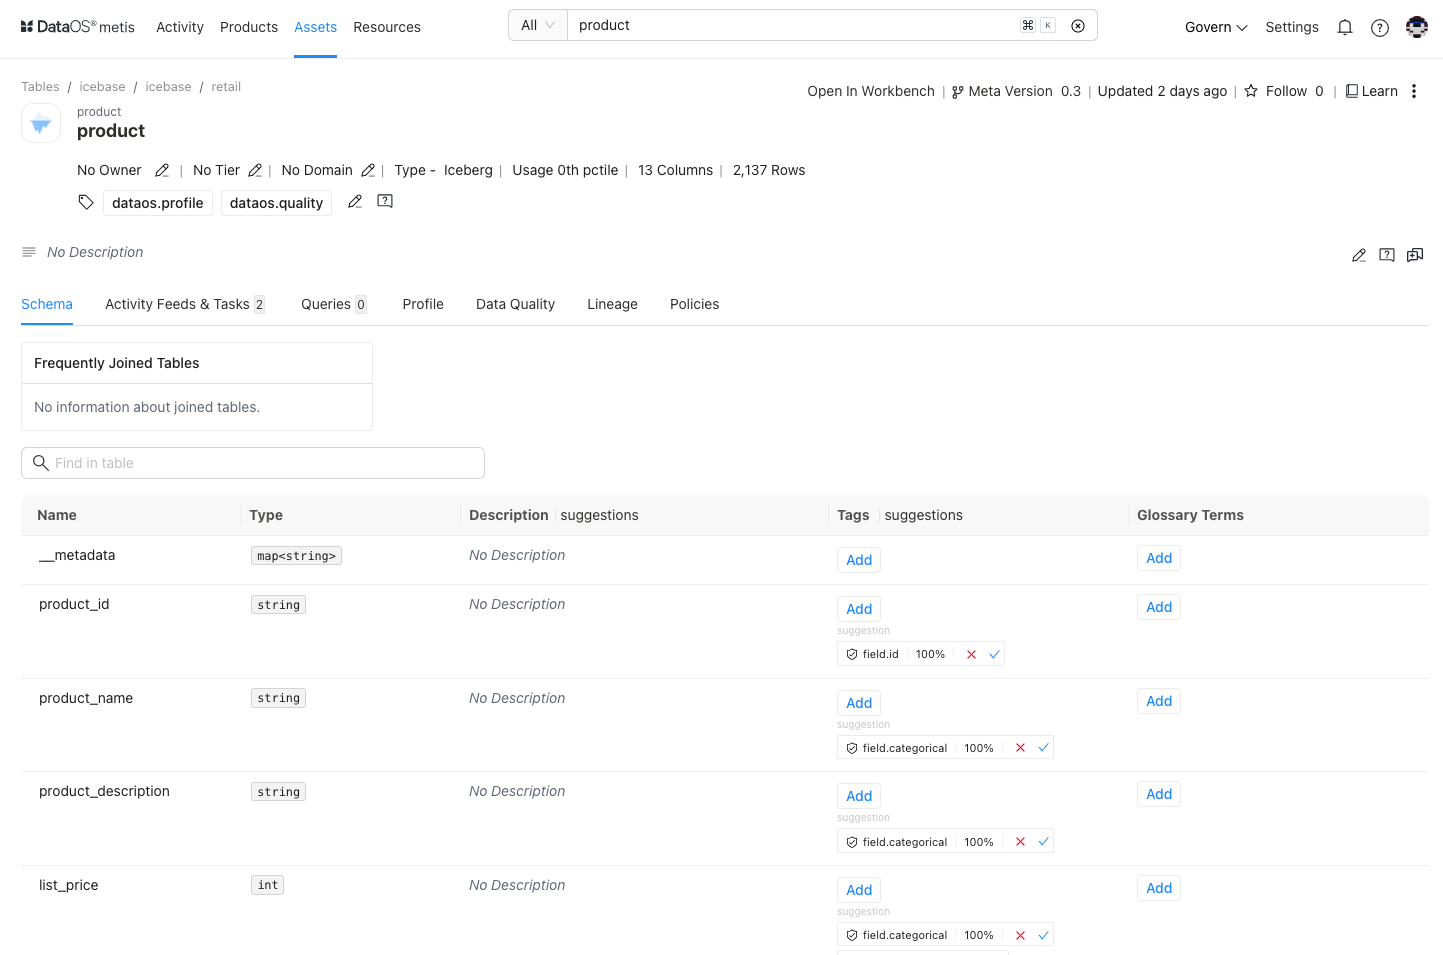
How to Get Fingerprinting Information
Fingerprinting analyzes the data to know that a column of data has a signature or a pattern. By examining the data values in a column, it can identify what type of data is there and determine what business terms or labels can be attached to this data. Fingerprinting automates identifying sensitive data (PII tag)that needs to be secured and to comply with government regulations like the GDPR.
This information is shown on the Metis UI for your dataset.
On the DataOS entity detailspage, you will see the following fingerprinting data for your dataset.
- Column names for which fingerprinting is performed.
- Label showing the labels identified in the data. These labels are defined as system labels or according to business value.
- For each label, you will get an option to accept the label to tag the fingerprint to the column or discard the label.
- The confidence score reflects the system's degree of certainty that the identified label/classification is correct.
- Once you accept the label, it will be added as a tag to the column.
How to Visualize Data Quality Tests
You can view the list of quality tests (SLOs)created for the columns of your dataset to monitor the data quality and trends charts for each run. The trend charts also show whether the checks are passed or failed.
Test Suite View
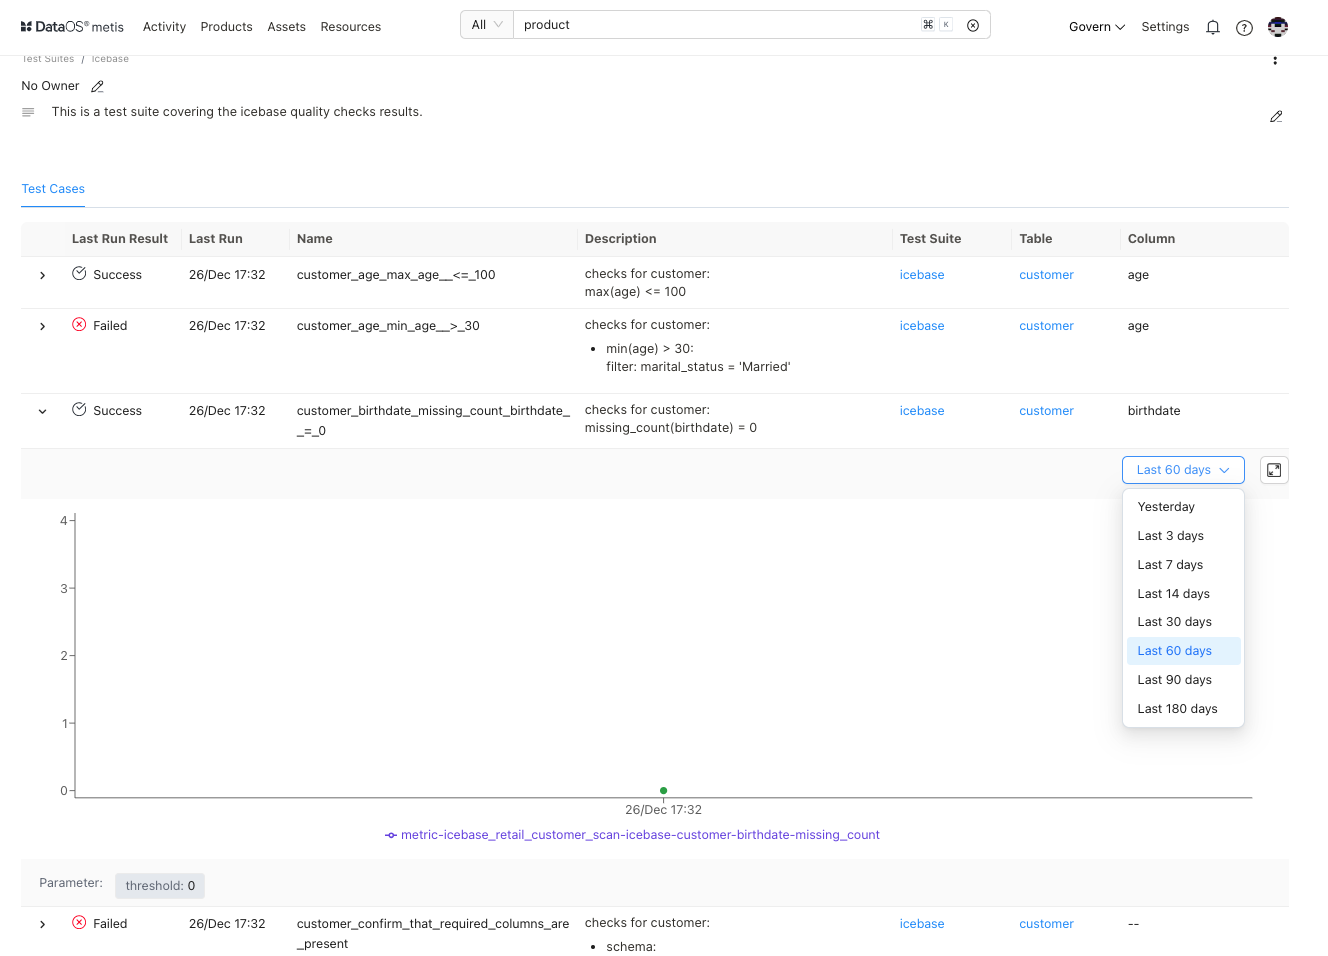
- On the Metis UI page, click on Govern > Quality. You will see the list of test suits appeared on the screen.
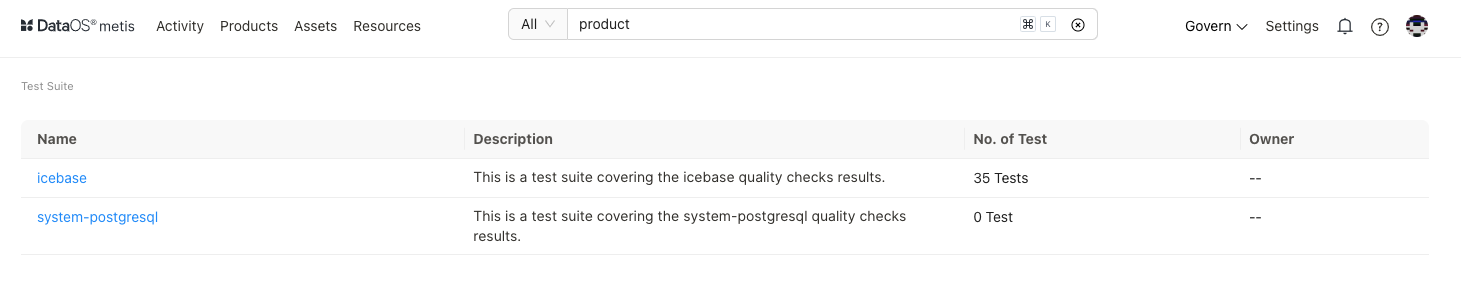
- Select the test suit for which you want to see quality test results. The list shows the latest test run results for all the datasets and their columns.
- Expand to see all the test results for a dataset column for the particular time period.
Dataset View
- Search the dataset for which you want to view quality test results.
- Click on the Profiler & Data Quality tab on the DataOS entity details page.
- You will see the summary. In the summary for quality test runs for the columns, click on the Data Quality tab to see a list of results of the last test run for the dataset. You can expand and select the time period to see all the test results for the particular column of the dataset.
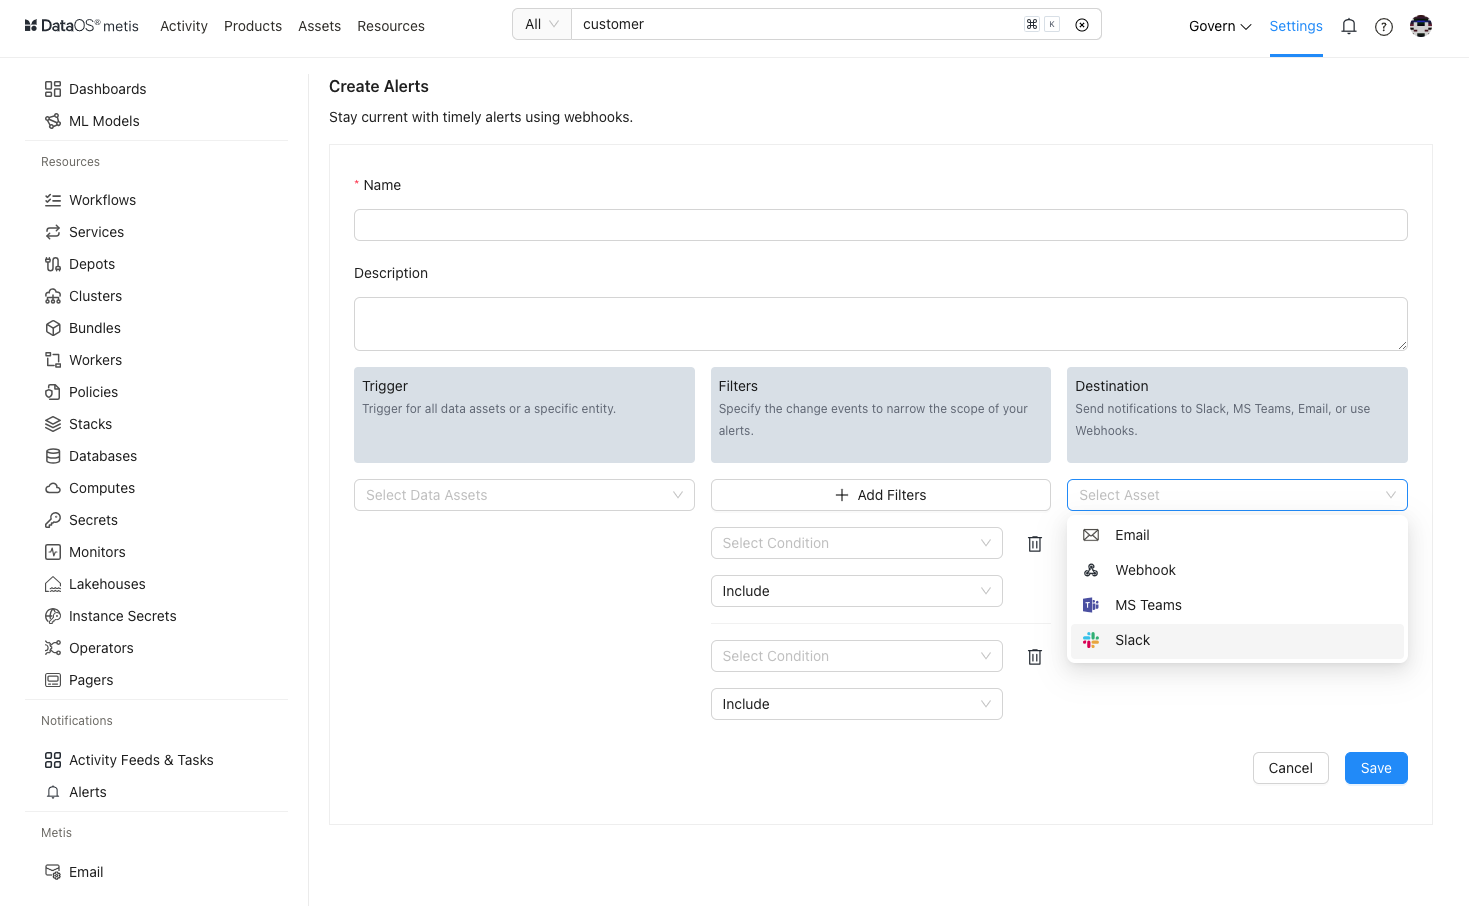
How to configure Alerts and Notifications
Metis allows users to define fine-grain notifications for alerts. You can select owners and various roles to be notified. It provides native integration with Teams, Slack, MS Webhook, etc. It also introduces the ability to send email alerts.
- On the Metis UI page, navigate to the Settings tab. Click on Alerts in the left pane to get the configuration options.
- To configure the alert, you will first need to add a Name and a Description for your alert.
- Provide Alert settings:
- Trigger: Choose when your alert should activate. You can select all existing assets or specific ones.
- Filter: Add event filters to specify which events trigger an alert. Use "Allow" to send an alert when the condition is met and "Deny" to silence it.
-
Destination: Decide where your alert should be sent. We offer four options: Slack, MS Teams, Email, and Webhook.
Configuration Details for Destinations (Webhook, Slack, MS Teams):
-
Webhook, Slack, Ms Team:
- Endpoint URL of the channel where you want to send alerts.
- Set parameters for:
- Batch Size: The size of the batch sent to the endpoint.
- Connection Timeout: The timeout for the connection.
- Secret Key: This key can be used to secure the connection.
- Email:
- For email alerts, provide configure settings for SMTP Server.