Integrating Data Products with Tableau Cloud
The following document outlines the process for integrating semantic model with Tableau Cloud.
The semantic model can be integrated with Tableau Cloud using the following ways:
-
Using Data Product Hub (Recommended – GUI based): Add connection details through an intuitive graphical interface.
-
Using cURL command (Command-Line based): Add connection details in the terminal via cURL command.
Using Data Product Hub(Recommended - GUI based)
Follow the below steps:
Step 1: Navigate to the Data Product Hub
Access the Home Page of DataOS. From the home page, navigate to the Data Product Hub to explore the various Data Products available.
.png)
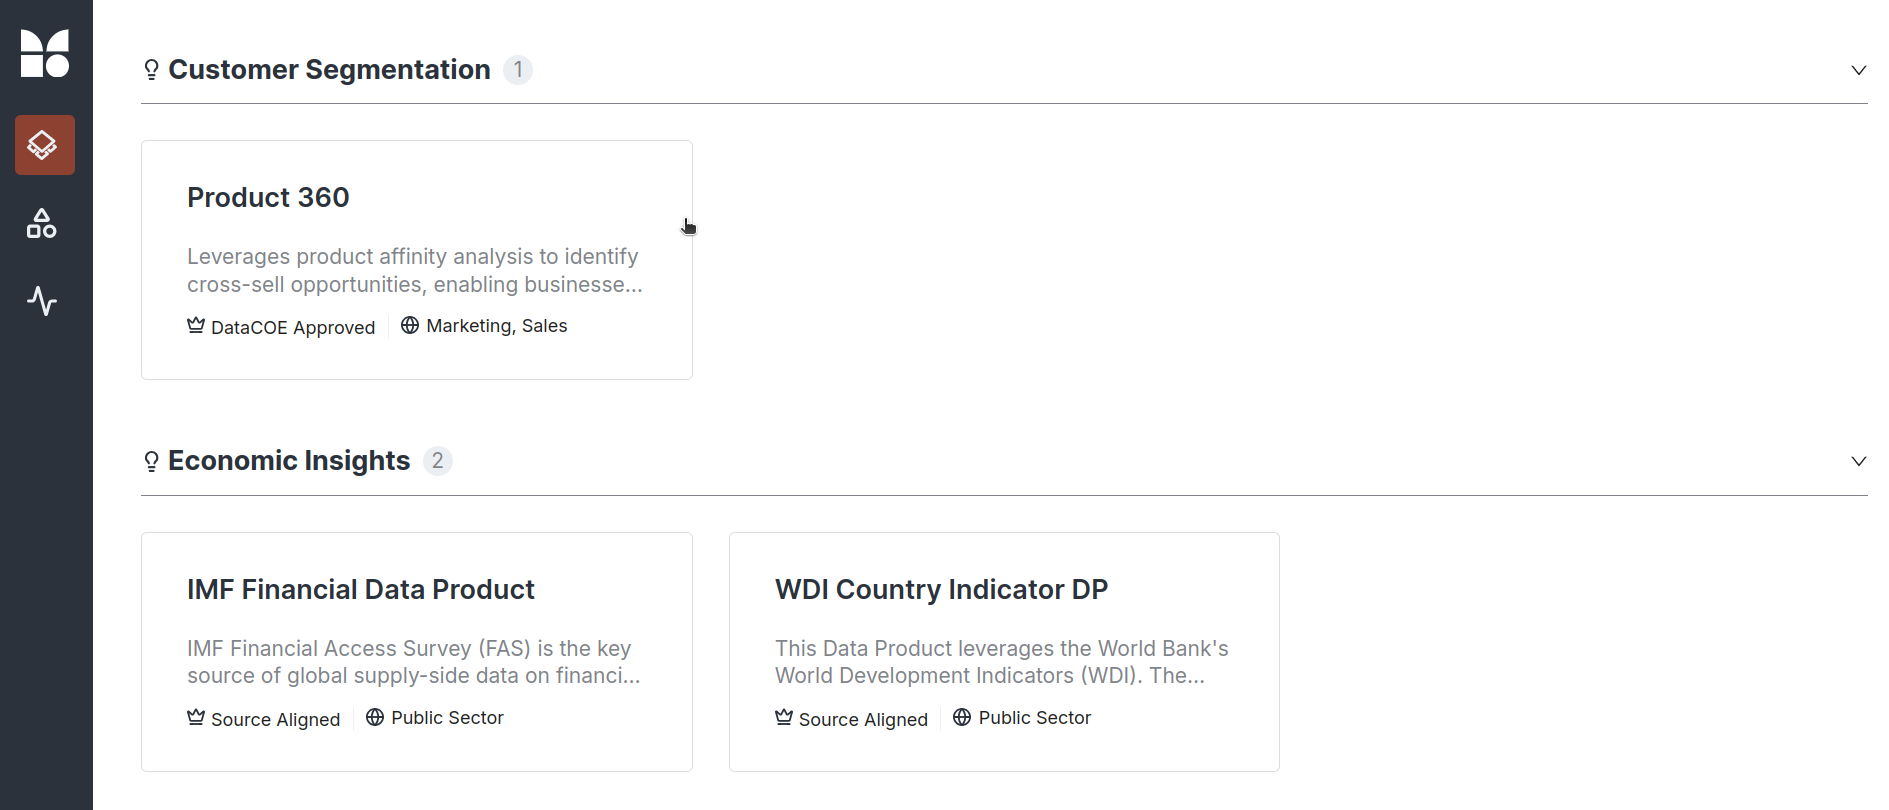
Step 2: Browse and select a Data Product
Browse through the list of available Data Products. Select a specific Data Product to integrate with Tableau. For instance, Product 360 can be chosen to explore the Data Product on Tableau for data visualisation and getting insights.
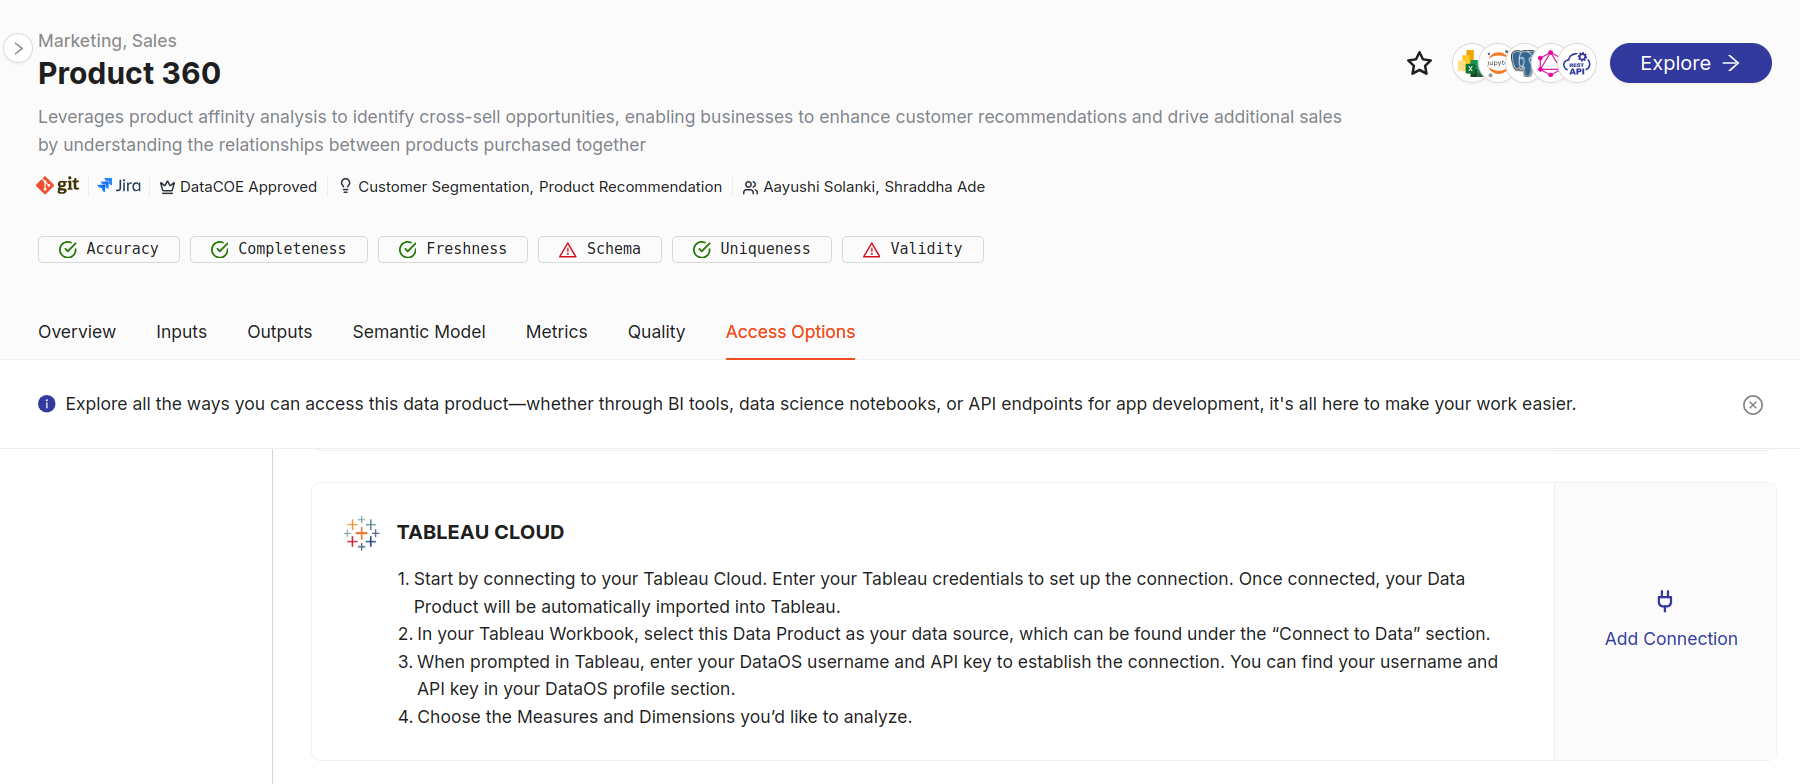
Step 3: Navigate to the Access Options
After selecting a Data Product, navigate to the BI Sync option in the Access Options tab. Scroll through the BI Sync and locate the Tableau Cloud option. Now, Click on the Add Connection button
Step 4: Enter connection details and click Activate button
A connection window will open, prompting the entry of the necessary connection details. There are following two ways to pass the connection details:
- Connection details for connecting using Tableau username and password
- Connection details for connecting using Tableau PAT
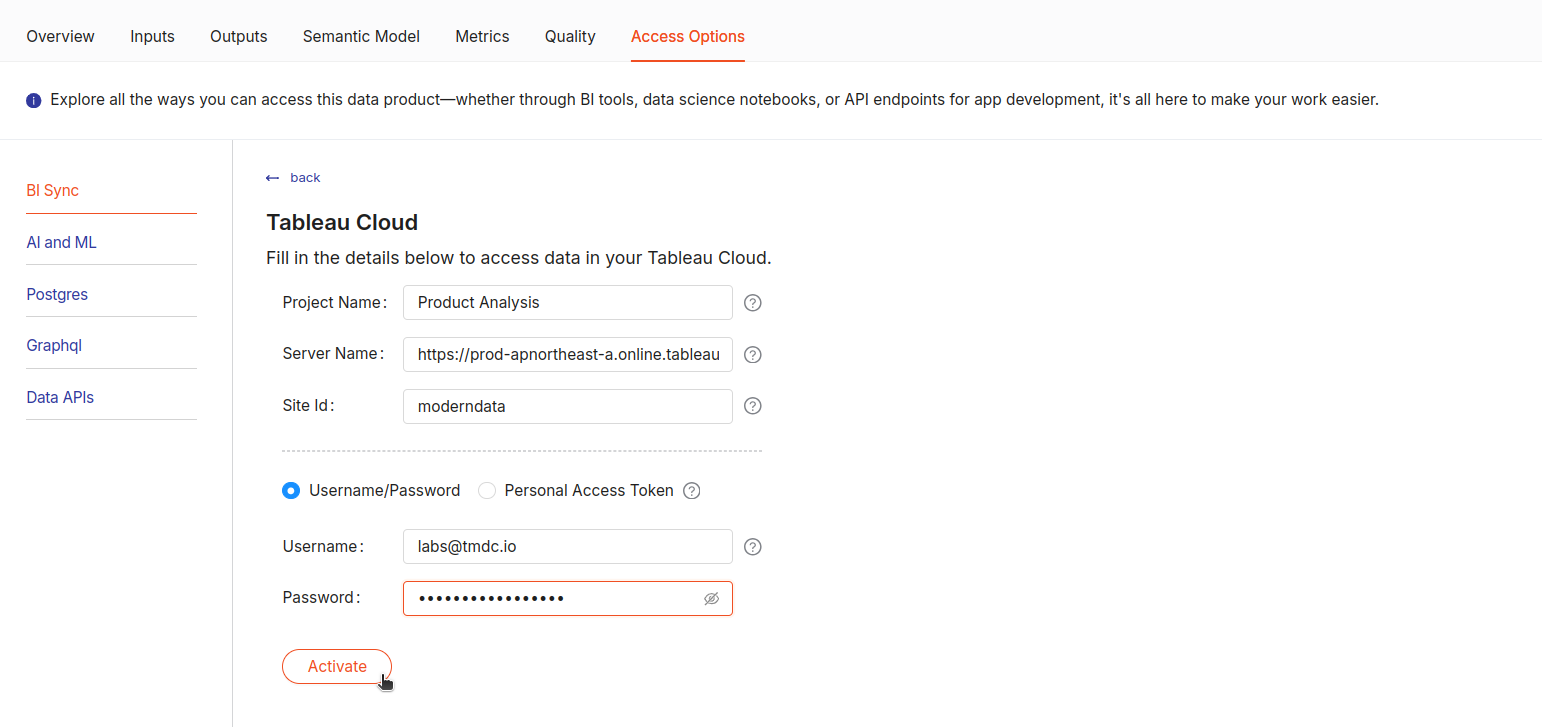
Connection details for connecting using Tableau username and password
- Project Name: Enter the Tableau project name. If a project with that name does not already exist, it will be created automatically. If you do not specify a name, the project will default to the name of the Data Product, which will register all associated data sources under that project.
For optimal organization within Tableau, we recommend providing a custom project name it facilitates easier navigation of your data sources.
- Server Name: The address of the Tableau server (e.g.,
https://prod-apnortheast-a.online.tableau.com). - Site ID: The site ID (e.g.,
tableausuer@123). - Username: The Tableau username.(e.g.,
labs@tmdc.io) - Password: The password associated with the Tableau account.
These details can be obtained upon logging into Tableau. The URL format will appear as follows:
https://prod-apnortheast-a.online.tableau.com/#/site/site_id
Sample URL:
https://prod-apnortheast-a.online.tableau.com/#/site/tableauuser@123/home
In this example, tableuuser@123 represents the site_id.
After entering the required credentials, click the Activate button to establish the connection. A confirmation message will appear upon successful connection.
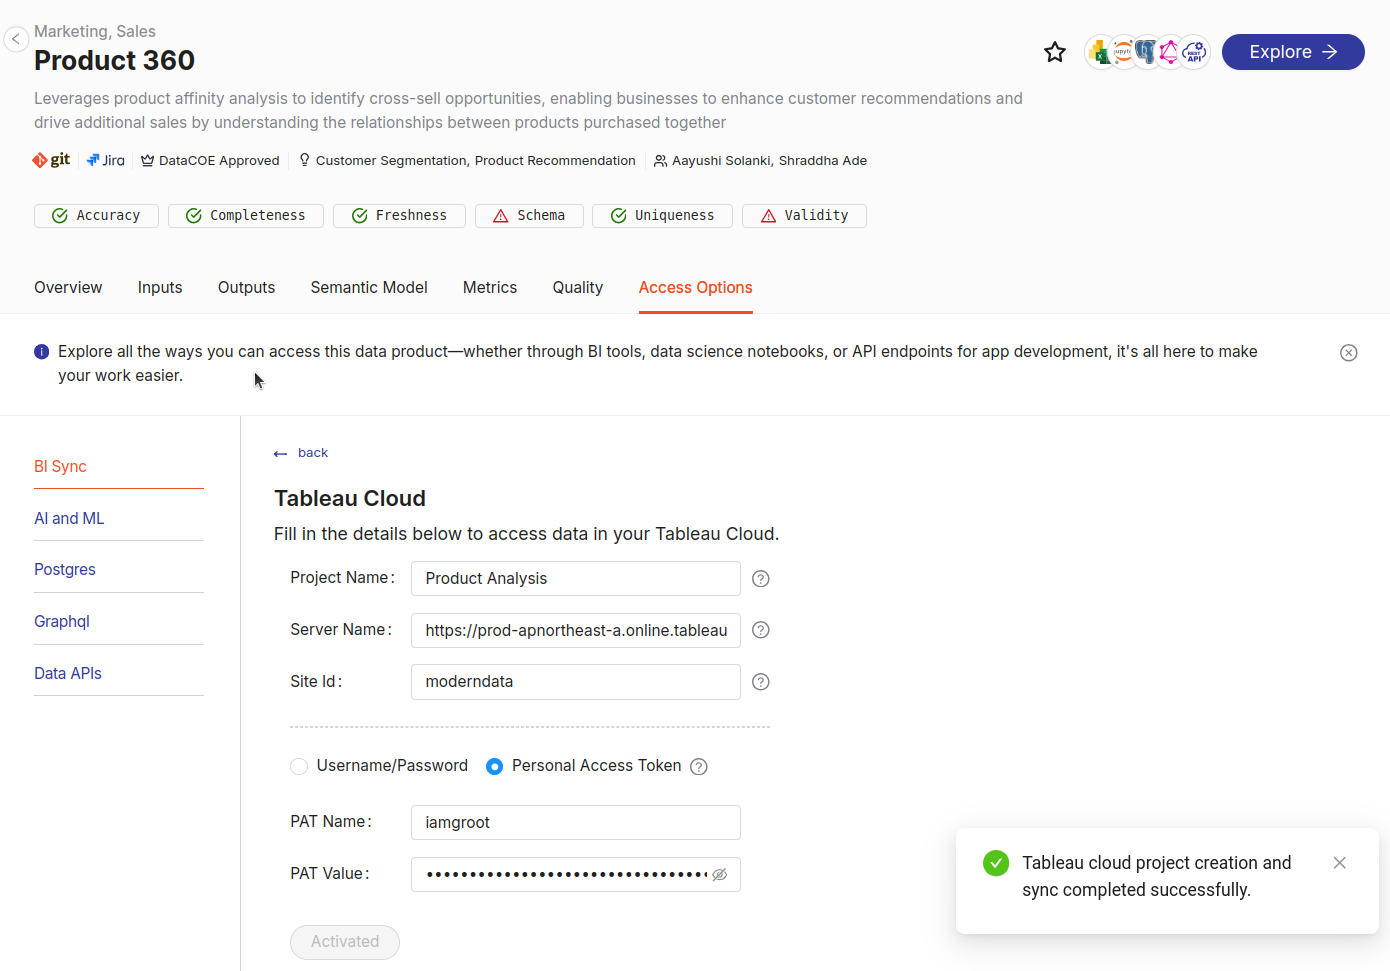
Connection details for connecting using Tableau PAT
In addition to using standard Tableau credentials, users can also opt to use Personal Access Tokens (PAT) for authentication. To create a PAT in the Tableau follow the instructions given on this link.
After successfully creating the PAT, follow the same steps as of connection details for the Tableau username and password and enter the connection details:
- Project Name: The designated name for the project within Tableau. (E.g. Product Analysis)
- Server Name: The URL or address of the Tableau Server hosting the cloud instance.
- Site ID: The identifier for the specific site on Tableau Cloud.
- PAT Name: Tableau PAT Name. (e.g.,
iamgroot,test_token) - PAT Value: Personal Access Token.
After filling all details, click on the Activate button. A confirmation message will appear upon successful connection.
Using cURL command (Command-Line based)
Follow the below steps:
Prerequisites
- Curl: Ensure that
curlis installed on the system. For Windows systems,curl.exemay be necessary. - Lens API endpoint: The API endpoint provided by Lens to sync semantic model, enabling integration with Tableau. Format:
http://<DATAOS_FQDN>/lens2/sync/api/v1/tableau/<WORKSPACE_NAME>:<LENS_NAME> - Access credentials: Access credentials such as username, password, project name etc., are required for Tableau.
- DataOS API key: Ensure the DataOS API key is available. Get it by using the following command:
Syntax of the command
To sync the semantic model with Tableau, copy the payload below and replace the placeholders with appropriate values:
curl --location --request POST 'http://tcp.<DATAOS_FQDN>/lens2/sync/api/v1/tableau-cloud/<WORKSPACE_NAME>:<LENS_NAME>' \
--header 'apikey: <APIKEY>' \
--header 'Content-Type: application/json' \
--data-raw '{
    "project_name": "<SAMPLE>",
    "username": "<USER_NAME/EMAIL>",
    "password": "<PASSWORD>",
    "site_id": "<SITE_ID>",
    "server_address": "https://prod-apnortheast-a.online.tableau.com"
}'
curl --location --request POST 'http://tcp.gentle-akita.dataos.app/lens2/sync/api/v1/tableau-cloud/<WORKSPACE_NAME>:<LENS_NAME>' \
--header 'apikey: <APIKEY>' \
--header 'Content-Type: application/json' \
--data-raw '{
    "project_name": "default",
    "username": "tmdc@labs.com",
    "password": "<PASSWORD>",
    "site_id": "modern",
    "server_address": "https://prod-apnortheast-a.online.tableau.com"
}'
Command configuration details
-
URL:
- This URL
http://tcp.<DATAOS_FQDN>/lens2/sync/api/v1/tableau-cloud/<WORKSPACE_NAME>:<LENS_NAME>is used to sync a specific semantic model to Tableau. - Replace
with the Fully Qualified Domain Name (FQDN) where Lens is hosted. Example: liberal-monkey.dataos.app. - Replace
with the name of the workspace where the semantic model (Lens) is deployed. e.g., public,curriculum. - Replace
with the name of the semantic model to sync. e.g., sales360.
- This URL
-
Headers:
-
apikey: User's API key for the current context in Lens. The DataOS API key for the user can be obtained by executing the below command.
-
Content-Type application/json: Specifies that the data being sent is in JSON format.
-
-
Raw data payload:
This section defines the details of the user's Tableau credentials and project configuration:
-
project_name: The name of the Tableau project where the data will be synced. Replace "
" with the actual project name. If the project does not already exist, Tableau will create a new project with the given name. -
username: Tableau account username, typically the email ID used to log in to Tableau.
-
password: Tableau account password.
-
site_id: The site ID associated with the current Tableau connection.
-
server_address: The URL of the Tableau server. Replace
with the correct server address (e.g., https://prod-apnortheast-a.online.tableau.com). This information can be obtained upon logging in to Tableau. The URL will appear as follows: https://prod-apnortheast-a.online.tableau.com/#/site/iamgroot1086a891fef336/home
Here: iamgroot1086a891fef336 is the site_id.
-
Exploring the Data Product on Tableau Cloud
Once the sync is successful, the data source is published to the Tableau cloud/server:
Step 1: Log in to Tableau Cloud
Users should log in to Tableau Cloud using the same credentials of Tableau. This will redirect to the Tableau Cloud home page.

Step 2: Manage Projects
Click on the Manage Projects option on the home page.
.png)
Step 3: Access the Project interface
This will open an interface displaying all projects, including the newly created project titled Product Analysis.
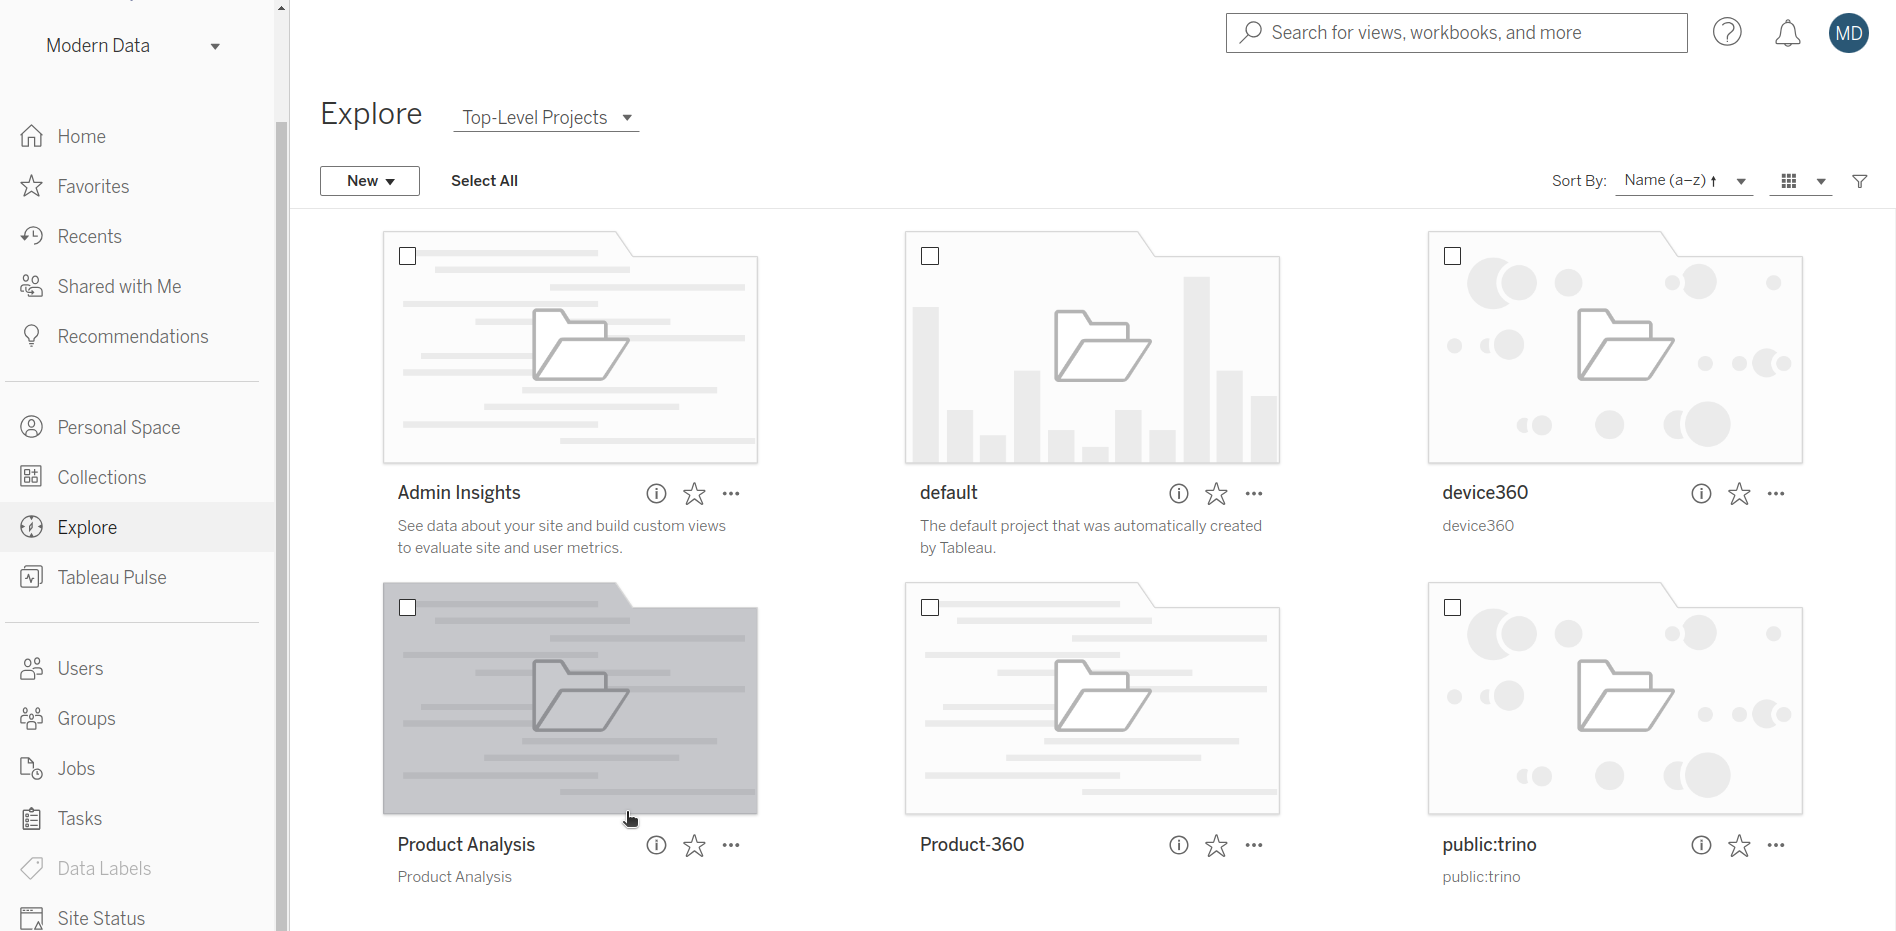
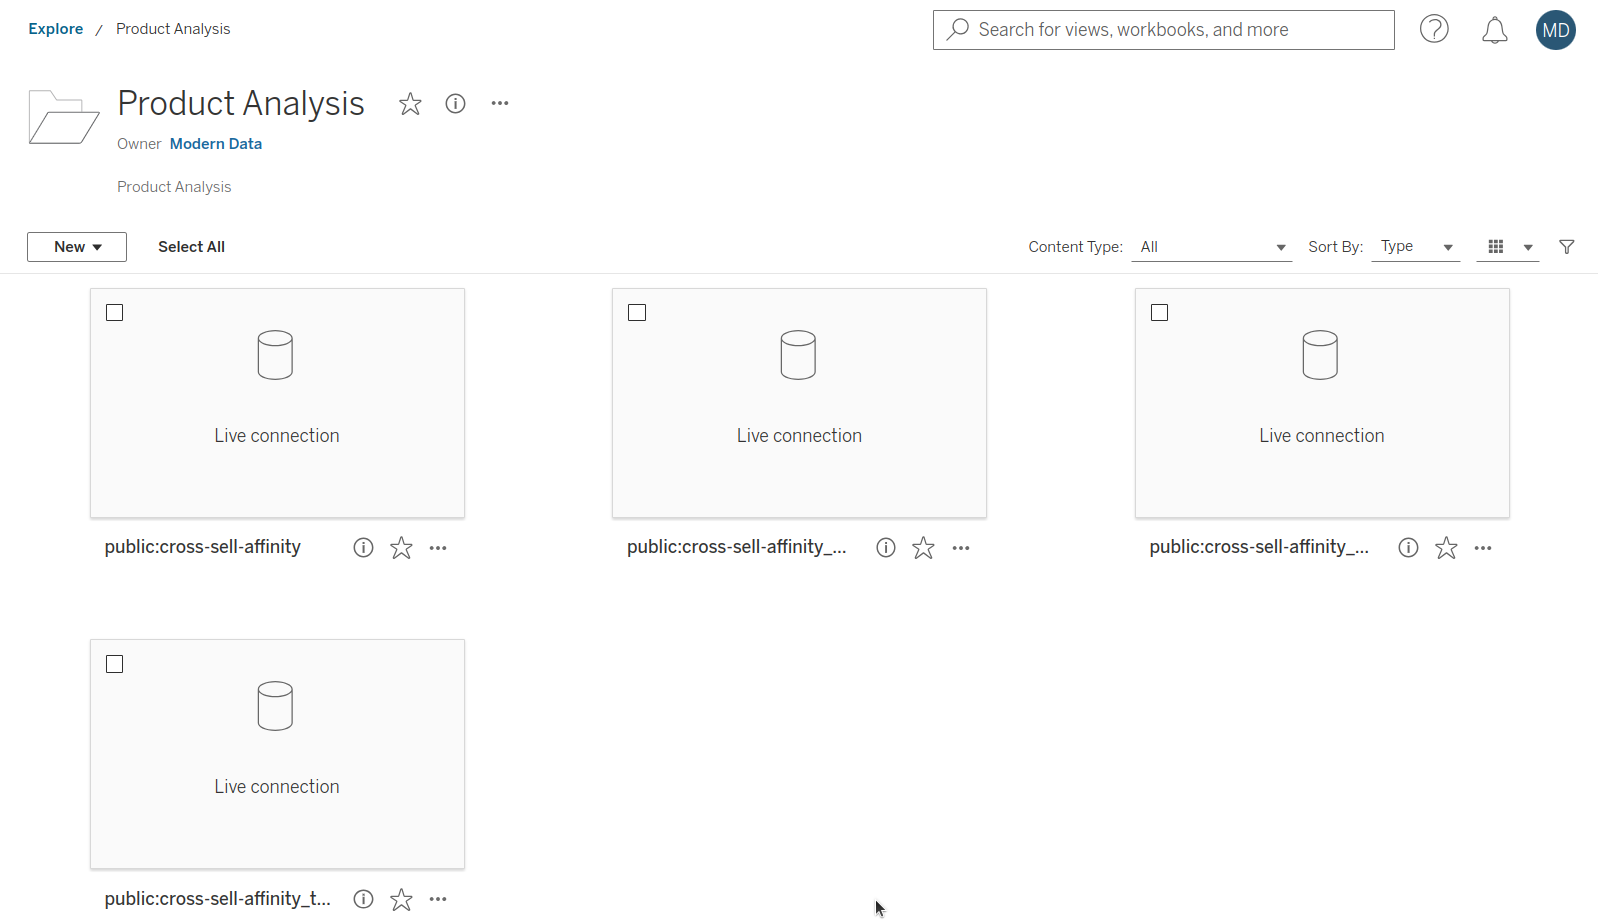
Step 4: Select the Project
Click on the project to view the available data sources for dashboard creation. This project will contains semantic model and all it's views (entities and metrics).
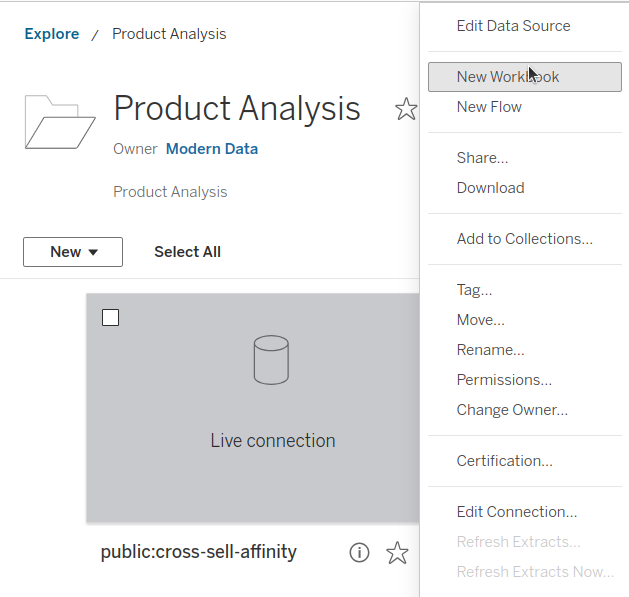
Step 5: Create a new workbook
Click on the menu option in the upper right corner of the data source and select the New Workbook option.
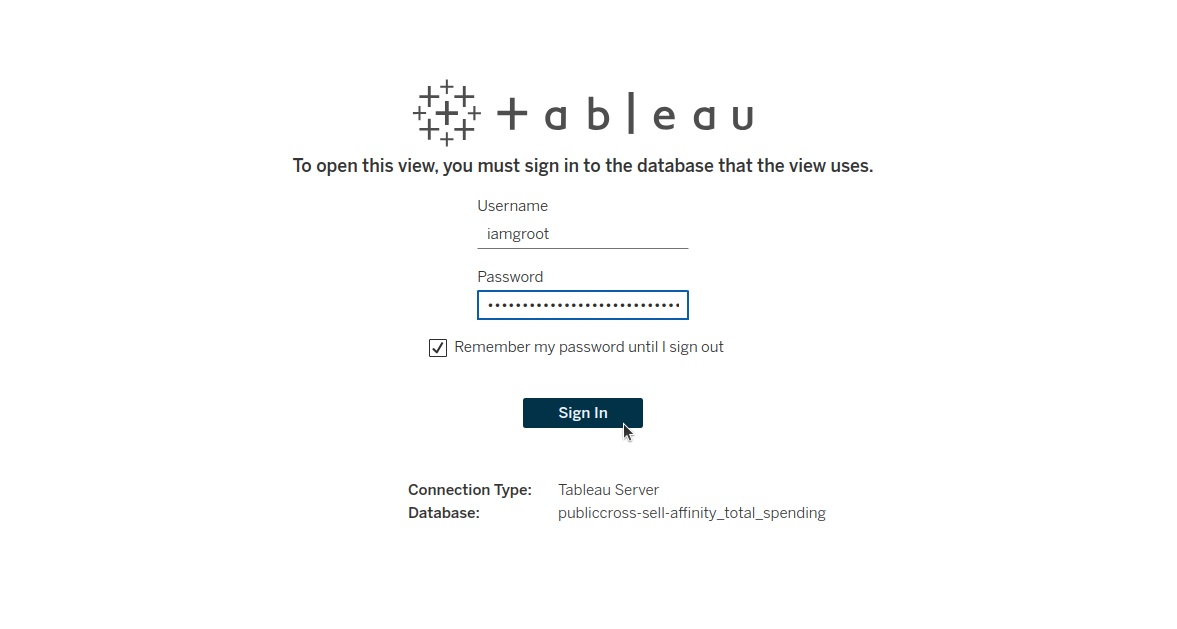
Step 6: Provide credentials
To create a new workbook where dashboard creation can commence, users will be prompted to provide their DataOS username and API key as the password to access the data source. The API can be retrieved by navigating to the profile page in the bottom left corner of the Data Product Hub.
Step 7: Start creating the dashboard
Now, users can create dashboard and extract relevant insights.

Step 8: Publishing workbook/dashboard
The publisher can embed their credentials (DataOS username and API Token) or ask users to provide credentials whenever they want to access the published Workbook/Sheet/Dashboard. If the publisher has chosen to ‘Embed password for data source’, users can access the published workbook and dashboard without providing credentials.
Note: Once the credentials are embedded, they cannot be accessed. You need to overwrite and ‘publish-as’ the workbook to reconfigure the embedding password optionality.
Supported data types
| Category | Data Type | Support Status | Recommended Approach |
|---|---|---|---|
| Dimension | time |
Supported | NA |
| Dimension | string |
Supported | NA |
| Dimension | number |
Supported | NA |
| Dimension | boolean |
Supported | NA |
| Measure | max |
Supported | NA |
| Measure | min |
Supported | NA |
| Measure | number |
Supported | NA |
| Measure | sum |
Supported | NA |
| Measure | count |
Supported | NA |
| Measure | boolean |
Auto-converts to Dimension | NA |
| Measure | string |
Auto-converts to Dimension | NA |
| Measure | time |
Auto-converts to Dimension | NA |
| Measure | avg |
Not Supported | Option 1: To use measure of type ‘avg’, define an additional measure of type 'count' in that entity: name: count type: count sql: '1' Option 2: Use measure of type 'number' and define average logic in SQL: measures: - name: total_accounts type: number sql: "avg({accounts})” |
| Measure | count_distinct |
Not Supported | Option 1: To use measure of type ‘count_distinct’, additionally define a measure of type 'count' in that entity: name: count type: count sql: '1' Option 2: Or, use measure of type 'number' and define logic for count_distinct in SQL: measures: - name: total_accounts type: number sql: "count(distinct({accounts}))” |
| Measure | count_distinct_approx |
Not Supported | NA |
| Rolling Window | - | Supported | NA |
Important considerations for Tableau integration
1. Handling Entities without Relationships: An error will occur during synchronization if any entity in the data model lacks a defined relationship. To resolve this issue, the entity can be hidden to avoid synchronization errors.
2. Live connection: The connection between the Lens semantic layer and Tableau Cloud is live meaning that any changes to the underlying data will automatically be reflected in Tableau.
3. Schema changes: If there are schema updates, such as adding new dimensions or measures, the integration steps will need to be repeated to incorporate these changes into Tableau.
4. Avoiding cyclic dependencies: Tableau does not support cyclic dependencies within data models. To prevent integration issues, it is essential to ensure that the data model is free of cyclic dependencies prior to syncing with Tableau.
5. Visualization with multiple data sources: You cannot build a visualization that incorporates data from multiple data sources. For live connections, Tableau does not support data blending. Only a single data source can be used to create a visualization.
6. Centralized management: All data sources should be managed and published by the admin on the server, with everyone else using this source.
7. Single authority for Desktop publications: If data sources are published via Tableau Desktop, ensure that all sources are published by a single authority to avoid multiple data source conflicts on the server.
8. Row limit: The Lens API has a maximum return limit of 50,000 rows per request. To obtain additional data, it is necessary to set an offset. This row limit is in place to manage resources efficiently and ensure optimal performance.
9. Selection: It is important to select fields from tables that are directly related or logically joined, as the system does not automatically identify relationships between tables through transitive joins. Selecting fields from unrelated tables may result in incorrect or incomplete results.
10. Parameter Action: Action filters can be defined on measures/dimensions to filter visualizations effectively.
11. Default chart types: All default chart types provided by Tableau can be plotted and visualized without issues.
12. Rolling Window Measure: For querying a rolling window measure, it is necessary to provide a time dimension and apply a date range filter to this time dimension. When querying a rolling window measure, follow these steps:
- Select the rolling window measure.
- Select the time dimension.
- To define granularity, right-click on the selected time dimension and set granularity (choose a granularity where the complete time, along with the year, is shown).
- Add the time dimension to the filter, and define the range filter.
Error handling
Scenario 1: Handling syntactical errors in measures or dimensions
If a measure or dimension contains a syntactical error (and is also not functioning in DPH Explorer Studio), the following error will appear when attempting to select such a measure or dimension:
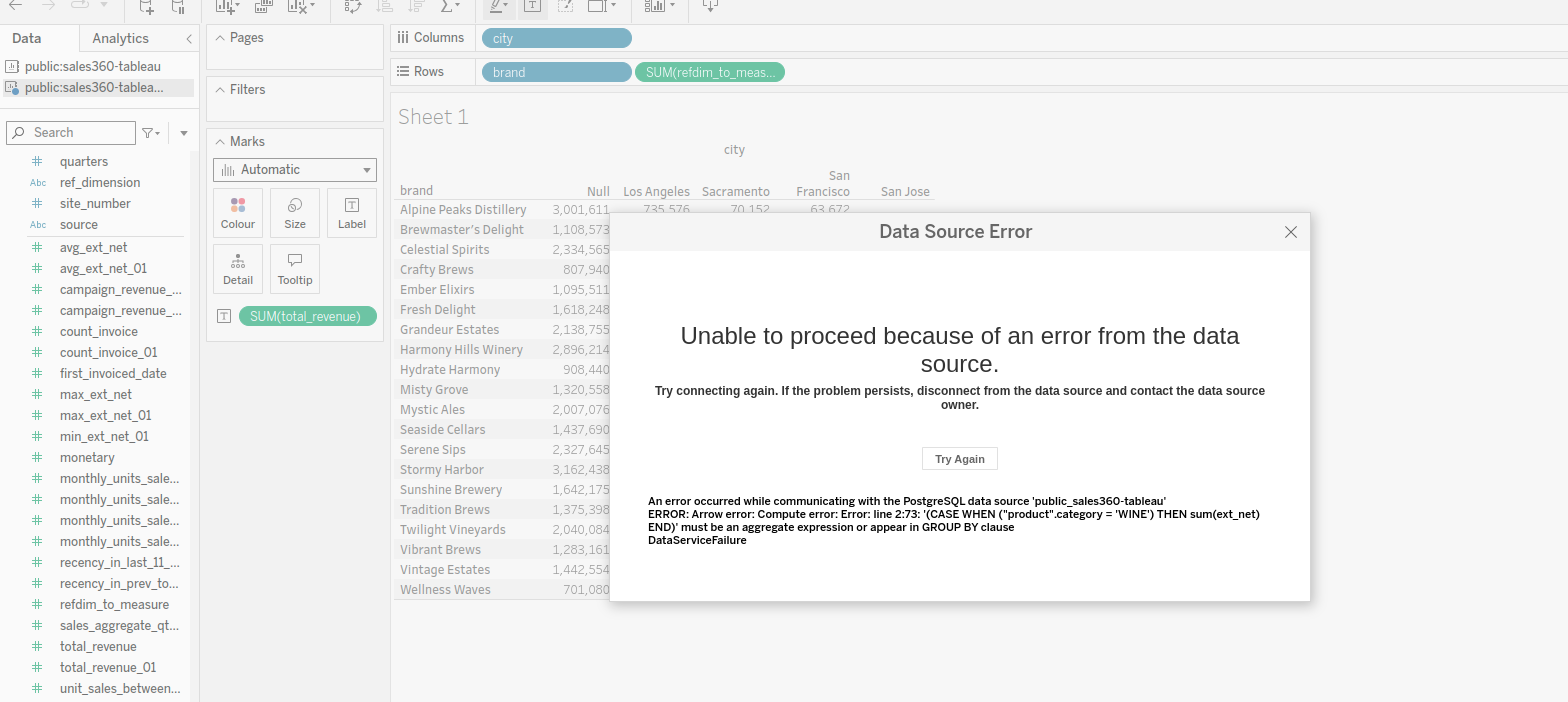
After correcting the syntactical error in the measure or dimension within Lens, the error will no longer appear. To reflect the changes in Tableau, refreshing the data source and re-selecting the measure or dimension will be necessary to display it in the chart.
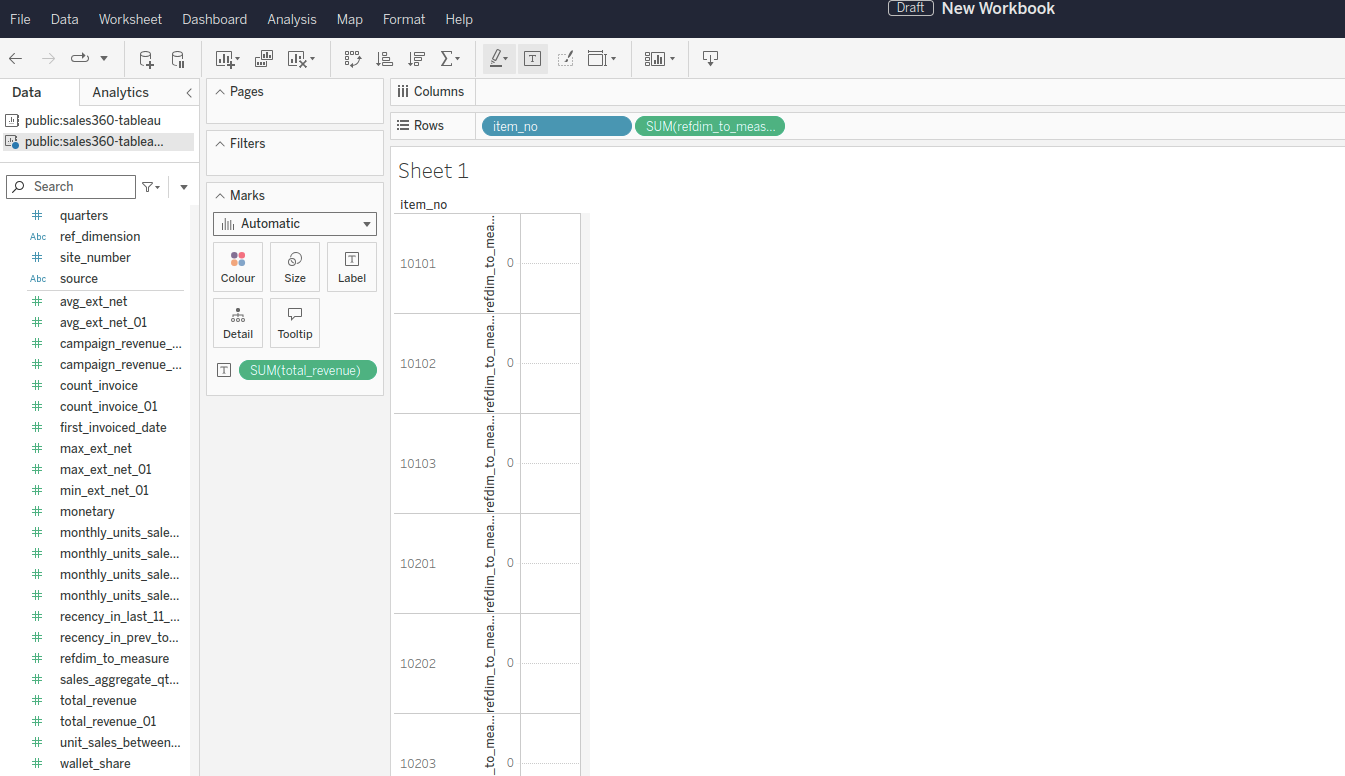
Scenario 2: Handling inactive Lens in the environment
If the Lens is not active in the environment while working on an existing workbook in Tableau or when attempting to establish a new connection, an error will be encountered. This may prevent access to or querying data from the Lens. Hence, verification that the Lens exists and is active is required before syncing.
Scenario 3: Handling data source errors due to access restrictions
If the Account table is set to public = false, a data source error will occur in Tableau. The error message will indicate that the "Account table not found," which will prevent querying or using data from that table.
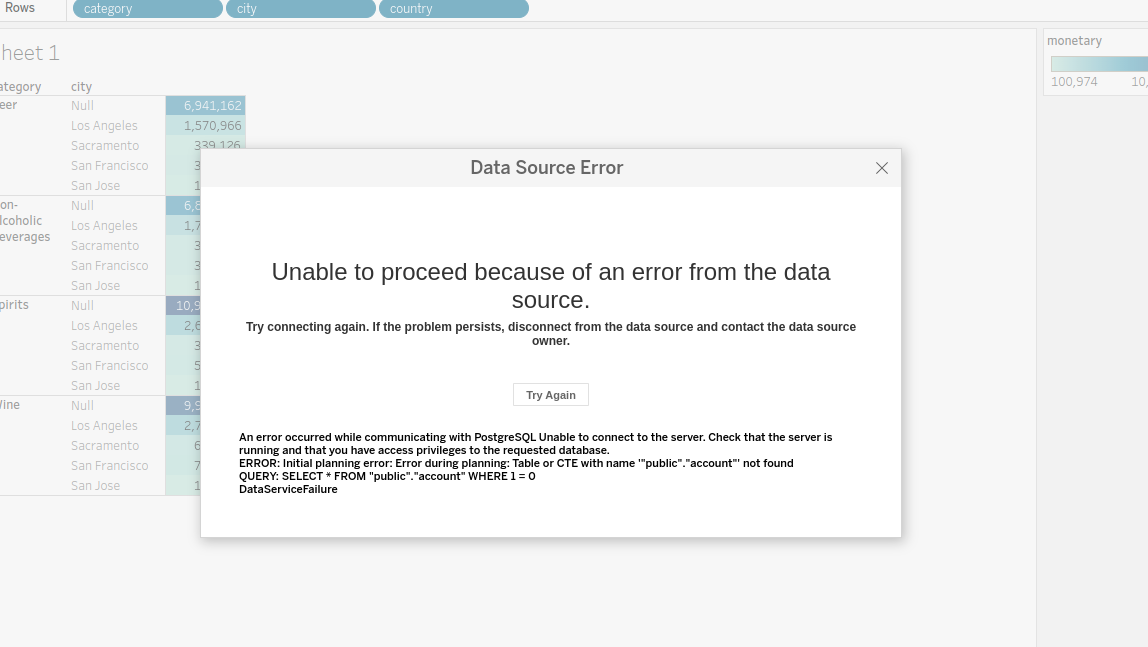
To resolve this issue, ensure the Account table is accessible (set to public = true or assign appropriate permissions) and then resync the Lens in Tableau to regain access.
Governance of model on Tableau Cloud
When the semantic model is activated via BI Sync in Tableau, data masking, restrictions, and permissions set by the publisher are automatically applied, ensuring consistent data security and compliance. The behavior of these policies (e.g., masking) may vary based on the Tableau user.
The Tableau management process involves authentication and authorization using the DataOS user ID and API key when accessing synced data models. This ensures that columns redacted by Lens data policies are restricted based on the user's group permissions.
For example, if a user named iamgroot in the Analyst group is restricted from viewing the 'Annual Salary' column, this column will not be visible in either the Data Product exploration page or Tableau after syncing. Tableau Cloud requires the DataOS user ID and API key for authentication, ensuring that users can access the full model, except for any columns restricted by any data policies. This approach maintains security and guarantees that users only see the data they are authorized to view.