Deploy and Register Data Product
Overview
In the last module you built business-ready tables, views, and a Lens model on top of the source-aligned retail datasets you ingested earlier.
Now it’s time to wrap everything into a single, deployable bundle, publish the Data Product spec, and surface it in the Data Product Hub (DPH) & Metis for your consumers.
Step 1: Create a Bundle Definition
Group related components—workflows, scripts, models—into a single bundle for easy management. Referencing the bundle in your Data Product manifest ensures all resources are deployed together.
🎯 Your actions:
-
Create a bundle.yaml file using the template below.
-
Include all relevant resources (Lens, monitors, pagers, etc.) in the resources section. Lens must be deployed through Bundle resource.
-
Organize resources into a dedicated workspace (recommended).
-
Apply the bundle using
dataos-ctl apply.
bundle.yaml
# Important: Replace 'abc' with your initials to personalize and distinguish the resource you’ve created.
name: productaffinity-bundle-abc
version: v1beta
type: bundle
tags:
- dataproduct
description: This bundle resource is for the product affinity Data Product.
layer: "user"
bundle:
resources:
    - id: lens
    file: build/semantic-model/deployment.yml
    workspace: <workspace_name>

    - id: quality_customer
    file: build/slo/input/customer.yml
    workspace: <workspace_name>

    # Add other resources (monitors, pagers) you have created

    # - id: quality_product
    #   file: build/slo/input/product.yml
    #   workspace: <workspace_name>

    # - id: quality_purchase
    #   file: build/slo/input/purchase.yml
    #   workspace: <workspace_name>

    # - id: quality_affinity
    #   file: build/slo/output/affinity-matrix.yml
    #   workspace: <workspace_name>

    # - id: quality_cross_sell
    #   file: build/slo/output/cross-sell.yml
    #   workspace: <workspace_name>
Step 2: Create the Data Product Specification file
Document key metadata, purpose, and the structure of your Data Product.
🎯 Your actions:
-
Create a productaffinity.yaml file using the template below.
-
Describe the product purpose and use cases.
-
Define input and output datasets.
-
Link to your bundle and services (e.g., Lens).
-
Set up ports for services like Lens, REST APIs, and databases. For this example, we have Lens.
-
Apply using:
Click here to view Data Product Spec file
# Important: Replace 'abc' with your initials to personalize and distinguish the resource you’ve created.
name: productaffinity-abc
version: v1beta
type: data
description: Analyzes product affinity to identify cross-sell opportunities.
tags:
  - DPDomain.Marketing
  - DPUsecase.Customer Segmentation
  - DPUsecase.Product Recommendation
  - DPTier.Consumer Aligned
v1beta:
  data:
    meta:
      title: Product Affinity abc
      #sourceCodeUrl: https://bitbucket.org/tmdc/product-affinity-training/src/main/
      #trackerUrl: https://rubikai.atlassian.net/browse/DPRB-65
    collaborators:
      - name:
        description: owner
      - name: <dataos-id of user>
        description: developer
      - name: <dataos-id of user>
        description: consumer
      - name: <dataos-id of user>
        description: consumer
    resource:
      refType: dataos
      ref: bundle:v1beta:productaffinity-bundle-abc
    inputs:
      - refType: dataos
        ref: dataset:postgresabc:public:customer_data

      - refType: dataos
        ref: dataset:postgresabc:public:purchase_data

      - refType: dataos
        ref: dataset:postgresabc:public:product_data

    outputs:
      - refType: dataos
        ref: dataset:lakehouse:crm_data:product_affinity_matrix     # Verify the Depot name for your training instance

      - refType: dataos
        ref: dataset:lakehouse:crm_data:cross_sell_recommendations

    ports:
      lens:
        ref: lens:v1alpha:productaffinity-abc:public
        refType: dataos
Step 3: Register in the Data Product Hub
To make your product discoverable in the Data Product Hub and Metis, apply a scanner workflow.
🎯 Your Actions:
-
Create a scanner.yaml file using the template.
-
Replace the includes field with your Data Product name.
-
Apply using:
Click here to view scanner.yaml
version: v1
name: scan-data-product-abc
type: workflow
description: Registers the Data Product in the Data Product Hub.
workflow:
  dag:
    - name: scan-data-product-job
      description: Scans and registers the Data Product.
      spec:
        tags:
          - scanner2
        stack: scanner:2.0
        compute: runnable-default
        stackSpec:
          type: data-product
          sourceConfig:
            config:
              type: DataProduct
              markDeletedDataProducts: true
              dataProductFilterPattern:
                includes:
                 - productaffinity-abc # Your Data Product name
Step 4: Validating the creation of Data Product
🎯 Your Actions:
-
Run the following command in your terminal to list your Data Products.
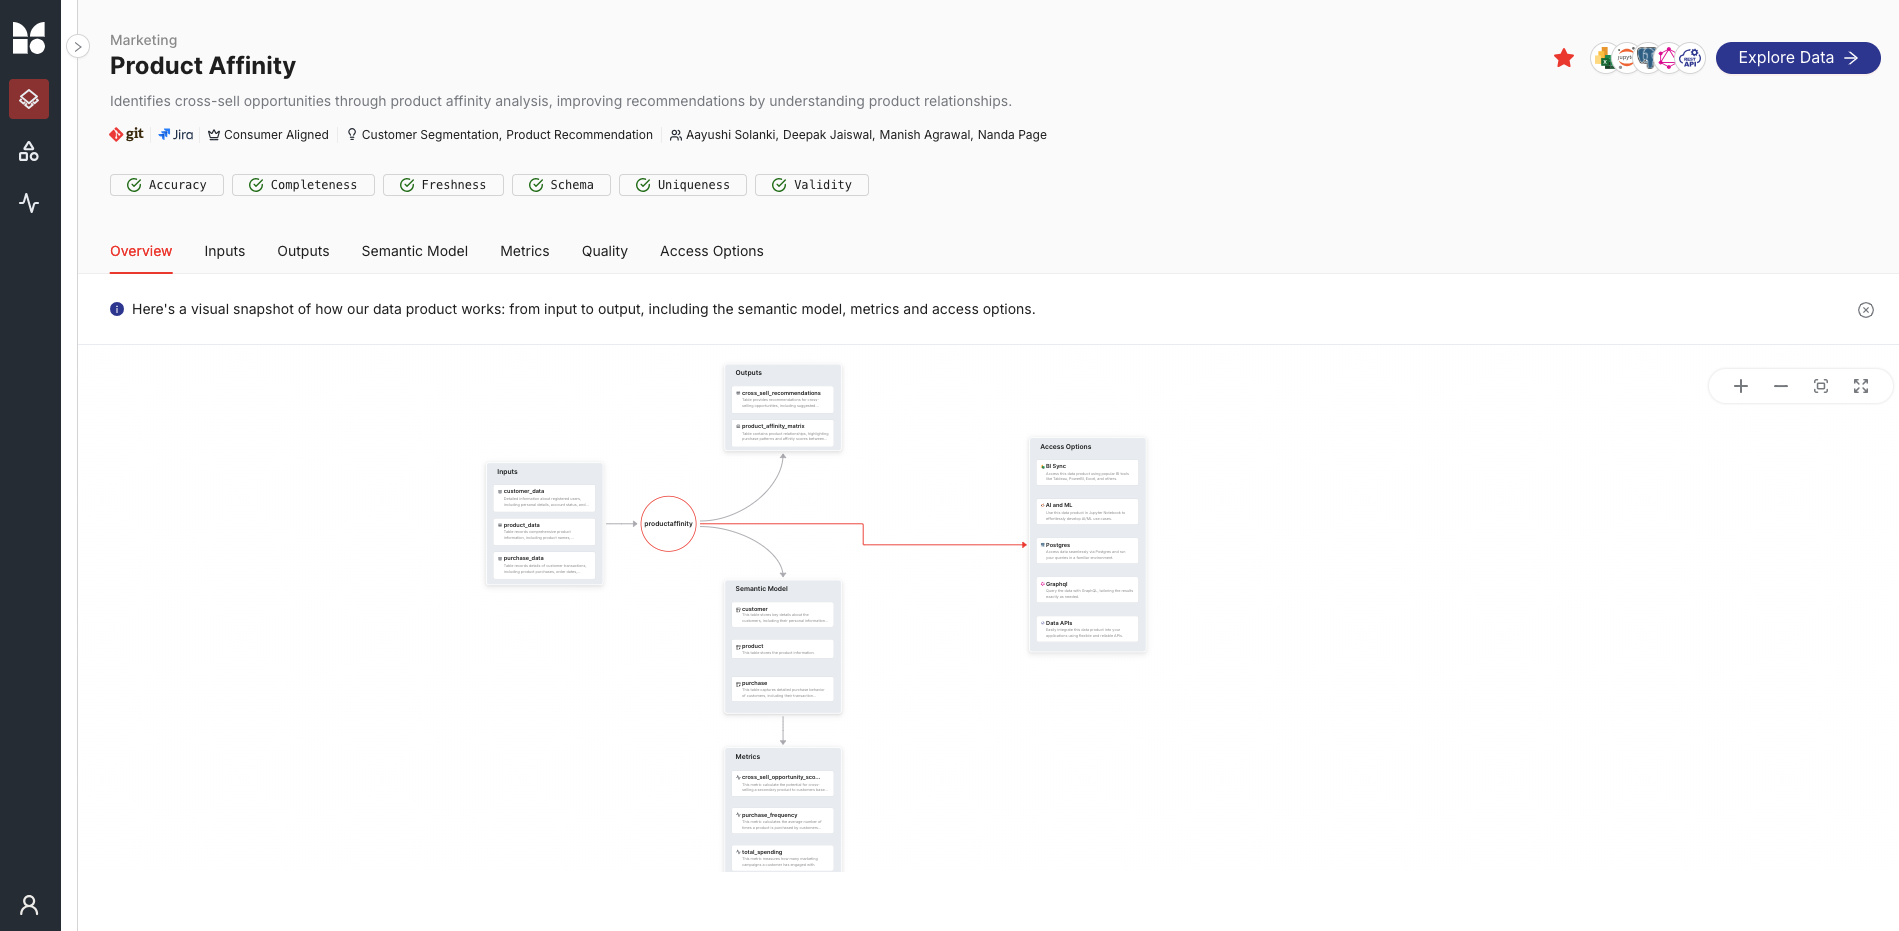
Step 5: Exploring Data Product on Data Product Hub
-
Log in to the DataOS instance and Navigate to Data Product Hub.
-
Click on the Data Product to view its details.