How to set up Talos locally?
This section involves step-by-step guide to set up Talos on your local enviroment.
Pre-requisite
- Make sure you have initialized the Docker.
- Extract the zip.
Steps
-
Create a Depot for your data source, below is the sample manifest file of BigQuery Depot.
name: crmbq
version: v1
type: depot
tags:
  - dropzone
  - bigquery
  - dataos:type:resource
  - dataos:type:cluster-resource
  - dataos:resource:depot
  - dataos:layer:user
owner: iamgroot
layer: user
depot:
  name: crmbq
  type: BIGQUERY
  owner: iamgroot
  description: Google Cloud BigQuery
  connectionSecret:
    - type: key-value-properties
      acl: rw
      data:
        crmbq: 'ABCD1234EFGH5678IJKL9012MNOP3456'
        crmbq_gcp-demo-write-sa.json: secrets/gcp-demo-sa.json #JSON file containing the credentials to read-write
    - type: key-value-properties
      acl: r
      data:
        crmbq: 'ABCD1234EFGH5678IJKL9012MNOP3456'
        crmbq_gcp-demo-write-sa.json: secrets/gcp-demo-sa.json #JSON file containing the credentials to read
  external: true
  resources:
    requests:
      cpu: 100m
      memory: 550Mi
    limits:
      cpu: 1000m
      memory: 1500Mi
  runAsUser: iamgroot
  spec:
    project: dataos-ck-trs-yak-dev
To know more about Depot, please refer to this.
-
Apply the Depot manifest file by executing the following command:
-
Open the Talos repository with your preferred code editor, navigate to
config.yamlmanifest file and update the name, description, version, dataos context, Depot name, and Depot type. -
Navigate to
docker-compose.yamlmanifest file and update thevolumespath/home/Desktop/talos/depot-postgreswith the actual path of your repository, add your dataos username and dataos API key inDATAOS_RUN_AS_USERandDATAOS_RUN_AS_APIKEYrespectively.version: "2.2" services: talos: image: rubiklabs/talos:0.1.6 ports: - "3000:3000" volumes: - /home/Desktop/talos-examples/depot/depot-bigquery:/etc/dataos/work environment: DATAOS_RUN_AS_USER: iamgroot DATAOS_RUN_AS_APIKEY: dG9rZW5fYWRtaXR0ZWRseV9uYXR1cmFsbHlfZW5hYmxpbmdfb3J5eC5lODg2MjIyfNWEtYjU3MC01YTJiZWY5MjI5OGE= DATAOS_FQDN: liberal-donkey.dataos.app tty: true -
Navigate to
apisfolder create two files, one with.sqland one with.yamlextension for example create two file one can betable1.sqland another one can betable1.yamlas shown below. You can add multiple SQL file and their corresponding manifest file with.yamlextension as per your use case.
-
Now run
docker-compose upon the terminal. The output should look like the following:```bash docker-compose up [+] Running 1/0 ✔ Container depot-postgres-talos-1 Created 0.0s Attaching to depot-postgres-talos-1 depot-postgres-talos-1 | 👉 /etc/dataos/work/config.yaml => { depot-postgres-talos-1 | "name": "postgres_domain", depot-postgres-talos-1 | "description": "A talos-depot-postgres app", depot-postgres-talos-1 | "version": "0.1.6", depot-postgres-talos-1 | "auth": { depot-postgres-talos-1 | "heimdallUrl": "https://liberal-donkey.dataos.app/heimdall" depot-postgres-talos-1 | }, depot-postgres-talos-1 | "logLevel": "DEBUG", depot-postgres-talos-1 | "sources": [ depot-postgres-talos-1 | { depot-postgres-talos-1 | "name": "postgre01", depot-postgres-talos-1 | "type": "depot" depot-postgres-talos-1 | } depot-postgres-talos-1 | ], depot-postgres-talos-1 | "schemaPath": "", depot-postgres-talos-1 | "cachePath": "tmp" depot-postgres-talos-1 | } depot-postgres-talos-1 | Get Depot Service Depot Fetch URL: https://liberal-donkey.dataos.app/ds/api/v2/depots/postgre01 depot-postgres-talos-1 | Get Depot Service Secrets Fetch URL: https://liberal-donkey.dataos.app/ds/api/v2/secrets/postgre01_r depot-postgres-talos-1 | 🧑🤝🧑 sources => [ depot-postgres-talos-1 | { depot-postgres-talos-1 | "name": "postgre01", depot-postgres-talos-1 | "type": "pg", depot-postgres-talos-1 | "connection": { depot-postgres-talos-1 | "host": "usr-db-dataos-ck-vgji-liberaldo-dev.postgres.database.azure.com", depot-postgres-talos-1 | "port": 5432, depot-postgres-talos-1 | "database": "postgres", depot-postgres-talos-1 | "user": "--REDACTED--", depot-postgres-talos-1 | "password": "--REDACTED--" depot-postgres-talos-1 | } depot-postgres-talos-1 | } depot-postgres-talos-1 | ] depot-postgres-talos-1 | - Building project... depot-postgres-talos-1 | ✔ Built successfully. depot-postgres-talos-1 | 2024-09-05 12:54:13.100 depot-postgres-talos-1 | INFO [CLI] depot-postgres-talos-1 | Starting server... depot-postgres-talos-1 | depot-postgres-talos-1 | 2024-09-05 12:54:13.163 INFO [CLI] depot-postgres-talos-1 | 🚀 Server is listening at port 3000. ``` -
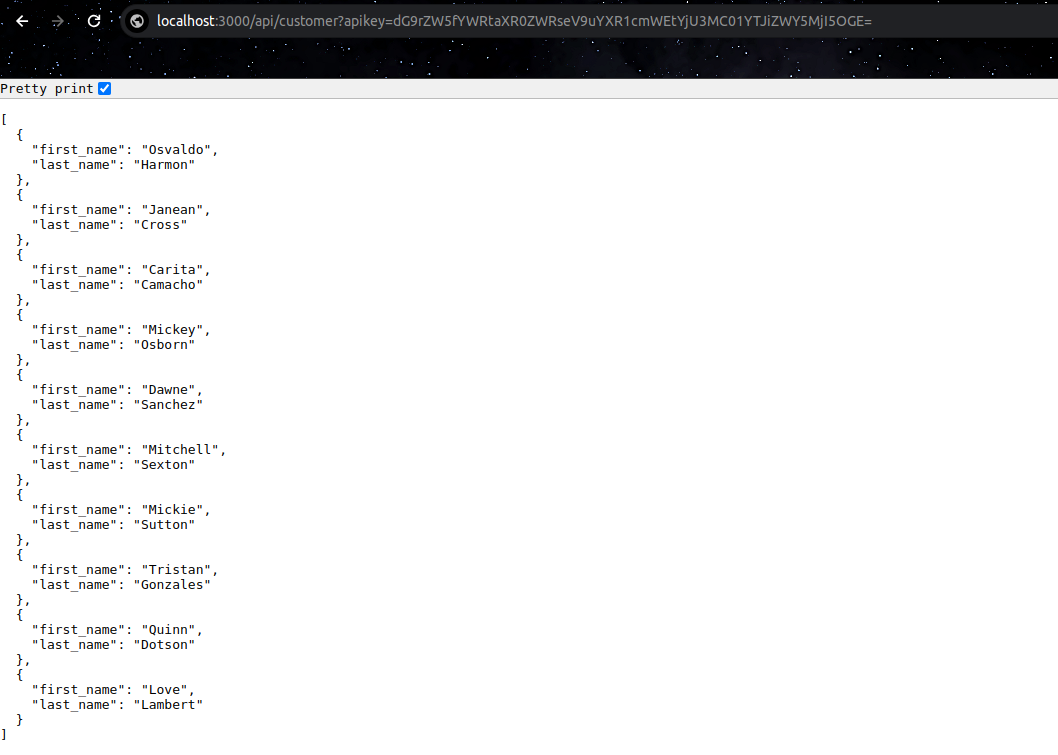
Now you are ready to fetch your data using your DataOS API key. On your browser copy the below link by updating the path and API key with your actual DataOS API key:
http://localhost:3000/api/customer?apikey=dG9rZW5fYWRt9uYXR1cmFsbHlfZgfhgu567rgdffC5lODg2MjIyZC05NDMwLTQU3MC01YTJiZWY5MjI5OGE=Successful execution will look like the following: