Local to Cloud using Standalone 2.0
Let’s take a case scenario, where we read data from the Local system and write it to the environment Pulsar.
To know more about the details of other supported input and output data sources navigate to the following link
But before diving right into the programming stuff, let’s make sure that we have the required prerequisites.
Pre-Requisites
Install/Update DataOS CLI with the latest version
DataOS CLI should be installed on your system with the latest version. To get the details of the CLI version run the command, after logging into DataOS
Note: Make sure you are logged into DataOS before executing the above command. In case you haven’t logged in, execute
dataos-ctl loginin the terminal
If CLI is not updated to the latest version, navigate to the below page
Get the Pulsar-admin tag
Since we would be dealing with Pulsar format, you will need the pulsar-admin tag to write the data to the environment pulsar. To check the available tags that you have, execute the command:
dataos-ctl user get
# Output
            NAME     |     ID      |  TYPE  |        EMAIL         |              TAGS
---------------|-------------|--------|----------------------|---------------------------------
      IamGroot   |   iamgroot  | person |  iamgroot@tmdc.io    | roles:direct:collated,
               |             |        |                      | roles:id:data-dev,
               |             |        |                      | roles:id:depot-manager,
               |             |        |                      | roles:id:depot-reader,
               |             |        |                      | **roles:id:pulsar-admin**,    # this is the required Pulsar-admin tag
               |             |        |                      | roles:id:system-dev,
               |             |        |                      | roles:id:user,
               |             |        |                      | users:id:iamgroot
Operationalize Docker, if you wanna Read/Write IO Locally
Docker should be installed and running on the system. If Docker is installed on your system, move to the next step in case it's not installed, visit the official Docker installation page for the same by clicking the link
Basics of Scala Programming
Flare Standalone uses Scala Programming Language. In case you don’t have any idea about Scala, no worries we have got you covered with some basic commands that will help you make the most of Standalone.
Getting started
Download and Unzip Sample Data
- Download the
flare-standalone-2.zipfolder provided below
- Extract the downloaded
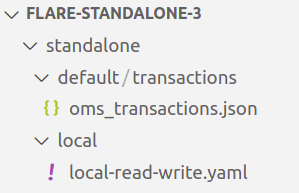
flare-standalone-2.zipfile. It contains only one folder by the namestandalone. Open the code editor inside theflare-standalone-2folder. - Now the scenario looks like the image below, where you have opened the code-editor inside the
flare-standalone-2folder which contains thestandalonefolder which further contains one folder by the namedefaultdirectory having thetransactionsdata and another file by the namepulsar-write.yaml
Adding details to the Flare Standalone Workflow YAML
- Open
pulsar-write.yamlfile using the code editor. The YAML looks like the one given below
version: v1
name: standalone-write-pulsar
type: workflow
tags:
  - standalone
  - writeJob
  - pulsar
title: Write to pulsar in standalone mode
description: |
  The purpose of this workflow is to verify if we are able to read different
  file formats & write by exploring standalone mode.

workflow:
  dag:
    - name: standalone-pulsar-write
      title: Write to pulsar using standalone mode
      description: |
        The purpose of this job is to verify if we are able to read different
        file formats & write by exploring standalone mode.
      spec:
        tags:
          - standalone
          - writeJob
          - pulsar
        envs:
          PULSAR_SSL: true
          ENABLE_PULSAR_AUTH: true
          DATAOS_RUN_AS_APIKEY: <dataos-api-key>
        stack: flare:3.0
        compute: runnable-default
        flare:
          job:
            explain: true
            logLevel: INFO
            inputs:
              - name: oms_transactions_data
                inputType: file
                file:
                  path: /data/examples/default/transactions/
                  format: json
            outputs:
              - name: finalDf
                outputType: pulsar
                pulsar:
                  serviceUrl: pulsar+ssl://<protocol>.<dataos-context>:<port>
                  adminUrl: https://tcp.<dataos-context>:<port>
                  topic: transactions12
            steps:
              - sequence:
                  - name: finalDf
                    sql: SELECT * FROM oms_transactions_data LIMIT 10
- Naming convention for local read/write IO
The paths given in the sample
pulsar-write.yamlfor local read/write are the docker container paths where the data will be mounted. If your data is located at the path let’s saystandalone/default/transactions/, your data is present inside thetransactionsand you have opened the terminal inside thestandalonefolder the input file path in YAML will be/data/examples/data/transactions/But if you have opened the terminal outside thestandalonefolder,thepath will be/data/examples/standalone/data/transactions/You can store the data directory and thepulsar-write.yamlanywhere you want you just have to configure the paths accordingly. - You also require the DataOS
prime apikeywhich you can get by executing the below command
If you don’t have it you can also create a new one
-
Now the last and final aspect that’s missing is the
serviceUrland theadminUrl, for which you require two things<dataos-context>- This is provided by the system administrator in your organization<port>- The serviceUrl and AdminUrl ports are available in the Operations App. To know more, navigate to the below page
Running the Flare Workflow YAML
- Use the below command to run the
pulsar-write.yaml.
dataos-ctl develop start -s <flare-version> -i <custom-image> -f <path-of-config.yaml> -d <path-of-data-directory> -P <port-number>
Example
dataos-ctl develop start -s flare:3.0 -i rubiklabs/flare3:6.0.93 -f standalone/pulsar/pulsar-write.yaml -d standalone -P 14044
Note: The path of
pulsar-write.yamlandstandalonedirectory could either be absolute or relative path. The port number by default is set at 14040, but if you have a job already running on 14040 you can configure it to a different port e.g. 14044.
- Since we have exposed the Spark Web UI on port 14044, we can type localhost:14042 in any web browser to check the status of the Job
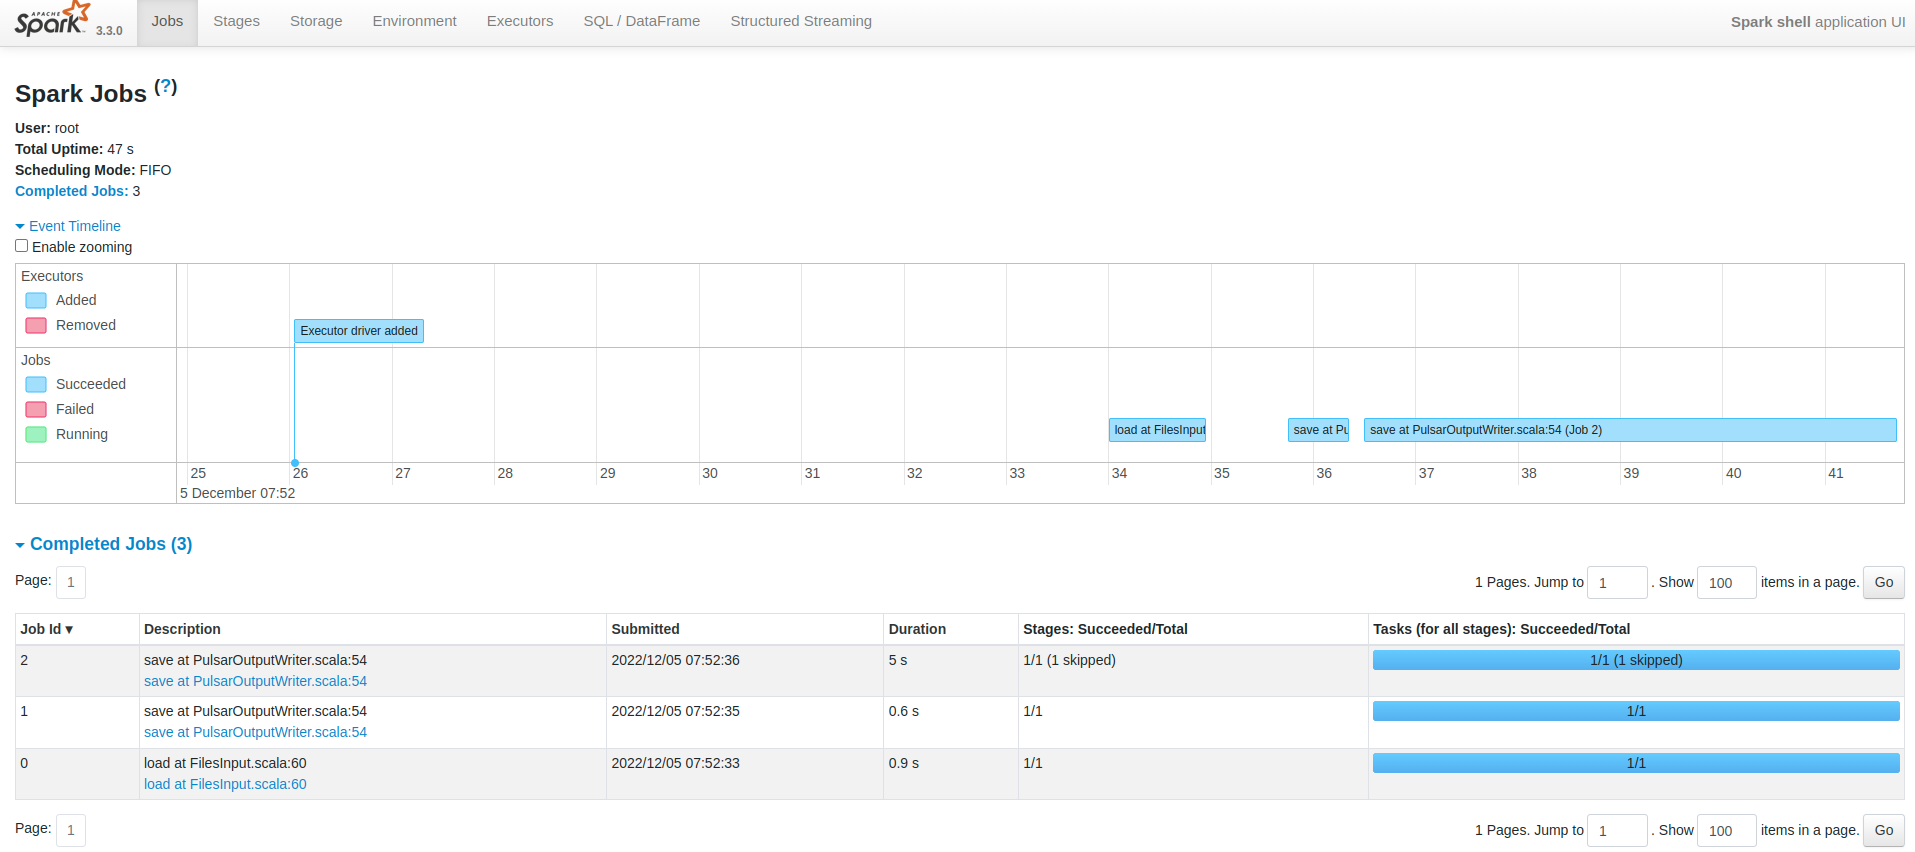
To know more about the various sections of the Spark UI and what each one of them signifies navigate to the link
- On successful execution, the Scala command line shell will open as below:
2022-12-05 05:28:10,854 INFO  [main] i.d.f.c.ProcessingContext: **run complete.
# When you see this run complete message then only your job has successfully executed**
2022-12-05 05:28:10,865 INFO  [dispatcher-BlockManagerMaster] o.a.s.s.BlockManagerInfo: Removed broadcast_1_piece0 on a1a833f1a4b1:38377 in memory (size: 38.9 KiB, free: 366.3 MiB)
Flare session is available as flare.
    Welcome to
         ______   _
        |  ____| | |
        | |__    | |   __ _   _ __    ___
        |  __|   | |  / _` | | '__|  / _ \
        | |      | | | (_| | | |    |  __/
        |_|      |_|  \__,_| |_|     \___|  version 1.2.0

    Powered by Apache Spark 3.3.0
Using Scala version 2.12.15 (OpenJDK 64-Bit Server VM, Java 1.8.0_262)
Type in expressions to have them evaluated.
Type :help for more information.
- You can check the written topic on the environment Pulsar using the following command
dataos-ctl fastbase topic -n public/default list
# Expected Output
INFO[0000] 🔍 list...
INFO[0002] 🔍 list...complete

                         TOPIC                        | PARTITIONED
------------------------------------------------------|--------------
  persistent://public/default/sampleTopic             | Y
  persistent://public/default/city_pulsar_01          | N
  persistent://public/default/random_users001         | N
  persistent://public/default/sampleTopic-partition-0 | N
  persistent://public/default/sampleTopic-partition-1 | N
  persistent://public/default/sampleTopic-partition-2 | N
  persistent://public/default/sampleTopic-partition-3 | N
  persistent://public/default/sample_topic01          | N
  persistent://public/default/sample_topic02          | N
  persistent://public/default/sample_topic03          | N
  persistent://public/default/sample_topic04          | N
  persistent://public/default/sampletopic01           | N
  **persistent://public/default/transactions123         | N   # Written Pulsar Topic**
  persistent://public/default/transactionsdatatopic   | N