Exploration of Lens using GraphQL
This guide provides comprehensive instructions for accessing and interacting with the Lens GraphQL API. You can interact with the Lens GraphQL API using:
- Explorer Studio in Data Product Hub: An interactive in-browser tool for writing and executing GraphQL queries.
- Curl: A command-line tool for transferring data with URLs, useful for automated scripts.
- Python: Use Python's
requestslibrary for more complex interactions with the API. - Postman: Use Postman API platform to start using and testing REST APIs.
Authentication and Authorization
To securely interact with the Lens GraphQL API, you must authenticate your requests using a DataOS API key and ensure proper user group configurations. This section explains how to generate an API key and configure user groups for accessing the API.
Generating a DataOS API Key
To authenticate API requests, you need a DataOS API key. This key validates your identity and ensures only authorized users can access and query the data.
Steps to Generate an API Key:
- Open your terminal and run the following command to create a new API key:
- To view existing API keys, use:
- Note down your API key and keep it secure. You will use this key to authenticate your API requests.
APIkey tokens can also be fetched from the DataOS GUI, for more details refer to the documentation here.
Configuring User Groups
To access and query data via the GraphQL endpoint, users must be part of a user group with the required permissions. The necessary permissions are defined using the api_scopes attribute within the user group configuration located in the Lens directory.
Example User Group Configuration
The following YAML configuration demonstrates how to set up user groups with different levels of access:
user_groups:
  # User group with full access to GraphQL API and data querying capabilities
  - name: engineer
    description: Data Analyst
    api_scopes:
      - meta      # For accessing metadata
      - graphql   # For accessing the GraphQL API
      - data      # For querying the data
    includes:
      - users:id:exampleuser

  # User group with access to GraphQL API but no data querying capabilities
  - name: analyst
    description: Data Engineer
    api_scopes:
      - meta
      - graphql
    includes:
      - users:id:testuser

  # User group without access to GraphQL API or data querying capabilities
  - name: testuser
    description: Data Engineer
    api_scopes:
      - meta
    includes:
      - users:id:testuser
Explanation of the Configuration:
engineerGroup: This group can access the GraphQL API and query data because it includes both thegraphqlanddataapi_scopes.analystGroup: This group can access the GraphQL API but cannot query the data because thedatascope is missing.testuserGroup: This group cannot access the GraphQL API or query data because both thegraphqlanddatascopes are missing.
Note
The user groups configured above only manage access permissions at the consumption level within DataOS. However, source-level permissions defined by the source administrator (e.g., in Snowflake or BigQuery) remain applicable. For sources accessible through the DataOS Query Engine (Minerva/Themis), you can define source-level permissions using the Bifrost application in the DataOS GUI or using the Policy and Grant Resource using DataOS CLI.
How to access the GraphQL API?
Using Explorer Studio in Data Product Hub
The Explorer Studio of Data Product Hub provides an intuitive, in-browser interface to interact with the GraphQL API.
-
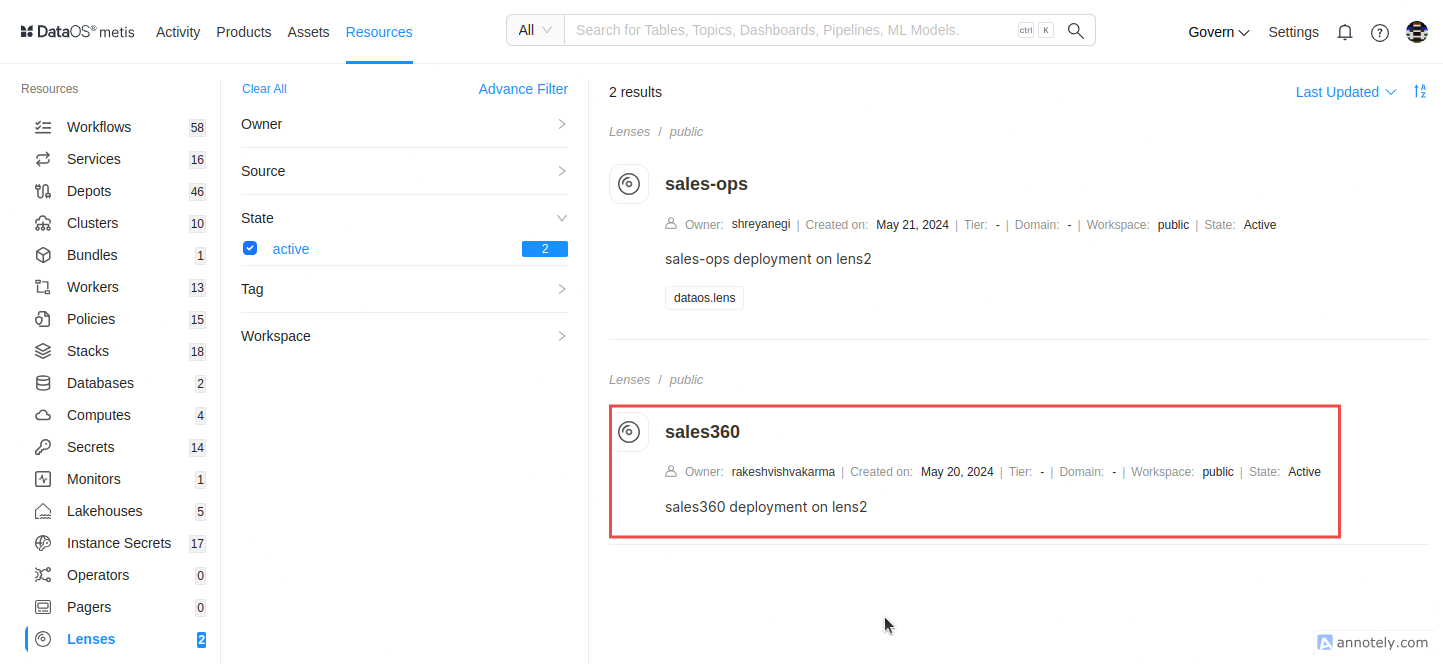
Open Metis: Go to the Metis application on the DataOS GUI and navigate to the Resource section here click on Lens choose the desired deployed Lens model.

Deployed Lens Resource on Metis UI -
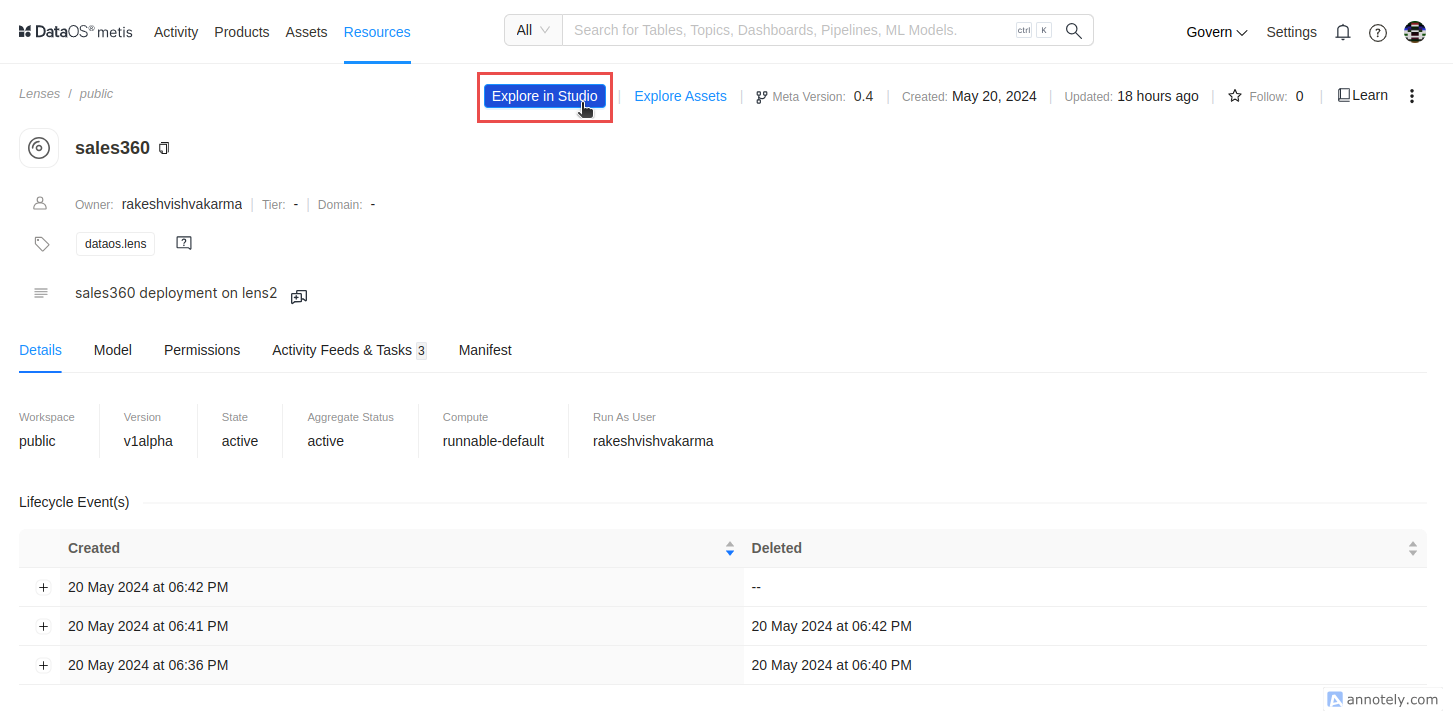
Access GraphQL Tab: Click on the ‘Explore in Studio’ button, the Studio will appear from here navigate to the GraphQL tab.

Lens Details Page and Explore in Studio Button -
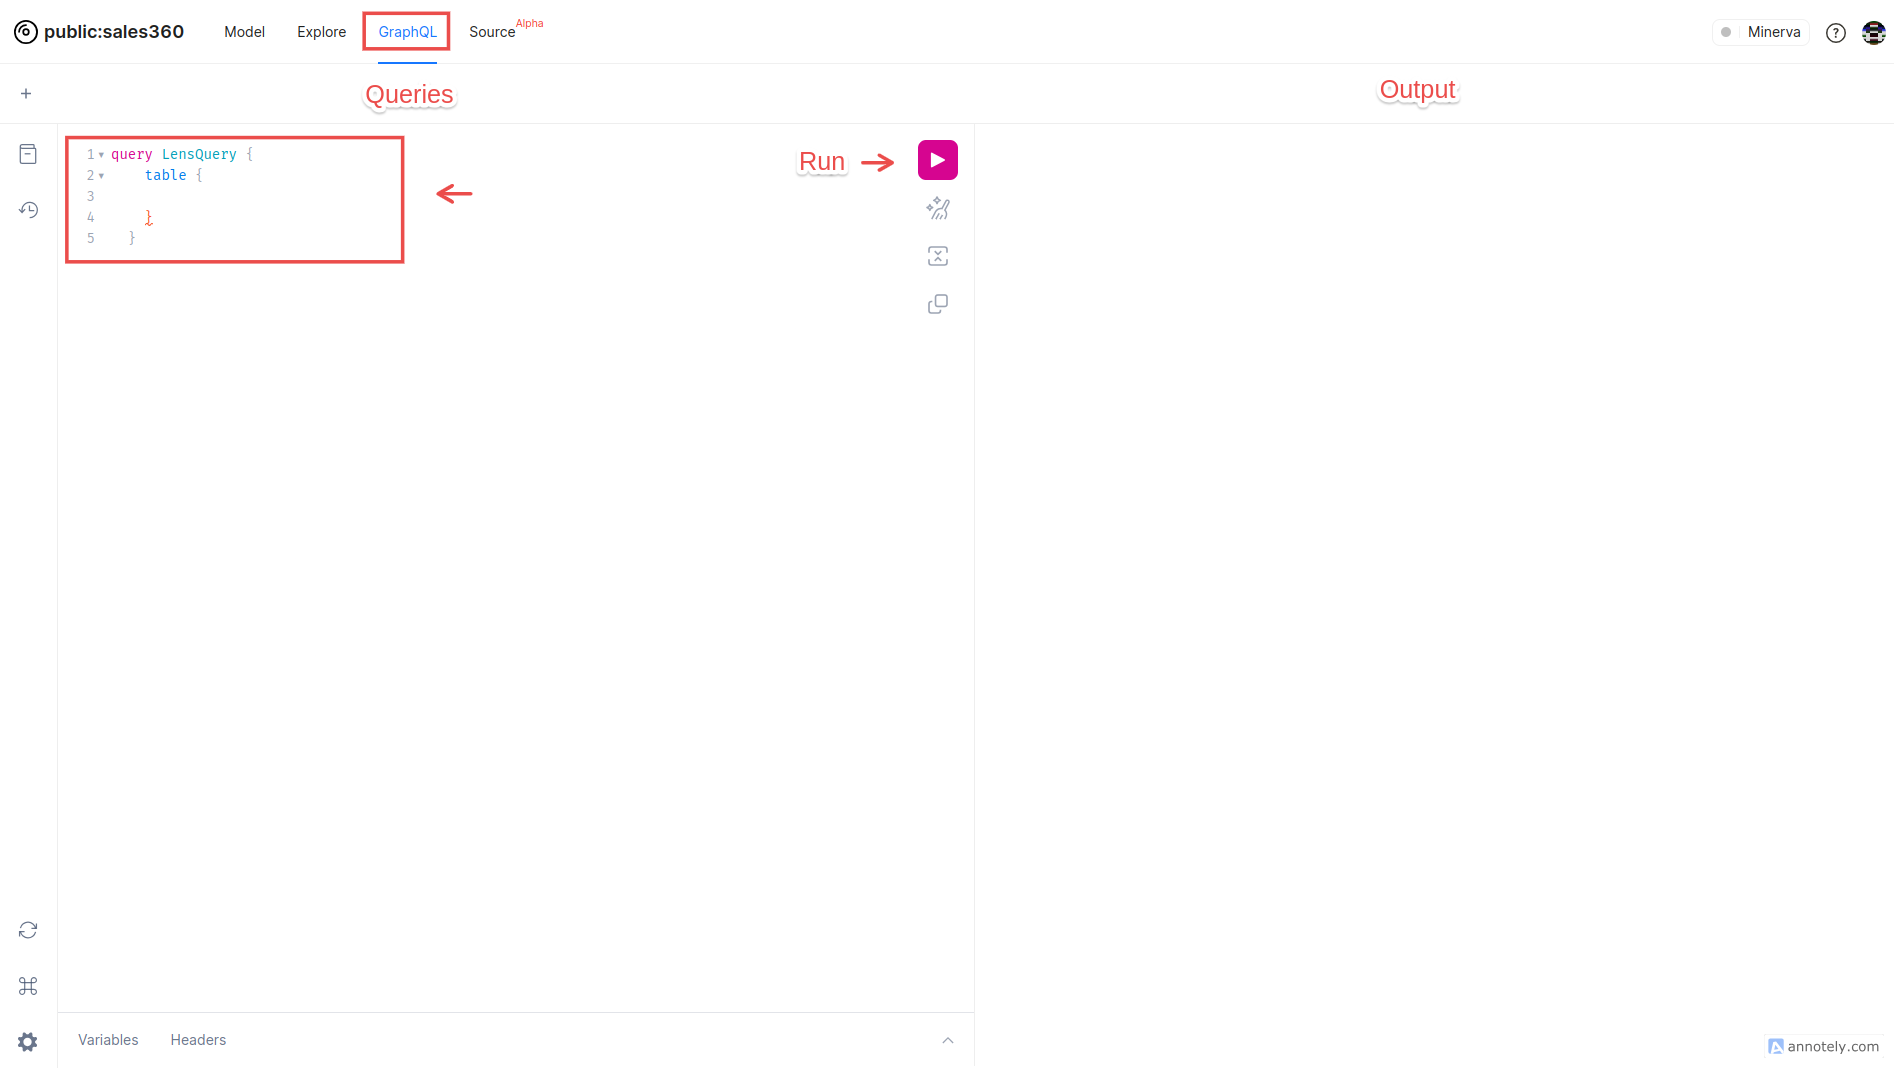
Compose a Query: Enter your GraphQL query in the left pane.

GraphQL Tab on Explorer Studio in Data Product Hub You can press
Ctrl + Spaceto bring up the autocomplete window. For example: -
Execute the Query: Click the 'Execute' button or press
Ctrl + Enterto run the query. The results will appear in the right pane.
Using Curl
Curl is a command-line tool used for transferring data with URLs, making it a convenient choice for interacting with APIs directly from the terminal. Ensure that curl is installed on your system before proceeding.
-
Prepare the Request: To send a GraphQL query using Curl, construct your request with the following template:
curl -X POST <URL> \ -H "Content-Type: application/json" \ -H "apikey: <DATAOS_API_KEY>" \ -d '{"query": "<GRAPHQL_QUERY>"}'-
Replace
<URL>with the appropriate endpoint based on your environment:- For local development, use:
- For a deployed Lens model, use:
-
Replace
<DATAOS_API_KEY>with your actual DataOS API key. Refer to the Generating an API Key section for more information on obtaining an API key. -
Replace
<DATAOS_FQDN>with the fully qualified domain name of your DataOS instance. For example:alpha-omega.dataos.apporhappy-kangaroo.dataos.app. -
Replace
<WORKSPACE>with the DataOS Workspace name where the Lens is deployed. -
Replace
<NAME_OF_LENS>with the name of your deployed Lens model. This corresponds to the specific Lens model you want to query. -
Replace
<GRAPHQL_QUERY>with your GraphQL query. Make sure to format the query as a valid JSON string.
Sample Request:
curl -X POST https://alpha-omega.dataos.app/lens2/api/public:lakehouse-insights01/v2/graphql \ -H "Content-Type: application/json" \ -H "apikey: abcdefghijklmnopqrstuvwxyz" \ -d '{"query": "query LensQuery { table { total_operations { lakehouse_insights_total_data_size_in_gb lakehouse_insights_table_name } } }"}' -
-
Execute the Command: Run the command in your terminal to execute the query and view the response.
Ensure you replace the placeholders with the actual values specific to your environment. Properly formatted queries and valid API keys are essential for successful API interactions.
Using Python
Python provides a flexible and powerful way to interact with the Lens GraphQL API. It is especially useful for building automation scripts or for use in data analysis workflows. Ensure that Python and the requests library are installed on your system before proceeding.
-
Install the
requestsLibrary:If you haven’t already installed the
requestslibrary, you can do so by running the following command: -
Prepare the Python Script:
Use the following template to create a Python script for querying the Lens GraphQL API:
import requests # Define the URL of the Lens GraphQL endpoint url = "<URL>" # Define the headers including the API key headers = { "Content-Type": "application/json", "apikey": "<DATAOS_API_KEY>" } # Define your GraphQL query query = """ <GRAPHQL_QUERY> """ # Send the POST request response = requests.post(url, headers=headers, json={'query': query}) # Print the response print(response.json())- Replace
<URL>with the appropriate endpoint based on your environment: - For local development, use:
-
For a deployed Lens model, use:
-
Replace
<DATAOS_API_KEY>with your actual DataOS API key. Refer to the Generating an API Key section for more information on obtaining an API key. -
Replace
<DATAOS_FQDN>with the fully qualified domain name of your DataOS instance. For example:alpha-omega.dataos.apporhappy-kangaroo.dataos.app. -
Replace
<WORKSPACE>with the workspace name associated with your Lens model. This is typically the name of the DataOS Workspace where the Lens is deployed. For example:public,sandbox, etc. -
Replace
<NAME_OF_LENS>with the name of your deployed Lens model. This corresponds to the specific Lens model you want to query. -
Replace
<GRAPHQL_QUERY>with the specific fields you want to query from your GraphQL schema. Make sure to format the query string as valid JSON.
Sample Script:
import requests

# Define the URL of the Lens GraphQL endpoint
url = "https://alpha-omega.dataos.app/lens2/api/public:lakehouse-insights01/v2/graphql"

# Define the headers including the API key
headers = {
    "Content-Type": "application/json",
    "apikey": "abcdefghijklmnopqrstuvwxyz"
}

# Define your GraphQL query
query = """
  query LensQuery {
    table {
      total_operations {
        lakehouse_insights_total_data_size_in_gb
        lakehouse_insights_table_name
      }
    }
  }
"""

# Send the POST request
response = requests.post(url, headers=headers, json={'query': query})

# Print the response
print(response.json())
In the above sample: -
<URL>ishttps://alpha-omega.dataos.app/lens2/api/public:lakehouse-insights01/v2/graphql-<DATAOS_API_KEY>isabcdefghijklmnopqrstuvwxyz(replace with your actual API key) -<WORKSPACE>ispublic-<NAME_OF_LENS>islakehouse-insights01- The query fetcheslakehouse_insights_total_data_size_in_gbandlakehouse_insights_table_namefields from thetotal_operationstable. - Replace
-
Run the Script:
Save the script as a
.pyfile and execute it using the following command in your terminal:This will send the GraphQL query to the Lens API and print the response to your terminal.
Note: Ensure you replace the placeholders with the actual values specific to your environment. Properly formatted queries and valid API keys are essential for successful API interactions.
Using Postman
When working with a Postman collection to test APIs, you typically need to configure authorization, set request methods, and provide the request body. Below are the steps to get started:
-
Open Postman and import the Postman collection:
- Open Postman and click on the Import button located at the top-left corner.
-
Import the Postman Collection file you’ve been given. For example, if you import the Lens API collection from the provided link, you will see a collection of API requests neatly organized into folders. Refer to the below image for subsequent steps.

Postman
-
Set up Authorization (bearer token):
- Once the collection is imported, click on the specific API request you want to test.
- Go to the Authorization tab.
- From the Auth Type dropdown, select Bearer Token.
- In the Token field, paste your Bearer token, which you have received from your authentication process.
- This token grants you access to the meta and data scopes.
-
Set the Request type:
- Select the API request type as
POSTfrom the dropdown next to the API URL.
- Select the API request type as
-
Prepare the URL and Query the API:
- Prepare the URL according to what data you want to fetch.
-
Replace
<URL>with the appropriate endpoint based on your environment:- For local development, use:
- For a deployed Lens model, use:
-
Replace
<DATAOS_API_KEY>with your actual DataOS API key. Refer to the Generating an API Key section for more information on obtaining an API key. -
Replace
<DATAOS_FQDN>with the fully qualified domain name of your DataOS instance. For example:alpha-omega.dataos.apporhappy-kangaroo.dataos.app. -
Replace
<WORKSPACE>with the workspace name associated with your Lens model. This is typically the name of the DataOS Workspace where the Lens is deployed. For example:public,sandbox, etc. -
Replace
<NAME_OF_LENS>with the name of your deployed Lens model. This corresponds to the specific Lens model you want to query. For e.g.sales360. -
Replace
<QUERY>with the specific fields you want to query from schema. Make sure to format the query string as valid JSON.
-
Set the Request Body in Postman (for POST Methods):
-
for
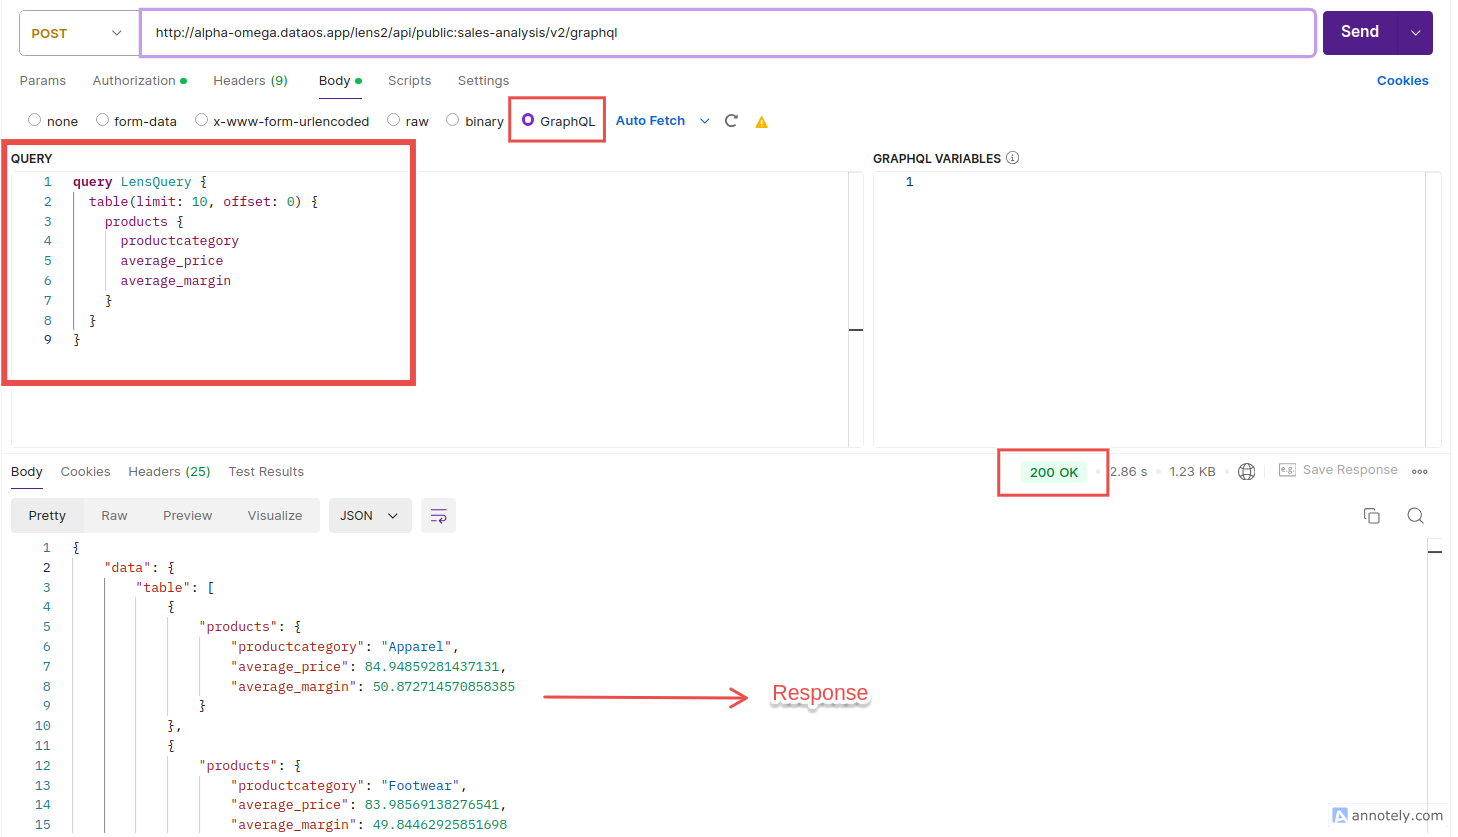
POSTrequests, you will need to configure the Body tab for graphql. Refer to the below image for subsequent steps.
Postman GraphQL request body tab - In the
Bodytab, selectGraphQLfrom the format options. - Enter the GraphQL query in the provided field in the following format.
query LensQuery { table(limit: 10, offset: 0) { <TABLENAME> { <DIMENSION> <MEASURE_1> <MEAUSRE_2> } } }-
Replace table name and choose requried dimensions and measures.
-
For Example: If you want to compare the average price and average margin of two major categories: Apparel and Footwear for the
productstable. The request body will be:
- In the
-
GraphQL Query Examples
This section provides sample GraphQL queries that you can use directly in Explorer Studio of the Data Product Hub. You can also use these queries with the
Querying a dimension
A GraphQL query to retrieve the city dimension associated with an account table might look something like this:
{
"data": {
"table": [
{
  "account": {
    "city": "Austin"
  }
},
{
  "account": {
    "city": "Baltimore"
  }
},
{
  "account": {
    "city": "Baton Rouge"
  }
},
{
  "account": {
    "city": "Chicago"
  }
},
{
  "account": {
    "city": "Cincinnati"
  }
},
{
  "account": {
    "city": "Columbus"
  }
},
{
  "account": {
    "city": "Denver"
  }
},
{
  "account": {
    "city": "Greenville"
  }
},
{
  "account": {
    "city": "Houston"
  }
},
{
  "account": {
    "city": "King of Prussia"
  }
},
{
  "account": {
    "city": "Longview"
  }
},
{
  "account": {
    "city": "Los Angeles"
  }
},
{
  "account": {
    "city": "Miami"
  }
},
{
  "account": {
    "city": "New York"
  }
},
{
  "account": {
    "city": "Philadelphia"
  }
},
{
  "account": {
    "city": "Portland"
  }
},
{
  "account": {
    "city": "San Diego"
  }
},
{
  "account": {
    "city": "San Francisco"
  }
},
{
  "account": {
    "city": "Seattle"
  }
},
{
  "account": {
    "city": "Springfield"
  }
},
{
  "account": {
    "city": "Syracuse"
  }
},
{
  "account": {
    "city": "Tampa"
  }
},
{
  "account": {
    "city": "Tulsa"
  }
}
]
}
}
Querying Measure and Dimension
A GraphQL query to retrieve the city and the total_accounts associated with each entry within the account table is given below:
{
  "data": {
    "table": [
      {
        "account": {
          "city": "Los Angeles",
          "total_accounts": 59
        }
      },
      {
        "account": {
          "city": "Chicago",
          "total_accounts": 12
        }
      },
      {
        "account": {
          "city": "Kansas City",
          "total_accounts": 11
        }
      },
      {
        "account": {
          "city": "San Francisco",
          "total_accounts": 8
        }
      },
      {
        "account": {
          "city": "New York",
          "total_accounts": 6
        }
      },
      {
        "account": {
          "city": "Miami",
          "total_accounts": 5
        }
      },
      {
        "account": {
          "city": "Houston",
          "total_accounts": 5
        }
      },
      {
        "account": {
          "city": "Greenville",
          "total_accounts": 5
        }
      },
      {
        "account": {
          "city": "Cincinnati",
          "total_accounts": 3
        }
      },
      {
        "account": {
          "city": "Denver",
          "total_accounts": 2
        }
      },
      {
        "account": {
          "city": "Baton Rouge",
          "total_accounts": 2
        }
      },
      {
        "account": {
          "city": "Baltimore",
          "total_accounts": 2
        }
      },
      {
        "account": {
          "city": "Portland",
          "total_accounts": 2
        }
      },

      {
        "account": {
          "city": "Seattle",
          "total_accounts": 2
        }
      },
      {
        "account": {
          "city": "Springfield",
          "total_accounts": 1
        }
      },
      {
        "account": {
          "city": "San Diego",
          "total_accounts": 1
        }
      },
      {
        "account": {
          "city": "Austin",
          "total_accounts": 1
        }
      },
      {
        "account": {
          "city": "King of Prussia",
          "total_accounts": 1
        }
      },
      {
        "account": {
          "city": "Columbus",
          "total_accounts": 1
        }
      }
    ]
  }
}
Modifying time dimension granularity
The granularity for a time dimension can easily be changed by specifying it in the query:
Any supported granularity can be used. If you prefer to not specify a granularity, then use value:
Specifying filters
Filters can be set on the load query or on a specific table. Specifying the filter on the load query applies it to all tables in the query. Filters can be added to the query as follows:
{
  "data": {
    "table": [
      {
        "account": {
          "total_accounts": 25,
          "city": "Los Angeles",
          "premise_code": "OFF"
        }
      },
      {
        "account": {
          "total_accounts": 11,
          "city": "Kansas City",
          "premise_code": "OFF"
        }
      },
      {
        "account": {
          "total_accounts": 9,
          "city": "Chicago",
          "premise_code": "OFF"
        }
      },
      {
        "account": {
          "total_accounts": 5,
          "city": "San Francisco",
          "premise_code": "OFF"
        }
      },
      {
        "account": {
          "total_accounts": 5,
          "city": "New York",
          "premise_code": "OFF"
        }
      },
      {
        "account": {
          "total_accounts": 5,
          "city": "Houston",
          "premise_code": "OFF"
        }
      },
      {
        "account": {
          "total_accounts": 4,
          "city": "Miami",
          "premise_code": "OFF"
        }
      },
      {
        "account": {
          "total_accounts": 4,
          "city": "Philadelphia",
          "premise_code": "OFF"
        }
      },
      {
        "account": {
          "total_accounts": 2,
          "city": "Sacramento",
          "premise_code": "OFF"
        }
      },
      {
        "account": {
          "total_accounts": 1,
          "city": "Spokane",
          "premise_code": "OFF"
        }
      },
      {
        "account": {
          "total_accounts": 1,
          "city": "Rochester",
          "premise_code": "OFF"
        }
      },
      {
        "account": {
          "total_accounts": 1,
          "city": "Charleston",
          "premise_code": "OFF"
        }
      },
      {
        "account": {
          "total_accounts": 1,
          "city": "Jacksonville",
          "premise_code": "OFF"
        }
      },
      {
        "account": {
          "total_accounts": 1,
          "city": "Austin",
          "premise_code": "OFF"
        }
      },
      {
        "account": {
          "total_accounts": 1,
          "city": "King of Prussia",
          "premise_code": "OFF"
        }
      },
      {
        "account": {
          "total_accounts": 1,
          "city": "Longview",
          "premise_code": "OFF"
        }
      },
      {
        "account": {
          "total_accounts": 1,
          "city": "San Antonio",
          "premise_code": "OFF"
        }
      },
      {
        "account": {
          "total_accounts": 1,
          "city": "San Jose",
          "premise_code": "OFF"
        }
      },
      {
        "account": {
          "total_accounts": 1,
          "city": "Springfield",
          "premise_code": "OFF"
        }
      },
      {
        "account": {
          "total_accounts": 1,
          "city": "Tulsa",
          "premise_code": "OFF"
        }
      },
      {
        "account": {
          "total_accounts": 1,
          "city": "Baltimore",
          "premise_code": "OFF"
        }
      },
      {
        "account": {
          "total_accounts": 1,
          "city": "Lafayette",
          "premise_code": "OFF"
        }
      },
      {
        "account": {
          "total_accounts": 1,
          "city": "Greenville",
          "premise_code": "OFF"
        }
      },
      {
        "account": {
          "total_accounts": 1,
          "city": "Portland",
          "premise_code": "OFF"
        }
      },
      {
        "account": {
          "total_accounts": 1,
          "city": "Fort Lauderdale",
          "premise_code": "OFF"
        }
      },
      {
        "account": {
          "total_accounts": 1,
          "city": "Tampa",
          "premise_code": "OFF"
        }
      },
      {
        "account": {
          "total_accounts": 1,
          "city": "Cincinnati",
          "premise_code": "OFF"
        }
      },
      {
        "account": {
          "total_accounts": 1,
          "city": "Fort Myers",
          "premise_code": "OFF"
        }
      },
      {
        "account": {
          "total_accounts": 1,
          "city": "Colorado Springs",
          "premise_code": "OFF"
        }
      },
      {
        "account": {
          "total_accounts": 1,
          "city": "San Diego",
          "premise_code": "OFF"
        }
      },
      {
        "account": {
          "total_accounts": 1,
          "city": "Amarillo",
          "premise_code": "OFF"
        }
      },
      {
        "account": {
          "total_accounts": 1,
          "city": "Syracuse",
          "premise_code": "OFF"
        }
      },
      {
        "account": {
          "total_accounts": 1,
          "city": "Omaha",
          "premise_code": "OFF"
        }
      },
      {
        "account": {
          "total_accounts": 1,
          "city": "Baton Rouge",
          "premise_code": "OFF"
        }
      },
      {
        "account": {
          "total_accounts": 1,
          "city": "Fort Wayne",
          "premise_code": "OFF"
        }
      },
      {
        "account": {
          "total_accounts": 1,
          "city": "Minneapolis",
          "premise_code": "OFF"
        }
      },
      {
        "account": {
          "total_accounts": 1,
          "city": "Columbus",
          "premise_code": "OFF"
        }
      },
      {
        "account": {
          "total_accounts": 1,
          "city": "Denver",
          "premise_code": "OFF"
        }
      },
      {
        "account": {
          "total_accounts": 1,
          "city": "Puyallup",
          "premise_code": "OFF"
        }
      }
    ]
  }
}
Specifying order by condition and limiting the result
A GraphQL query that specifies an order by condition and limits the number of results returned would look like this:
{
  "data": {
    "table": [
      {
        "account": {
          "total_accounts": 27,
          "city": "Los Angeles",
          "premise_code": "ON"
        }
      },
      {
        "account": {
          "total_accounts": 25,
          "city": "Los Angeles",
          "premise_code": "OFF"
        }
      },
      {
        "account": {
          "total_accounts": 9,
          "city": "Chicago",
          "premise_code": "OFF"
        }
      },
      {
        "account": {
          "total_accounts": 7,
          "city": "Los Angeles",
          "premise_code": "BOTH"
        }
      },
      {
        "account": {
          "total_accounts": 5,
          "city": "Houston",
          "premise_code": "OFF"
        }
      },
      {
        "account": {
          "total_accounts": 5,
          "city": "New York",
          "premise_code": "OFF"
        }
      },
      {
        "account": {
          "total_accounts": 5,
          "city": "San Francisco",
          "premise_code": "OFF"
        }
      },
      {
        "account": {
          "total_accounts": 4,
          "city": "Greenville",
          "premise_code": "ON"
        }
      },

    ]
  }
}
Querying multiple tables
Using the same account table as before, let’s try and get the revenue for each. We can do this by adding the sales table to our query as follows:
{
  "data": {
    "table": [
      {
        "account": {
          "total_accounts": 26,
          "city": "Los Angeles",
          "premise_code": "ON"
        },
        "sales": {
          "revenue": 3911966
        }
      },
      {
        "account": {
          "total_accounts": 25,
          "city": "Los Angeles",
          "premise_code": "OFF"
        },
        "sales": {
          "revenue": 10562513
        }
      },
      {
        "account": {
          "total_accounts": 11,
          "city": "Kansas City",
          "premise_code": "OFF"
        },
        "sales": {
          "revenue": 3423034
        }
      },
      {
        "account": {
          "total_accounts": 9,
          "city": "Chicago",
          "premise_code": "OFF"
        },
        "sales": {
          "revenue": 3206423
        }
      },
      {
        "account": {
          "total_accounts": 7,
          "city": "Los Angeles",
          "premise_code": "BOTH"
        },
        "sales": {
          "revenue": 937897
        }
      },
      {
        "account": {
          "total_accounts": 5,
          "city": "New York",
          "premise_code": "OFF"
        },
        "sales": {
          "revenue": 6716860
        }
      },
      {
        "account": {
          "total_accounts": 5,
          "city": "Houston",
          "premise_code": "OFF"
        },
        "sales": {
          "revenue": 2687617
        }
      },
      {
        "account": {
          "total_accounts": 5,
          "city": "San Francisco",
          "premise_code": "OFF"
        },
        "sales": {
          "revenue": 4070105
        }
      },
      {
        "account": {
          "total_accounts": 4,
          "city": "Greenville",
          "premise_code": "ON"
        },
        "sales": {
          "revenue": 477785
        }
      },
      {
        "account": {
          "total_accounts": 4,
          "city": "Philadelphia",
          "premise_code": "OFF"
        },
        "sales": {
          "revenue": 1942174
        }
      },
      {
        "account": {
          "total_accounts": 4,
          "city": "Miami",
          "premise_code": "OFF"
        },
        "sales": {
          "revenue": 668754
        }
      },
      {
        "account": {
          "total_accounts": 2,
          "city": "Cincinnati",
          "premise_code": "ON"
        },
        "sales": {
          "revenue": 164592
        }
      },
      {
        "account": {
          "total_accounts": 2,
          "city": "San Francisco",
          "premise_code": "ON"
        },
        "sales": {
          "revenue": 679107
        }
      },
      {
        "account": {
          "total_accounts": 2,
          "city": "Chicago",
          "premise_code": "BOTH"
        },
        "sales": {
          "revenue": 832273
        }
      },
      {
        "account": {
          "total_accounts": 1,
          "city": "Springfield",
          "premise_code": "OFF"
        },
        "sales": {
          "revenue": 777520
        }
      },
      {
        "account": {
          "total_accounts": 1,
          "city": "King of Prussia",
          "premise_code": "OFF"
        },
        "sales": {
          "revenue": 766746
        }
      },
      {
        "account": {
          "total_accounts": 1,
          "city": "Seattle",
          "premise_code": "BOTH"
        },
        "sales": {
          "revenue": 1063062
        }
      },
      {
        "account": {
          "total_accounts": 1,
          "city": "Seattle",
          "premise_code": "ON"
        },
        "sales": {
          "revenue": 1177920
        }
      },
      {
        "account": {
          "total_accounts": 1,
          "city": "New York",
          "premise_code": "BOTH"
        },
        "sales": {
          "revenue": 781302
        }
      },
      {
        "account": {
          "total_accounts": 1,
          "city": "Baltimore",
          "premise_code": "OFF"
        },
        "sales": {
          "revenue": 869502
        }
      },
      {
        "account": {
          "total_accounts": 1,
          "city": "Chicago",
          "premise_code": "ON"
        },
        "sales": {
          "revenue": 74490
        }
      },
      {
        "account": {
          "total_accounts": 1,
          "city": "Portland",
          "premise_code": "OFF"
        },
        "sales": {
          "revenue": 828035
        }
      },
      {
        "account": {
          "total_accounts": 1,
          "city": "Jacksonville",
          "premise_code": "OFF"
        },
        "sales": {
          "revenue": 94176
        }
      },
      {
        "account": {
          "total_accounts": 1,
          "city": "Greenville",
          "premise_code": "OFF"
        },
        "sales": {
          "revenue": 1767816
        }
      },
      {
        "account": {
          "total_accounts": 1,
          "city": "San Francisco",
          "premise_code": "BOTH"
        },
        "sales": {
          "revenue": 700260
        }
      },
      {
        "account": {
          "total_accounts": 1,
          "city": "Philadelphia",
          "premise_code": "BOTH"
        },
        "sales": {
          "revenue": 848815
        }
      },
      {
        "account": {
          "total_accounts": 1,
          "city": "San Diego",
          "premise_code": "OFF"
        },
        "sales": {
          "revenue": 920196
        }
      },
      {
        "account": {
          "total_accounts": 1,
          "city": "Portland",
          "premise_code": "ON"
        },
        "sales": {
          "revenue": 925375
        }
      },

      {
        "account": {
          "total_accounts": 1,
          "city": "Baltimore",
          "premise_code": "ON"
        },
        "sales": {
          "revenue": 486769
        }
      },
      {
        "account": {
          "total_accounts": 1,
          "city": "Jacksonville",
          "premise_code": "ON"
        },
        "sales": {
          "revenue": 64960
        }
      },
      {
        "account": {
          "total_accounts": 1,
          "city": "Denver",
          "premise_code": "OFF"
        },
        "sales": {
          "revenue": 219864
        }
      },
      {
        "account": {
          "total_accounts": 1,
          "city": "Columbus",
          "premise_code": "OFF"
        },
        "sales": {
          "revenue": 617413
        }
      },
      {
        "account": {
          "total_accounts": 1,
          "city": "Baton Rouge",
          "premise_code": "ON"
        },
        "sales": {
          "revenue": 173586
        }
      },
      {
        "account": {
          "total_accounts": 1,
          "city": "Baton Rouge",
          "premise_code": "OFF"
        },
        "sales": {
          "revenue": 819126
        }
      },
      {
        "account": {
          "total_accounts": 1,
          "city": "Miami",
          "premise_code": "BOTH"
        },
        "sales": {
          "revenue": 142380
        }
      },
      {
        "account": {
          "total_accounts": 1,
          "city": "Denver",
          "premise_code": "ON"
        },
        "sales": {
          "revenue": 798121
        }
      },
      {
        "account": {
          "total_accounts": 1,
          "city": "Cincinnati",
          "premise_code": "OFF"
        },
        "sales": {
          "revenue": 941096
        }
      },
      {
        "account": {
          "total_accounts": 1,
          "city": "Austin",
          "premise_code": "OFF"
        },
        "sales": {
          "revenue": 84138
        }
      },
      {
        "account": {
          "total_accounts": 1,
          "city": "Spokane",
          "premise_code": "ON"
        },
        "sales": {
          "revenue": 972030
        }
      }
    ]
  }
}