End to end use-case to back a streamlit application via Database resource
Our goal is to back a Streamlit app with Database resource.
This app will provide insights on the product data contained in the database.
We will start by - creating an initial schema migration and \n - set up a Database Resource resource, configure a depot for data transfer, \n - migrate data from LakeHouse to Database, validate with a cluster setup, and finally, dockerize and deploy the Streamlit app using Alpha Stack.\n
To achieve this, follow this step by step guide
For this process, we need to maintain a folder with the following structure in the IDE:
project-directory/
├── app/
│   ├── main.py
│   ├── Dockerfile
│   └── requirements.txt
├── database/
│   ├── migrations/
│   │   └── initial_schema.sql
├── flare.yaml
├── depot.yaml
├── cluster.yaml
├── service.yaml
└── container.yaml
Create Database schema migration
We will begin by creating a new migration that includes only the schema, without any initial data. For that, Create a folder named migration and in it create a schema_migration file.
CREATE TABLE if not EXISTS product_data (
    product_id VARCHAR PRIMARY KEY,
    product_name VARCHAR,
    product_description VARCHAR,
    list_price INTEGER,
    sale_price INTEGER,
    brand_name VARCHAR,
    size_name VARCHAR,
    size_description VARCHAR,
    department_name VARCHAR,
    category_name VARCHAR
);
Create the Database manifest
Following the schema setup, we will create a Database Resource based on the schema.
name: productdb
version: v1
type: database
description: productdb database created for testing.
tags:
  - database
database:
  migrate:
    includes:
      - migration/
    command: up
  compute: runnable-default
Check the workflow of the created Database
dataos-ctl resource get -t workflow -w curriculum
# Expected Output
➜  DatabaseUseCase dataos-ctl apply -f database.yaml
INFO[0000] 🔍 get...
INFO[0000] 🔍 get...complete

                NAME               | VERSION |   TYPE   | WORKSPACE | STATUS |  RUNTIME  |     OWNER
-----------------------------------|---------|----------|-----------|--------|-----------|-----------------
  productdb-2-m-Database Resource           | v1      | workflow | curriculum    | active | running   | iamgroot
When you create a Database Resource a depot automatically gets created with the name {your_db}database. for e.g., if your Database Resource name is productdb the depot name will be like productdbdatabase which you can fetch using get command.
dataos-ctl resource get -t depot
#Expected_Output
INFO[0000] 🔍 get...
INFO[0000] 🔍 get...complete

         NAME         | VERSION | TYPE  | WORKSPACE | STATUS | RUNTIME |     OWNER
----------------------|---------|-------|-----------|--------|---------|-----------------
  customersdbdatabase | v1      | depot |           | active |         | iamgroot
  productdbdatabase   | v1      | depot |           | active |         | iamgroot
The Resource YAML can be viewed on Operations App by following these steps.
To access the Resource YAML, follow these steps within the Operations App:
-
Navigate to Operations: Open the Operations application interface.
-
Go to User Space: Navigate to the User Space section.
-
Search for Depot: Look for the automatically generated depot named productdbdatabase.
-
View Resource YAML: Click on "Resource YAML" to view detailed configuration and specifications of the productdbdatabase depot.
Create a Beacon Service
Now, Create a Beacon Service to expose the PostgreSQL Database Resource on API.
version: v1
name: product-db-01
type: service
service:
  replicas: 1
  ingress:
    enabled: true
    stripPath: true
    path: /product/api/v1    # naming of path what you want but formatting is neccessary.
    noAuthentication: true
  stack: beacon+rest
  compute: runnable-default
  envs:
    PGRST_OPENAPI_SERVER_PROXY_URI: https://<dataos_fqdn>/product/api/v1

  stackSpec:
    source:
      type: database
      name: productdb
      workspace: public
  topology:
    - name: database
      type: input
      doc: product database connection
    - name: rest-api
      type: output
      doc: serves up the customers database as a RESTful API
      dependencies:
        - database
you can now access the PostgreSQL Database Resource using the exposed API by
To validate the outcome, execute a request to the designated URL as highlighted in the above manifest:
A successful response with no errors indicates that the Database Resource has been successfully initialized with no data initially.
Create the Depot manifest
Next, a depot will be established to connect PostgreSQL Database with DataOS. This depot will serves as an intermediary to facilitate data movement from from lakehouse Depot to product Database Resource depot which is backed by postgreSQL Database.
Here we need information of the following attributes:
- Database name: The name of the PostgreSQL database. Here,
productdb - Hostname/URL of the server: The hostname or URL of the PostgreSQL server.
- Parameters: Additional parameters for the connection, if required.
- Username: The username for authentication, here it is
postgres - Password: The password for authentication, which you need to ask to your respective DevOps team.
This information can be copied from Resource YAML, which would look like following after configuration
database: productdb
host: usr-db-dataos-ck-vgji-liberaldo-dev.postgres.database.azure.com
port: 5432
subprotocol: postgresql
version: v1
name: productdb
type: depot
layer: user
depot:
  type: JDBC                                # Depot type
  description: To write data to retaildb postgresql database
  external: true
  connectionSecret:                               # Data source specific configurations
    - acl: rw
      type: key-value-properties
      data:
        username: "postgres"
        password: "XXXXa1110XXb540Xad2fXe2245X90aXXX"
  spec:                                           # Data source specific configurations
    database: product
    host: usr-db-dataos-ck-vgji-colorfuldo-dev.postgres.database.azure.com
    port: 5432
    subprotocol: postgresql
Here, we will be using cluster to check whether we are able to query the Database using workbench.
Create the Cluster manifest
To verify the successful movement of the data from Lakehouse to productdb database, we will set up a cluster. This cluster will allow us to query the data using a workbench. Successful querying will confirm that the data has been correctly migrated.
name: databasetestcluster
version: v1
type: cluster
cluster:
  compute: runnable-default
  type: minerva
  minerva:
    replicas: 1
    resources:
      requests:
        cpu: 2000m
        memory: 2Gi
      limits:
        cpu: 2000m
        memory: 2Gi
    depots:
      - address: dataos://productdb:default
    debug:
      logLevel: DEBUG
      trinoLogLevel: DEBUG
Create a Flare job manifest
After succesful creation of PostgreSQL Database Depot. Now, We will migrate data from LakeHouse to the Database via Flare stack.
# creds depends upon the env refer to default schema public
# it's an internal service of  dataos which is not exposed publicly so can not be connected with any gui applications
version: v1
name: postgres-read-write01
type: workflow
tags:
  - bq
  - dataset
description: This job read and write data from to postgres
title: Read Write Postgres
workflow:
  dag:
    - name: write-postgres
      title: Write Postgres
      description: This job write data from postgres
      spec:
        tags:
          - Connect
        stack: flare:7.0
        compute: runnable-default
        stackSpec:
          job:
            explain: true
            inputs:
              - name: input
                dataset: dataos://lakehouse:retail/product
                format: Iceberg
              #  schemaPath: dataos://thirdparty01:none/schemas/avsc/city.avsc
            logLevel: INFO
            outputs:
              - name: finalDf
                dataset: dataos://productdb:public/product_data?acl=rw
                driver: org.postgresql.Driver
                format: jdbc
                options:
                  saveMode: overwrite
                description: Data set from Lakehouse
                tags:
                  - Connect
                title: Postgres Dataset
            steps:
              - sequence:
                  - name: finalDf
                    sql: |
                      SELECT
                        product_id,
                        product_name ,
                        product_description ,
                        list_price ,
                        sale_price ,
                        brand_name ,
                        size_name ,
                        size_description ,
                        department_name ,
                        category_name
                      FROM input
                      LIMIT 1000
Now, In the same directory, let's create a folder named application in it we will create a requirements.txt, app.py, and a Dockerfile.
Before moving to deploy streamlit in DataOS. You can download this zip folder to replicate the streamlit application. To download click here
Add dependencies to your requirements file
In the application folder, let's create a create a requirements.txt file, preferably pinning its version (replace x.x.x with the version you want installed):
Write your Streamlit app
Write the desired streamlit app app.py configure it with the connection details as highlighted below
# Product Data Viewer App with Category-wise Sales Chart
# Import necessary libraries
import pandas as pd
from trino.dbapi import connect
from trino.auth import BasicAuthentication
import streamlit as st
import altair as alt
import webbrowser
import requests
from streamlit.components.v1 import components
# Function to fetch data and return pandas dataframe
@st.cache(persist=True, show_spinner=False, ttl=100)
def fetch_data(query, _cur):
_cur.execute(query)
rows = _cur.fetchall()
columns = [desc[0] for desc in _cur.description]
formatted_columns = [col.replace("_", " ").title() for col in columns]
df = pd.DataFrame(rows, columns=formatted_columns)
return df
# Streamlit app
def main():
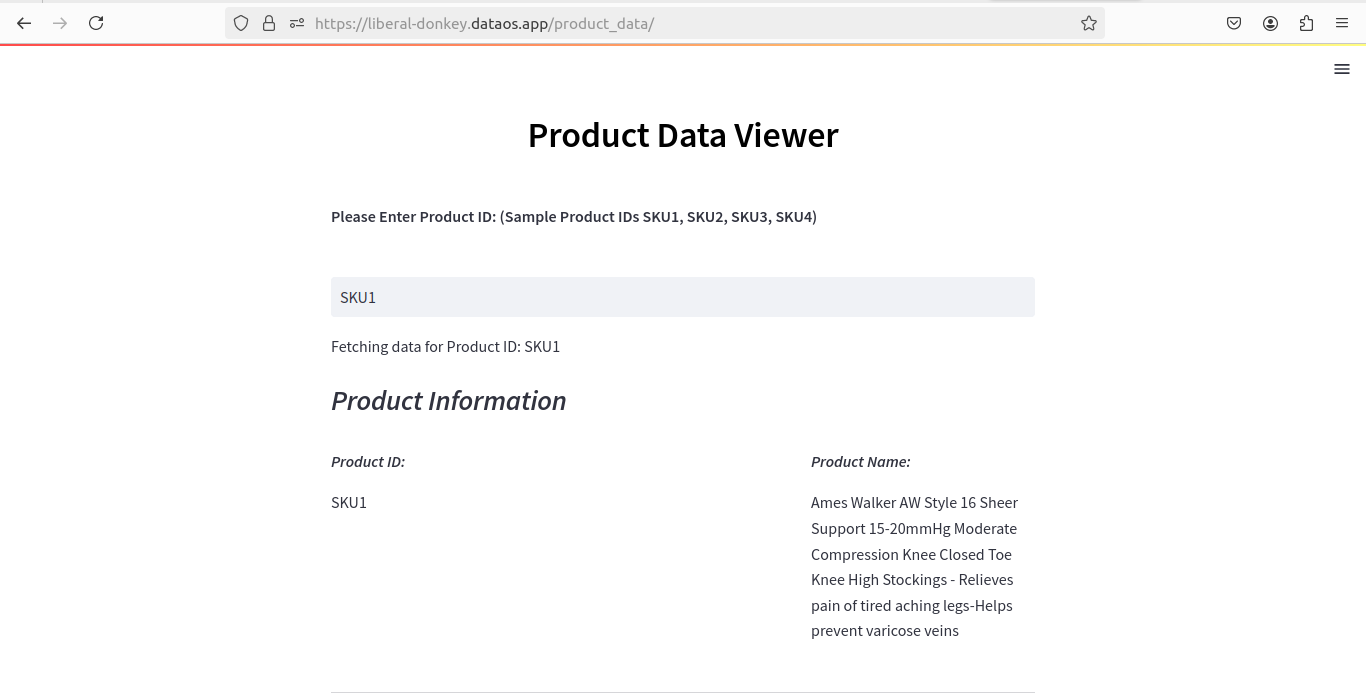
st.markdown("<h2 style='text-align: center; color: black;'>Product Data Viewer</h2>", unsafe_allow_html=True)
st.write("\n")
st.write("\n")
st.markdown("**Please Enter Product ID: (Sample Product IDs SKU1, SKU2, SKU3, SKU4)**")
product_id = st.text_input("", value="")
if len(product_id) < 1:
st.write("Please enter a valid Product ID")
else:
st.write("Fetching data for Product ID: {}".format(product_id))
# Connect to Trino database
with connect(
host="tcp.liberal-donkey.dataos.app",
port="7432",
auth=BasicAuthentication(
"iamgroot",
"dG9rZW5fcGVycdfafuiawfa29uYWxseV9pbGxlZ2FsbHlfd2lzZV9qYWd1YXIuNDJjZTEwZlZDk3MDNjODI3"
),
http_scheme="https",
http_headers={"cluster-name": "postgresdptest"}
) as conn:
cur = conn.cursor()
query = f"SELECT * FROM postgresdp.public.product_data WHERE product_id = '{product_id}'"
data = fetch_data(query, cur)
if data.empty:
st.write("Please enter a valid Product ID")
else:
st.subheader("*Product Information*")
col1, col2, col3 = st.columns(3)
with col1:
st.markdown("***Product ID:***")
st.write(data.at[0, 'Product Id'])
with col3:
st.markdown("***Product Name:***")
st.write(data.at[0, 'Product Name'])
st.markdown("""-------------""")
col1, col2, col3 = st.columns(3)
with col1:
st.markdown("***Brand Name:***")
st.write(data.at[0, 'Brand Name'])
with col3:
st.markdown("***Category Name:***")
st.write(data.at[0, 'Category Name'])
st.markdown("""-------------""")
col1, col2, col3 = st.columns(3)
with col1:
st.markdown("***List Price:***")
st.write(data.at[0, 'List Price'])
with col3:
st.markdown("***Sale Price:***")
st.write(data.at[0, 'Sale Price'])
st.markdown("""-------------""")
# Display fetched data
st.write("## Fetched Data:")
st.write(data)
# Show summary statistics
st.write("## Summary Statistics:")
st.write(data.describe())
# Show interactive scatter plot for List Price vs Sale Price
st.write("## Interactive Scatter Plot: List Price vs Sale Price")
scatterplot = alt.Chart(data).mark_circle().encode(
x='List Price',
y='Sale Price',
tooltip=['Product Name', 'Brand Name', 'List Price', 'Sale Price']
).interactive()
st.altair_chart(scatterplot, use_container_width=True)
# Show distribution of List Price
st.write("## Distribution of List Price:")
hist_chart = alt.Chart(data).mark_bar().encode(
alt.X("List Price", bin=True),
y='count()',
tooltip=['count()']
).interactive()
st.altair_chart(hist_chart, use_container_width=True)
# Show category-wise sales chart
st.write("## Category-wise Sales:")
category_sales_chart = alt.Chart(data).mark_bar().encode(
x='Category Name',
y='sum(Sale Price)',
tooltip=['Category Name', 'sum(Sale Price)']
).properties(
width=700,
height=400
).interactive()
st.altair_chart(category_sales_chart, use_container_width=True)
if __name__ == "__main__":
main()
Create a Docker Image
Build a Docker Image
Next, we need to create a Docker image for our application. Docker is a containerization platform that allows you to package your application and its dependencies into a single image that can be run in any environment.
To create a Docker image, we need to create a Dockerfile that defines the build process.
# Use an official Python runtime as a parent image
FROM python:3.7.6
# Set the working directory in the container
WORKDIR /application
# Copy the current directory contents into the container at /app
COPY requirements.txt ./requirements.txt
# Install any needed packages specified in requirements.txt
RUN pip3 install -r requirements.txt
# Make port available to the world outside this container
COPY streamlit.py .
CMD streamlit run streamlit.py --server.port 8501
#/product_data
This Dockerfile starts with a lightweight Python 3.7.6 base image, installs all packages and libraries mentioned in requirments.txt, sets the working directory to /app, copies the app.py file into the container, and defines the command to run the application.
To build the Docker image, run the following command in the same directory as your Dockerfile:
Replace your-username with your Docker Hub username, and input the password to login.
Tag the Docker Image
To push an image to Docker Hub, your image needs to be tagged. In case it’s not tagged, you can use the below command.
List Docker Images
Now, Use the following command to list all Docker images on your system, this will also confirm that the Docker image you just build is available locally.
This command will display a table of images with their REPOSITORY, TAG, IMAGE ID, CREATED, and SIZE.
REPOSITORY                                  TAG          IMAGE ID       CREATED         SIZE
iamgroot/my-first-db-st-app              1.0.4           3bcfa387913d   5 hours ago     1.41GB
my-first-db-st-app                           new         3bcfa387913d   5 hours ago     1.41GB
my-first-db-st                              1.0.3        ff101fffd5f3   17 hours ago    1.41GB
my-first-db-st                              latest       ff101fffd5f3   17 hours ago    1.41GB
iamgroot/my-first-db-st-app              1.0.2           a853294d3733   5 days ago      1.41GB
Run the Docker Image
Before pushing a Docker image to a repository, it is crucial to verify that the image runs correctly on your local machine. To do the same run the following command:
This command will display a table of images with their REPOSITORY, TAG, IMAGE ID, CREATED, and SIZE.
REPOSITORY                                  TAG          IMAGE ID       CREATED         SIZE
iamgroot/my-first-db-st-app              1.0.4           3bcfa387913d   5 hours ago     1.41GB
my-first-db-st-app                           new         3bcfa387913d   5 hours ago     1.41GB
my-first-db-st                              1.0.3        ff101fffd5f3   17 hours ago    1.41GB
my-first-db-st                              latest       ff101fffd5f3   17 hours ago    1.41GB
iamgroot/my-first-db-st-app              1.0.2           a853294d3733   5 days ago      1.41GB
Push the Docker Image
Finally, push the Docker image to Docker Hub using the following command:
Create a Container manifest file
version: v1
name: product-summary
type: service
service:
  replicas: 1
  servicePort: 8501
  ingress:
    enabled: true
    noAuthentication: true
    path: /product_data
    stripPath: true
  stack: container
  compute: runnable-default
  resources:
    requests:
      cpu: 300m
      memory: 500Mi
    limits:
      cpu: 500m
      memory: 1000Mi
  envs:
    LOG_LEVEL: info
  stackSpec:
    command:
      - streamlit
    arguments:
      - run
      - streamlit.py
    image: iamgroot/my-first-db-st-app:1.0.1
Apply the container manifest file
Apply the YAML file using the apply command, as follows:
Navigate over to the Web Browser
You can see the streamlit UI, on the web browser at the following address
https://<dataos-context>/<path>
for example, here the address will be:
https://liberal-donkey.dataos.app/product_data/